
30, 60, or 120 LEDs/m: Which LED Strip Density Is Right for Your Project?
You install an LED strip in a ceiling cove, but the light looks like a series of disconnected spots instead of a smooth glow. The client is unhappy, and now you have to explain why their high-end project looks cheap.
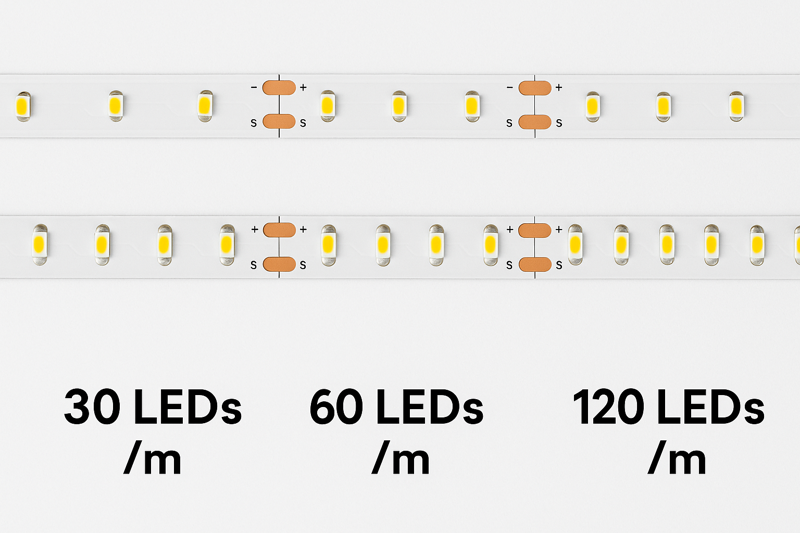
LED density—the number of LED chips per meter—is the most critical factor affecting light quality and brightness. 30 LEDs/m is for subtle, budget-friendly accents. 60 LEDs/m is the professional standard for general use. 120 LEDs/m is for creating a flawless, dot-free line of light.
As a manufacturer, I see specifications all day. And I can tell you that a pro like Tom knows that density is about more than just brightness; it’s about the character of the light. Choosing the wrong density is one of the most common and visible mistakes an installer can make. It directly impacts the uniformity of the light, the power requirements, the heat generated, and the overall cost of the job. Understanding how to select the right density is a core skill that separates the amateurs from the true lighting professionals.
When Should You Use a Low-Density (30 LEDs/m) Strip?
Your client has a huge hotel lobby with hundreds of feet of cove, and they want to add a simple lighting accent. The budget is tight, and the primary goal is a subtle effect, not functional illumination.
A low-density 30 LEDs per meter strip is the ideal choice for large-scale, highly budget-sensitive projects where the light source is completely hidden and a smooth, even line of light is not the primary concern. Its low cost and low power consumption are its main advantages.
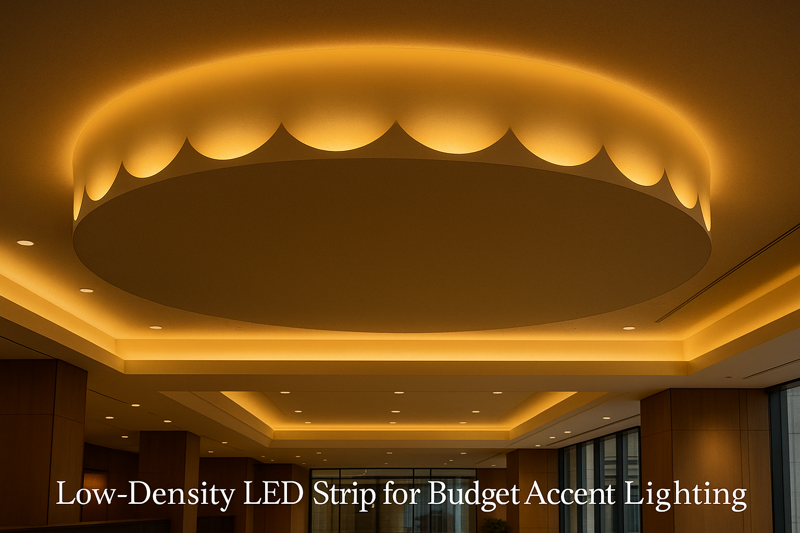
I often see our 30 LEDs/m strips being ordered in massive quantities for large commercial projects. In these scenarios, the designer isn’t looking for a perfect line of light. They are looking for a cost-effective way to add depth and a hint of light over a very large area. The fact that the individual light points are visible up close doesn’t matter, because the installation is typically viewed from a distance, or the light is reflecting off a surface deep within a soffit or behind a large piece of furniture. For a professional, knowing when to use this product can be the key to winning a competitive bid.
Understanding the Trade-Offs of Low Density
Using a 30 LEDs/m strip is a strategic choice, and you need to understand exactly what you’re getting.
- Embracing the "Scalloping" Effect: With LEDs spaced about 1.3 inches (3.3cm) apart, you will not get a smooth line of light. Instead, you get a "scalloping" effect, where you can see the distinct pools of light from each LED. On a textured surface like a stone wall, this can actually be a beautiful design element. However, if you shine this onto a smooth, semi-gloss surface, the result will look unfinished and spotty. It is critical that the strip itself is never in the direct line of sight.
- The Advantages of Low Power and Low Cost: This is the primary reason to choose this density.
- Cost: Fewer LED components and a simpler circuit board make these strips the most affordable option per foot. For a 500-foot project, this cost saving is substantial.
- Power: Lower density means significantly lower wattage. A typical 30 LEDs/m strip might only consume 1.5-2 watts per foot. This allows you to use smaller, cheaper power supplies and create much longer maximum runs before needing to worry about voltage drop.
- Heat: Less power means less heat. These strips run very cool, often eliminating the need for an aluminum channel for heat dissipation, which further reduces material cost and installation complexity.
Deciding If 30 LEDs/m is the Right Tool
Here’s a quick guide to help you decide.
| Factor | Description & Recommendation |
|---|---|
| Best Use Cases | Large accent areas, budget-sensitive commercial jobs, backlighting where the source is very far from the visible edge (e.g., under sofas, behind large headboards). |
| Pros | Lowest cost per foot, lowest power consumption, minimal heat, allows for very long runs1. |
| Cons | Very visible dots2 ("hotspots"), creates a scalloped light effect, low overall brightness, not suitable for task lighting or direct-view applications. |
Why is 60 LEDs/m the Professional Standard?
You need a versatile, reliable LED strip to keep in your truck for everyday jobs. It has to be bright enough for under-cabinet tasks but also look good in a ceiling cove.
A 60 LEDs per meter strip is the industry’s workhorse because it offers the perfect balance of brightness, light uniformity, and cost. It’s bright enough for most task and accent applications, and the LEDs are close enough to create a smooth line of light when used with a standard diffuser.
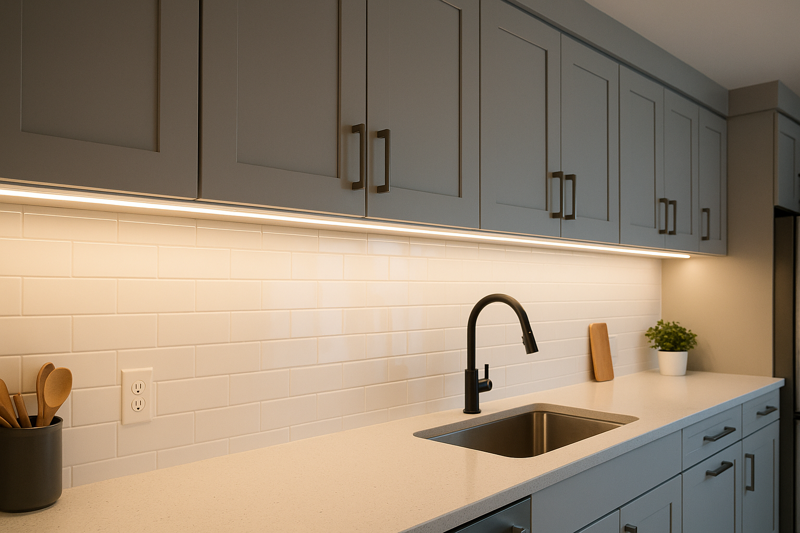
This is, by far, the most popular density we sell to installers and contractors. I would estimate that 70% of the architectural lighting projects we supply use a 60 LEDs/m strip. Why? Because it is incredibly versatile. With LEDs spaced only about 0.65 inches (1.7cm) apart, the "dot" problem is much less pronounced. When you put this strip inside even a shallow aluminum channel with a frosted lens, the light blends into a clean, solid bar. This combination gives you a finished, high-end look that is suitable for the vast majority of residential and light commercial jobs.
The Sweet Spot for Performance and Value
This density hits the sweet spot that professionals need.
- The Ideal Partner for Aluminum Channels: The rise of 60 LEDs/m3 as the standard is directly linked to the popularity of aluminum extrusion channels4. The slightly diffused light from the individual LEDs is just close enough to be easily blended by a simple frosted cover. You don’t need a bulky, deep channel to hide the dots. This allows you to create a finished fixture that is sleek, low-profile, and provides beautiful, functional light. This combination is the bread-and-butter of modern kitchen, bathroom, and office lighting.
- Sufficient Brightness for Functional Tasks: While a 30 LEDs/m strip is purely decorative, a standard 60 LEDs/m strip (typically using a 2835 or 5050 chip) produces enough light for real work. It can effectively illuminate a kitchen counter for food prep, light up the inside of a closet, or provide pleasant, functional ambient light from a ceiling cove. It’s not usually bright enough to be the sole source of light in a room, but it’s a perfect middle layer of light.
Deciding If 60 LEDs/m is the Right Tool
For most jobs, the answer is probably yes.
| Factor | Description & Recommendation |
|---|---|
| Best Use Cases | The ultimate all-rounder. Perfect for under-cabinet and under-shelf lighting, most cove and soffit applications, closet lighting, and general accent lighting. |
| Pros | Excellent balance of brightness, energy use, and cost. Creates a smooth, finished line when paired with a channel and diffuser. |
| Cons | Dots are still visible without a diffuser, especially on reflective surfaces. May not be bright enough for very high ceilings or primary illumination. |
When Do You Need a High-Density (120 LEDs/m) Strip?
You’re installing a strip in a retail display with glass shelves and polished chrome fixtures. Your client is a luxury brand, and the light source itself is visible. The final result must be absolutely perfect and seamless.
A high-density 120 LEDs per meter strip is the premium choice for applications where the light must be a perfect, unbroken line without any hotspots. It’s essential for direct-view installations, projects with highly reflective surfaces, or when you need higher brightness for task lighting.
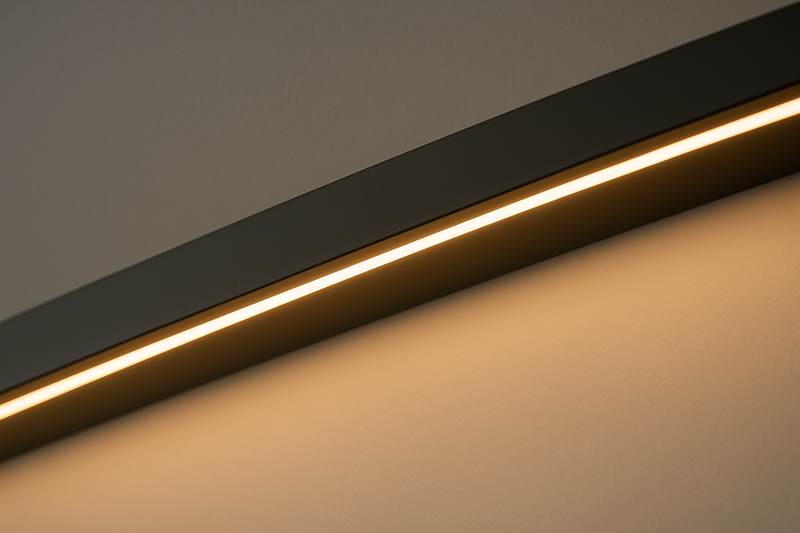
When a high-end architect or designer specifies an LED strip for a project, they often choose a high-density model. My most demanding clients in North America and Japan use 120 LEDs/m (or even higher, like 240 LEDs/m) as their default. For them, any visible dotting is a sign of a low-quality installation. With LEDs packed together—spaced only about 0.3 inches (0.8cm) apart—their light cones overlap so much that they create a continuous line of light on their own, even before you add a diffuser. This is the secret to achieving that flawless, high-end look.
The Demands of High-Density Lighting
This level of quality comes with specific technical requirements.
- Achieving the Truly "Dotless" Look5: This is the main reason to upgrade. If the strip will be installed on a reflective surface like polished stone countertops, glossy tiles, or metal, a 60 LEDs/m strip will show a reflection of dots. A 120 LEDs/m strip will show a reflection of a solid bar of light. This is a night-and-day difference in perceived quality and is non-negotiable for luxury projects.
- Mandatory Thermal Management6: This is critical. Double the LEDs in the same meter means you have roughly double the power consumption and double the heat being generated in a very small space. You absolutely must mount a 120 LEDs/m strip on an aluminum channel. The channel is not for diffusion (though it helps); it is a mandatory heat sink. Without it, the strip will overheat, and its lifespan will be drastically shortened. As a factory owner, I will not warranty a high-density strip that has failed due to overheating from an improper installation.
- Increased Power and Cost7: High-density strips are a premium product. They use more materials (LEDs, copper in the PCB) and require a more precise manufacturing process, making them more expensive. They also require larger, more powerful, and more expensive drivers to run them. You must factor these system-wide costs into your project bid.
Deciding If 120 LEDs/m is the Right Tool
Choose this density when perfection is the goal.
| Factor | Description & Recommendation |
|---|---|
| Best Use Cases8 | Direct-view applications, lighting near reflective surfaces (granite, quartz, glass), high-end retail and museum displays, task lighting that requires high brightness. |
| Pros | Creates a virtually seamless, dot-free line of light even without a diffuser. Offers higher brightness levels. The most professional aesthetic. |
| Cons | Highest cost, highest power consumption and heat output. Requires mandatory mounting on a heat sink (aluminum channel). |
Conclusion
Choosing the correct LED strip density is a balancing act. 30 LEDs/m is your budget tool for large accents, 60 LEDs/m is your versatile daily driver for most professional jobs, and 120 LEDs/m is your premium solution for high-end, flawless results.
-
Discover how long runs can enhance your lighting design while maintaining efficiency and cost-effectiveness. ↩
-
Learn techniques to reduce visible dots for a smoother lighting experience in your projects. ↩
-
Explore this link to understand how 60 LEDs/m can enhance your lighting design with optimal brightness and efficiency. ↩
-
Discover how aluminum extrusion channels can elevate your LED lighting projects, ensuring sleek designs and effective light diffusion. ↩
-
Learn techniques to achieve a seamless lighting effect, enhancing the aesthetic of your projects. ↩
-
Understanding thermal management is crucial for ensuring the longevity and efficiency of high-density lighting systems. ↩
-
Explore the factors contributing to the cost and power requirements of high-density LED strips to make informed purchasing decisions. ↩
-
Discover optimal applications for high-density LED strips to maximize their benefits in your lighting projects. ↩
Interested in Our LED Solutions?
Get professional consultation and customized LED lighting solutions for your projects. Contact our expert team today.
Related Articles

How Do You Build Profitable Custom Vehicle and RV Interior LED Rope Lights?
You lose RV installation contracts because your interior lights fail on rough roads. Standard strips show bright dots on glossy…

How to Perfect Bookshelf and Display Cabinet LED Rope Lighting?
You lose retail clients when bookshelves look incredibly dark. Ugly shadows hide expensive products inside display cabinets daily. You need…

How to Master Mirror and Vanity LED Rope Light Installation?
Your clients complain about ugly shadows in their bathroom mirrors. Bad lighting ruins expensive vanity designs. You lose future contracts…
