
Brightness Guide: How Many Lumens Do You Actually Need for Outdoor LED Strip Lights?
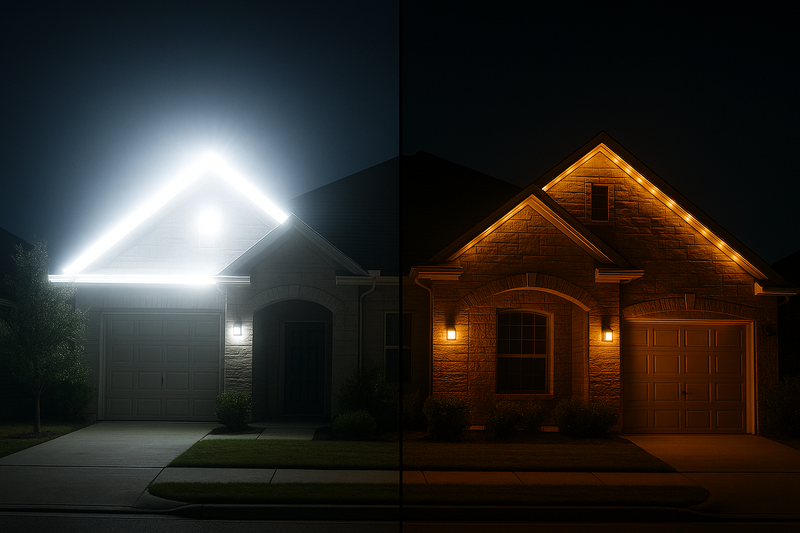
You have likely walked past a high-end home at night and noticed how the lighting felt "expensive." Then, you walked past a DIY project that looked like a landing strip at an airport. The difference was not the price of the lights; it was the volume of the light. Choosing the wrong brightness is the single most common mistake I see wholesalers and contractors make, and it destroys the aesthetic value of the project immediately.
For direct accent lighting (like under deck rails), you should aim for a modest 150-250 lumens per foot to avoid harsh glare. However, for functional architectural washing (like soffits) where the light must travel a distance, you need a high-output strip delivering 450-600 lumens per foot. Always prioritize dimmable drivers; it is safer to install "too much" light and dial it down than to be stuck with a dim, cheap-looking glow.
When you source products from me or any factory in China, you will see spec sheets screaming "High Brightness!" or "Super Bright!" But let’s be honest, "super bright" is not a technical specification. It is marketing fluff. In the outdoor environment, light behaves differently than it does indoors. There are no white walls to bounce the light around; the darkness absorbs your lumens. This creates a challenging balance: you need enough power to fight the darkness, but not so much that you create uncomfortable hot spots. In the following sections, I will break down exactly how to read the specs like a manufacturer, so you can specify the right strip for the right application every single time.
Are You Buying Efficient Brightness, or Just Overheated LEDs?
I often have clients ask me, "Jeremy, can you get me the brightest strip possible for the lowest price?" I can, but I refuse to do it. Why? Because in the LED world, cheap brightness is usually achieved by overdriving the chip. This is a recipe for disaster.
Do not look at "Total Lumens" alone; you must look at "Luminous Efficacy" (Lumens per Watt). You want a modern strip that produces light efficiently (100+ lm/W) rather than a cheap strip that wastes energy as heat. Overdriven LEDs might be bright for the first month, but they will decay and yellow rapidly, leading to warranty calls.
When I manage the production line for my "High Efficiency" series, the goal isn’t just raw light output; it is thermal management. Most importers only look at the price tag, but the real cost sits inside the physics of the PCB. Let me take you onto the factory floor to explain why "cheap brightness" is actually the most expensive product you can buy.
In the competitive wholesale market, many factories cheat. They utilize a very simple, destructive trick. They take a standard, low-cost LED chip and pair it with a resistor that has very low resistance. This forces a massive amount of current through the chip, far beyond its rated capacity.
- The Result: The LED shines incredibly bright. It looks impressive on a sample board at a trade show.
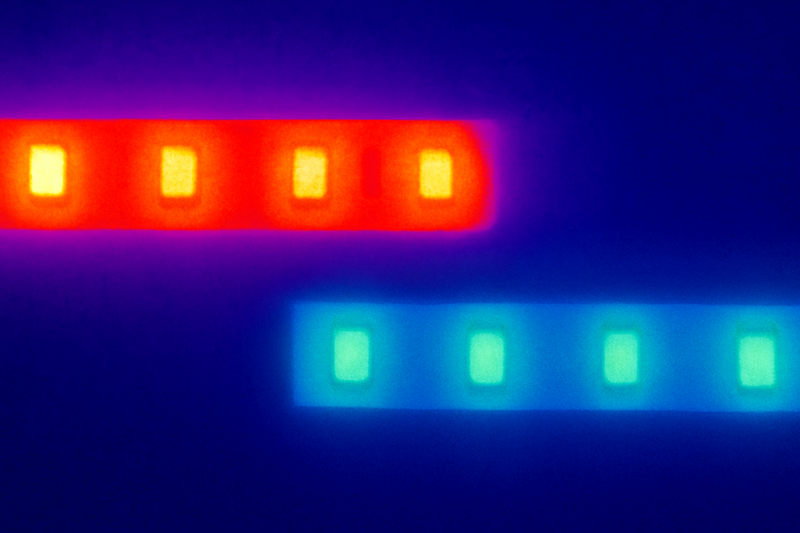
- The Cost: The internal junction temperature of the LED spikes.
When an LED chip runs too hot (typically over 60°C or 140°F), the phosphor coating—the yellow chemical layer you see on top of the diode—starts to cook. This process is called "Phosphor Carbonization." As it degrades, the light does not just burn out; it shifts color. That nice 3000K warm white you sold your client turns into a sickly blue or purple within 2,000 hours of use. By the time winter comes, your client is calling you to ask why their expensive house looks like a cheap nightclub.
Furthermore, we need to talk about the chip architecture itself. Many of my American clients still ask for "5050" chips because that was the industry standard ten years ago. They assume that because the 5050 chip is physically larger, it must be brighter and better. This is false.
The SMD 2835 chip is currently the king of efficiency.
- Thermal Pad: Unlike the old 5050, the 2835 chip has a dedicated heat dissipation pad on its underside. This allows us to push the lumens higher while keeping the core temperature lower.
- Lumen Density: Because 2835 chips are smaller, I can pack 120, 180, or even 240 of them onto a single meter of strip. This creates a seamless line of light (dot-free) which is perceived by the human eye as "brighter" and higher quality than a spotted 5050 strip, even if the total lumen count is similar.
So, how do you calculate "real" value? When you are comparing quotes from suppliers, do not just look at the price per reel. Look at the efficiency math.
- Supplier A (The Cheaper Option): Sells a 5 Watts/ft strip producing 300 lumens. (Efficiency: 60 lm/W). This is old technology.
- My Recommendation: Look for a 3 Watts/ft strip producing 300 lumens (Efficiency: 100 lm/W).
Why does this matter to your wallet? Because with the efficient strip, you can use a smaller power supply. If you are lighting a whole backyard, the difference between needing a 600W driver and a 300W driver is significant money. You generate less heat, meaning the silicone waterproof casing won’t yellow or crack in the sun. You prevent the plastic from becoming brittle. Smart sourcing isn’t about the lowest strip price; it’s about the lowest system cost and the lowest failure rate.
| Feature | "Cheap" Overdriven Strip | "Pro" High-Efficacy Strip | Impact on Your Business |
|---|---|---|---|
| Chip Technology | Old 5050 or 3528 | Modern 2835 with Heat Pad | Less frequent replacements; happier clients. |
| Heat Generation | Hot to the touch (>140°F) | Warm/Cool (<115°F) | Silicone coating stays clear; longer lifespan. |
| Power Supply | Requires huge, expensive PSUs | Uses 30% smaller PSUs | Savings on the driver offset the cost of the strip. |
| Lifespan (L70) | < 10,000 Hours | > 50,000 Hours | You can confidently offer a 3-5 year warranty. |
Which Lumen Level Fits Which Outdoor Zone?
You cannot use one roll of lights for the whole house. That is the mark of an amateur. A professional lighting designer breaks the exterior into "zones," and each zone requires a specific intensity to look correct.
You need to categorize your installation into Direct View (low brightness), Indirect Glow (medium brightness), and Projection (high brightness). If you put high-lumen strips on a toe-kick, you will blind the homeowner; if you put low-lumen strips on a roofline, they will disappear. Context is everything.
Let’s break this down into a practical guide you can give your sales team or your installers. I have seen too many projects ruined because the installer used a "sledgehammer" of light when they needed a "scalpel." Outdoor lighting is not about illumination; it is about contrast. You are painting with light against a black canvas.
Zone 1: Direct View & Markers (The "Neon" Look)
- Lumen Target1: 100 – 150 Lumens per foot.
- Applications: Exposed neon flex borders, stair treads, toe kicks, patio perimeters.
- The Logic: In these locations, the human eye often looks directly at the light source or the plastic diffuser. The eye is extremely sensitive to contrast at night. If you use a standard 300+ lumen strip here, it will be painful to look at. It creates "glare bombs" that ruin the user’s night vision. If a client is walking down stairs and the light under the tread is too bright, they actually can’t see the next step because their pupil constricts.
- My Advice: For these areas, looking for "dim" lights is hard. Instead, I recommend using our COB (Chip on Board)2 strips or Neon Flex. They naturally diffuse the light, eliminating the "dots" that look cheap. Low brightness here equals high luxury. It should feel like a glow, not a light bulb.
Zone 2: Indirect Accent3 (The "Wash" Look)
- Lumen Target: 200 – 350 Lumens per foot.
- Applications: Under railings, under bench seating, hardscape cap lights, swimming pool perimeters.
- The Logic: Here, you are relying on reflected light. The light hits the wood deck, the pavers, or the stone wall and bounces back to the eye. You have to account for absorption.
- Light Wood/Concrete: Reflects about 60% of light. 200 Lumens is plenty.
- Dark Ipe Wood/Slate: Absorbs about 80% of light. You might need 350 Lumens just to see the glow.
- My Advice: 250 lumens is the "sweet spot" for 90% of deck applications. It is strong enough to be functional (you can see where you are walking and spot a dropped phone) but soft enough to set a romantic mood. If you go brighter, you lose the ambiance and it starts to feel like a commercial parking lot.
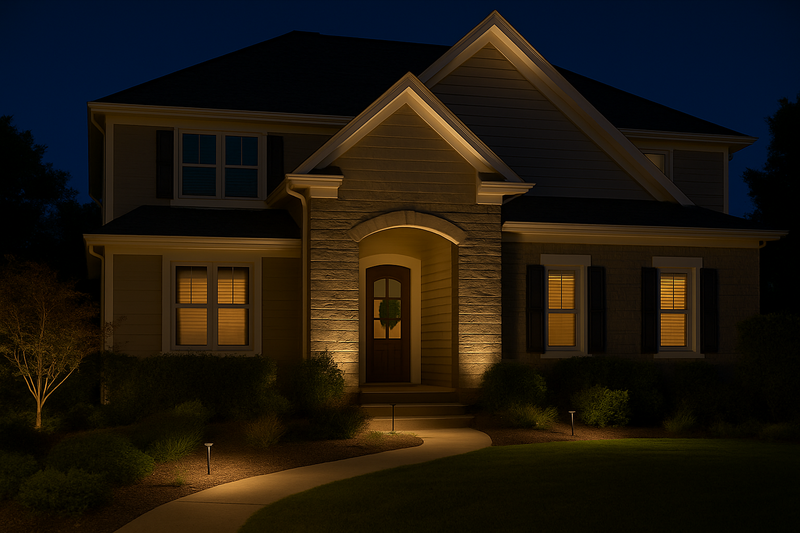
Zone 3: Architectural Projection4 (The "Flood" Look)
- Lumen Target: 500 – 800+ Lumens per foot.
- Applications: Soffit lighting (rooflines), wall grazing (shining up a column), security lighting.
- The Logic: This is pure physics—specifically, the Inverse Square Law5. This law states that intensity is inversely proportional to the square of the distance. Put simply: every time you double the distance from the light source, you lose 75% of the light intensity.
- If you mount lights on a 20-foot high soffit and want them to wash down the wall to the flower beds, the light has to travel a long way. By the time it hits the ground, a 200-lumen strip will be invisible. You need raw power here to fight the distance.
- My Advice: Never carry less than 500 lm/ft for rooflines. Even better, buy the 800 lm/ft strip and install a dimmer. Why? Because LED chips last significantly longer if you run a bright strip at 70% power than if you run a medium strip at 100% capacity. It keeps the heat down and extends the life of the phosphor.
| Zone | Recommended Lumens/ft | Typical Application | The "Gotcha" |
|---|---|---|---|
| Marker | 100 – 150 | Toe Kicks, Stairs | Too bright = Safety hazard6 (blinding). |
| Accent | 200 – 350 | Under Rail, Decks | Dark wood decks absorb more light; scale up. |
| Task/Wash | 500 – 800+ | Rooflines, Cooking Areas | Distance kills brightness; need high power. |
Why Do My Lights Get Dimmer at the End of a Long Run?
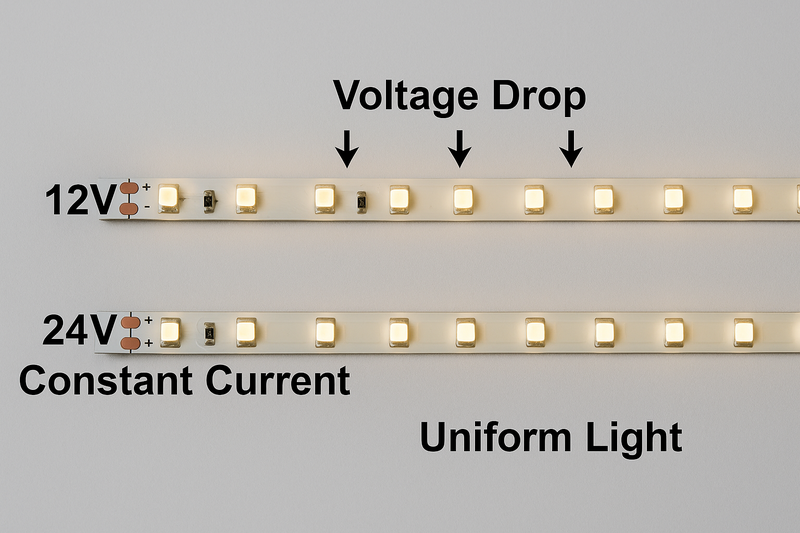
There is nothing worse than finishing a job, turning on the power, and seeing that the first 10 feet are brilliant white, but the last 10 feet look yellow and weak. This is called Voltage Drop, and it makes you look like you don’t know what you are doing.
For any outdoor run over 16 feet (5 meters), you must switch from 12V to 24V DC, or use "Constant Current" strips. Voltage drop occurs when the resistance in the copper PCB eats up the power before it reaches the end, causing a visible loss of brightness and color accuracy.
This is a technical hurdle that every installer faces eventually, usually on their first big landscape job. As a manufacturer, I can tell you that the copper thickness on the strip plays a huge role, but voltage selection and circuit design are the primary factors.
The Physics of Voltage Drop
Think of electricity like water in a garden hose.
- 12V System7: This is like a very wide fire hose with low pressure. You need a LOT of water volume (Current/Amps) to get the same power. High current causes friction (Heat/Resistance) against the walls of the hose. By the time the water gets to the end of a long hose, it’s just a trickle. This is why 12V strips dim after just 16 feet.
- 24V System8: This is like a pressure washer. Higher pressure (Voltage) means you need less water volume (Current) to do the same work. Because the current is lower, there is less friction in the wire. The pressure stays high all the way to the end of the hose.
- My Rule: For small indoor cabinet jobs or inside a van, 12V is fine. For anything outdoors, use 24V. It allows you to run up to 32 feet (10 meters) from a single power point without visible dimming.
The Secret Weapon: Constant Current (CC) IC Chips
If you have a massive commercial project—say, lighting the perimeter of a warehouse or a very long fence line—even 24V might not be enough. This is where I recommend Constant Current (CC) Strips9.
These strips look like normal LEDs, but if you look closely at the PCB, you will see tiny black chips (ICs) mounted on the board every few inches.
- How they work: The IC acts like a gatekeeper. It is designed to accept a range of voltage (say, from 24V down to 21V) and output a fixed amount of current to the LED.
- The Result: Even if voltage drop10 happens and the end of the strip only has 21V, the IC chip sees "enough" power and forces the LED to shine at 100%. The first LED and the last LED are identical in brightness.
- The Benefit: You can run these strips up to 65 feet (20 meters) on a single power feed. This saves you huge amounts of money on wiring, trenching, and extra power supplies. You don’t need to hide drivers every 15 feet.
Copper Weight: The Hidden Quality Mark
Finally, ask your supplier about the PCB copper weight11. Standard cheap strips use 1oz copper. It is cheaper to manufacture. My premium outdoor strips use 3oz or 4oz copper.
More copper acts like a highway with more lanes. It reduces resistance, minimizes voltage drop, and—crucially—helps dissipate heat.
- The Touch Test: When you get a sample, try to bend the strip. If it feels flimsy like paper, it is 1oz copper. Put it back. If it feels stiff and substantial, almost like a thin piece of metal, that is 3oz copper. That weight is the heavy copper trace that ensures your brightness stays consistent from start to finish. In the winter, that copper also helps conduct heat away from the chips, preventing failure.
| System Voltage | Max Run (Standard) | Max Run (Constant Current) | Best Usage Case |
|---|---|---|---|
| 12V DC | 16 ft (5m) | Not Recommended | Small, short segments only. |
| 24V DC | 32 ft (10m) | 65 ft (20m) | The Industry Standard for residential. |
| 48V DC | 65 ft (20m) | 165 ft (50m) | Large commercial projects / Long driveways. |
Conclusion
Brightness is not just about power; it is about control. By choosing high-efficacy 2835 chips to manage heat, matching reasonable lumen levels (150-250 lm/ft) to accent zones, and utilizing 24V Constant Current technology for uniformity, you elevate your work from a DIY experiment to a professional architectural integration.
-
Understanding Lumen Targets helps in selecting the right brightness for various applications, ensuring safety and ambiance. ↩
-
COB lighting offers superior diffusion and efficiency, making it a luxurious choice for ambient lighting. ↩
-
Exploring Indirect Accent lighting techniques can enhance the aesthetic appeal and functionality of outdoor spaces. ↩
-
Learning about Architectural Projection can help in creating stunning visual effects and improving security in outdoor areas. ↩
-
Grasping the Inverse Square Law is crucial for effective lighting placement and intensity management in architectural projects. ↩
-
Understanding potential safety hazards related to lighting can help in designing safer environments for users. ↩
-
Understanding the 12V system is crucial for optimizing power usage in small projects. ↩
-
Explore the benefits of a 24V system for efficient power delivery and reduced voltage drop. ↩
-
Learn how CC strips maintain brightness over long distances, enhancing your lighting projects. ↩
-
Understanding voltage drop is essential for effective electrical design and troubleshooting. ↩
-
Discover how copper weight affects performance and longevity of LED strips. ↩
Interested in Our LED Solutions?
Get professional consultation and customized LED lighting solutions for your projects. Contact our expert team today.
Related Articles

How Do You Build Profitable Custom Vehicle and RV Interior LED Rope Lights?
You lose RV installation contracts because your interior lights fail on rough roads. Standard strips show bright dots on glossy…

How to Perfect Bookshelf and Display Cabinet LED Rope Lighting?
You lose retail clients when bookshelves look incredibly dark. Ugly shadows hide expensive products inside display cabinets daily. You need…

How to Master Mirror and Vanity LED Rope Light Installation?
Your clients complain about ugly shadows in their bathroom mirrors. Bad lighting ruins expensive vanity designs. You lose future contracts…
