
Color-Changing LED Rope Lights: Features and Control Options (More Than Just a Party Trick)
You walk into a high-stakes client presentation. The room feels dull, the energy is flat, and the lighting is a sterile hospital white. You want to change the mood instantly—to warm the room for a handshake, or turn it vibrant for a product reveal—but you are stuck with a simple on/off switch. In the world of modern commercial design, static lighting is a missed opportunity to control the customer’s emotion.
Color-changing LED strips transform environments by offering three distinct technologies: Standard RGB for basic color mixing, RGBW for added true white, and Magic Color (Pixel) for dynamic chasing effects. Success lies in pairing the correct high-density COB hardware with the right control protocol (DMX, SPI, or RF) to ensure seamless operation without complexity.

As a manufacturer shipping containers of LED strips to wholesalers in the US, I often see purchase orders that scare me. Distributors buy the most expensive "Dream Color" strips but pair them with cheap, incompatible controllers, guaranteeing a nightmare for their installers. Today, I am going to walk you through the actual specs—from the density of the chips to the data protocols—so you can sell a complete, failure-proof system, not just a box of wires.
What Are the Real Differences Between RGB, RGBW, and Dream Color?
Most people think "color changing" just means a strip that turns red, green, and blue. But when your client asks for "pastel pink" and you can only give them "hot magenta," you have a problem. The hardware limitations of the chip define what colors you can actually produce.
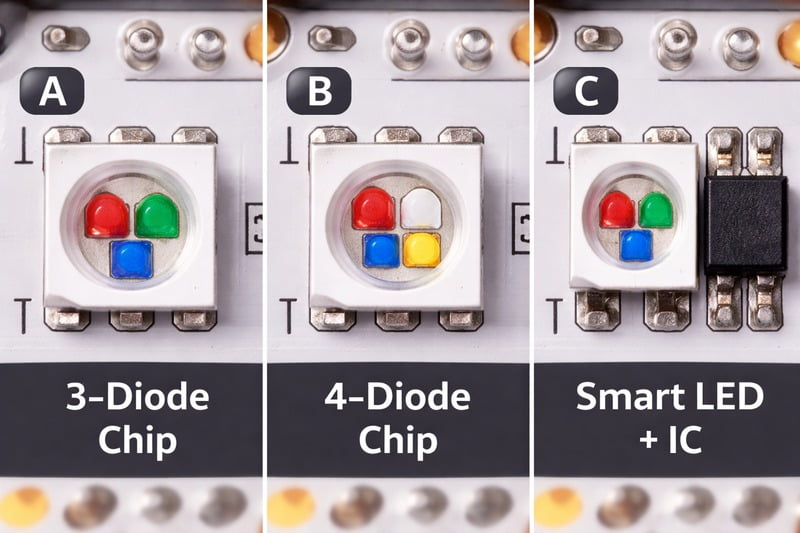
Standard RGB uses three diodes to mix colors but cannot produce ultra-bright or true white. RGBW solves this by adding a dedicated white chip for functional lighting. "Dream Color" (or Magic Color) embeds IC chips onto the PCB, allowing individual segments to be controlled separately for chasing, flowing, and meteor effects.
The Chip Architecture Matters
In our factory, we produce three distinct categories of color-changing lights. Understanding the physical construction helps you explain the price difference to your clients.
1. Standard RGB (The Atmosphere setter):
- The Tech: This is the baseline. We use chips like the 840 LEDs/m HIGH DENSITY COB.
- Factory Spec: My RGB 840 LEDs/m strip packs Red, Green, and Blue diodes so close together that even without a diffuser, the light looks like a solid neon bar.
- Limitation: To make white, it mixes R+G+B. This creates a "cool white" that often looks a bit blue or purple. It has a low Color Rendering Index (CRI), making skin tones look grayish.
2. RGBW (The Multitasker):
- The Tech: We add a fourth diode: White. This can be Warm White (3000K) or Cool White (6000K).
- Why Buy It: This is for spaces that need to be functional during the day and fun at night. A restaurant can run the "White" channel for cleaning and lunch service, then switch to "RGB" for the evening cocktail hour.
- Power Draw: Be careful. These strips pull more power. Our data shows RGBW often demands 19W to 24W per meter if all channels are firing.
3. Magic Color / Dream Color1 (The Showstopper):
- The Tech: These are often listed in my catalog as "Pixel" or "IC" strips (like the HC-12-12 Pixel Series).
- How it works: We solder a tiny microchip (IC) onto the copper board. This chip talks to the controller.
- The Result: You can have the first meter of the strip be Red and the second meter be Blue. This enables "Horse Race" modes, meteor showers, and water-flowing effects.
- The Density: We now offer these in 720 LEDs/m COB density. Previously, pixel strips looked like distinct dots. Now, the "snake" of light is perfectly smooth.
Why Is High-Density COB Critical for Color Mixing?
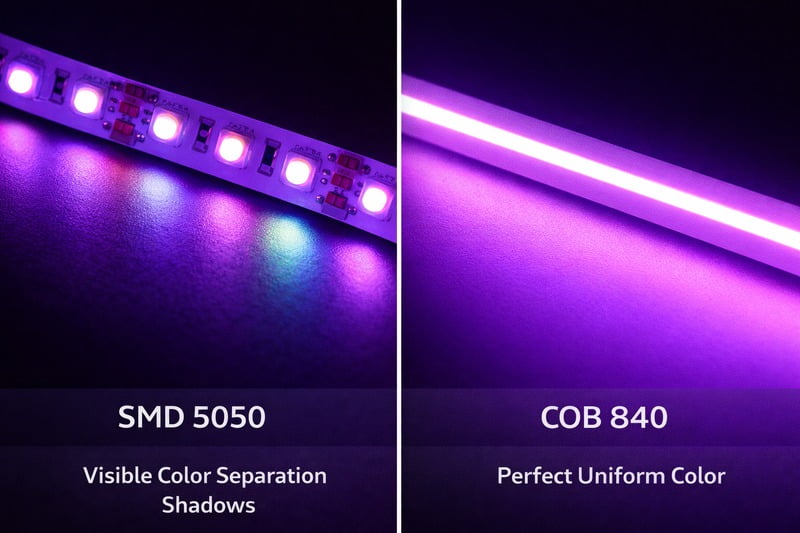
You have seen the cheap LED kits at big-box stores. When they switch to purple, you see a red dot next to a blue dot on the wall. It looks tacky. This is called "color separation," and it destroys the illusion of high-end lighting.
High-density COB (Chip-on-Board) technology, particularly with 810 or 840 LEDs per meter, places the Red, Green, and Blue diodes microscopic distances apart under a single phosphor layer. This ensures that colors mix instantly at the source, projecting a uniform hue even when installed in very shallow profiles or directly exposed to sight.
The Physics of the "Dot-Free" Look
In the B2B market, "Dot-Free" is the buzzword that gets contracts signed. Here is the engineering behind it.
The Old Way (SMD 5050):
- Legacy RGB strips usually had 60 LEDs per meter2.
- The spacing between chips was roughly 16mm.
- The Problem: Light travels in a cone. If the wall is close (like under a counter), the red cone and blue cone hit the wall at different spots. You see two colors, not one mixed color.
The New Standard (COB 840):
- Our RGB 840 LEDs/m3 strips have a pitch (spacing) of roughly 1.2mm.
- Because they are so close, the light cones overlap immediately, essentially right on the surface of the strip.
- The "Yellow" Cover: We coat the entire board in a layer of silicone mixed with diffuser powder (phosphor). This acts as a physical blender. The light that escapes is already perfectly mixed.
Catalog Realities:
- Look at our DC-24V RGB COB specs. We use a 10mm wide board to handle the heat.
- Cutting Flexibility: Despite the density, you can still cut these. Our 24V RGB COB usually has a cut point every 33mm to 50mm. This is crucial for custom joinery.
- Visual Impact: I tell my clients, "You are selling a neon tube that you can roll up." That is the aesthetic. It allows designers to build lines of colored light into floors, ceilings, and furniture without needing inches of depth to hide the dots.
How Do "Magic" Pixel Strips Work (SPI vs DMX)?
You sold the client on the "chasing light" effect for their nightclub entrance. Now your electrician is screaming at you because the controller has three wires and the strip has four, and nothing is lighting up. Welcome to the complex world of Digital IC protocols.
Magic Color strips rely on digital data signals, not just power. The most common protocol is SPI (Serial Peripheral Interface), which uses a ‘Data’ wire to send instructions to each chip sequentially. For large commercial setups, DMX512 is the standard, requiring a decoder to translate the heavy-duty stage lighting signals into language the LED strip understands.
- SPI (TTL): This is what 90% of your projects will use. It is simple.
- Wiring: V+ (Power), GND (Ground), DAT (Data). Sometimes a Backup Data line (Bi) is added so if one chip breaks, the rest keep working.
- Limit: You usually need a specialized "Pixel Controller" and you must tell the controller exactly how many pixels are on the strip.
- DMX512: This is the industry standard for stages and huge buildings.
- To use our strips with a DMX console, you need a DMX to SPI Decoder.
- This box takes the professional signal and translates it into the rapid-fire data pulses the strip needs.
- Pixel lighting is power-hungry. If you turn all the lights to White (RGB 100%), the voltage drops fast.
- My Rule: For 5V Pixel strips (like our HC-10-5 series), you must inject power every 2 to 3 meters.
- For 12V or 24V Pixel strips, you can run 5 meters, but injecting power from both ends is always safer to prevent the "Pink Tail" (where white turns pink at the end due to voltage drop).
What Are the Best Control Methods for End-Users?
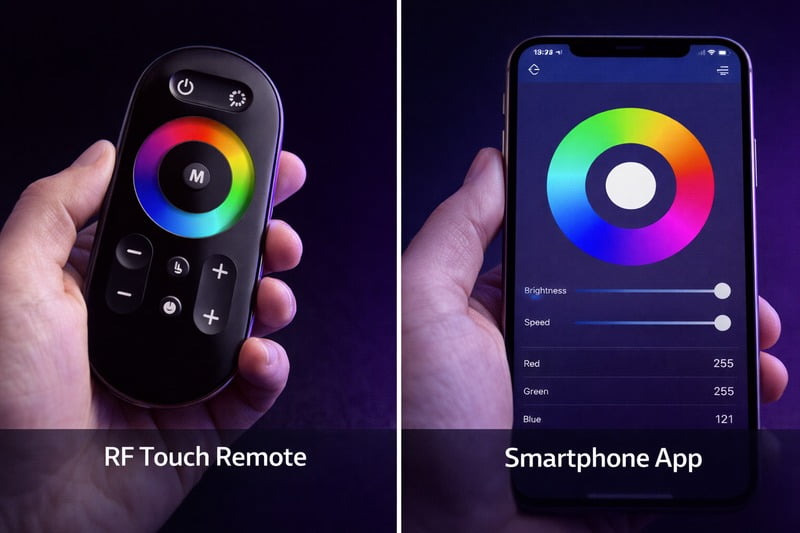
Your client is a restaurant owner, not a lighting engineer. If they have to open a confusing app and scroll through menus just to dim the lights, they will hate the product. The interface you choose effectively "makes or breaks" the user experience.
For residential and small commercial use, RF (Radio Frequency) remotes or Zigbee/WiFi Gateways (compatible with Philips Hue/Alexa) offer the best balance of ease and cost. For larger installations, hardwired Wall Panels or DALI systems provide professional reliability, ensuring the lights work even if the WiFi goes down.
RF vs. Zigbee vs. Bluetooth
I sell thousands of controllers. Here is the hierarchy of reliability.
1. IR (Infrared) – The "Cheap" Option:
- You know these. The remote has to point directly at the receiver.
- Verdict: Do not sell this. It feels like a $10 toy. If the receiver is hidden in the ceiling, it won’t work.
2. RF (Radio Frequency) – The "Standard" Option:6
- Signal goes through walls.
- Pros: Instant response. No setup time. High reliability.
- Cons: If your neighbor has the same remote, they might accidentally control your lights (though pairing prevents this mostly).
- Best For: Simple setups where the client just wants a physical remote on the wall.
3. Bluetooth Mesh – The "Local Smart" Option:
- Phone control without a router.
- Pros: Great app interface. Mesh networking means one light talks to the next, extending range.
- Cons: You have to be near the lights to control them.
4. DeFi/Zigbee – The "Smart Home" Option:7
- This is what connects to Alexa, Google Home, or Philips Hue.
- Pros: "Alexa, turn the kitchen Pink." Automation, scheduling, remote access from outside the house.
- Cons: Depends on the WiFi router. If the internet crashes, sometimes the automation fails.
5. The Hybrid Solution:
- I recommend controllers that support both RF and Smart Tech.
- This way, Grandma can use the physical wall switch, and the teenager can use the phone app. Everyone is happy.
How Do You Handle Power and Installation for Changing Colors?
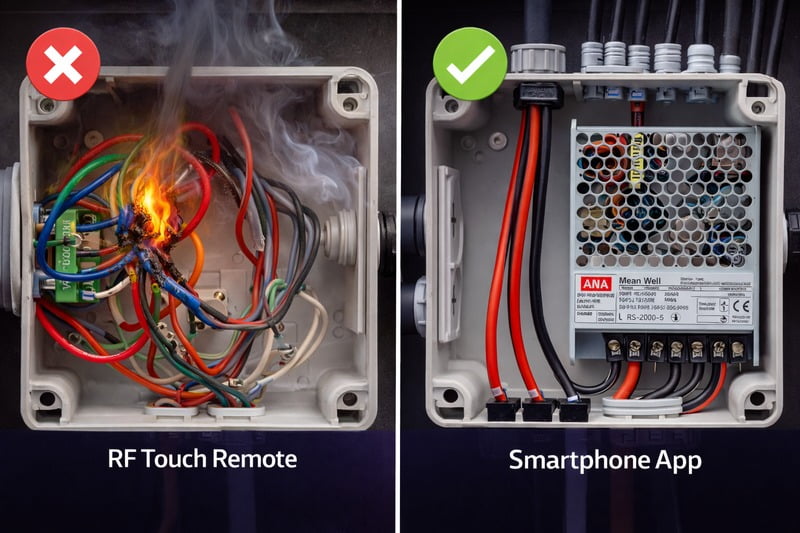
You have chosen the 840 RGB strip and the fancy DMX controller. You wire it up, and the colors are flickering, the controller is buzzing, and the whites look yellow. You didn’t account for the amperage. Color-changing strips are electrical beasts.
Color-changing strips, especially RGBW and High-Density types, have significantly higher power density (up to 24W/m) than single-color strips. You must oversize your power supply by at least 20% (Headroom) and use thicker gauge wire (18AWG or lower) for the multi-channel feeds to prevent overheating and hazardous voltage drop.
Calculation and Cabling
Let’s look at the math for a 10-meter run of our 24V RGBW COB8.
The Math:
- Power Spec: Let’s say it is 19.2 Watts per meter.
- Total Load: 10 meters × 19.2W = 192 Watts.
- Safety Margin: You never run a power supply at 100%. We need a 20% buffer.
- 192W ÷ 0.8 = 240 Watts.
- Result: You need a 250W or 300W DC24V Power Supply.
The Cabling Bottleneck:
- The output: That 192W at 24V equals 8 Amps of current.
- The Common Wire: In an RGBW strip, all the current (8 Amps) returns through the positive (+) wire (Anode).
- The Mistake: Using a standard, thin RGB extension wire (usually 22AWG). 8 Amps will melt 22AWG wire over a long run, or cause a huge voltage drop.
- The Fix: You need to use 18AWG or 16AWG9 multi-conductor wire for the main feed line from the power supply to the start of the strip.
Amplifiers (Repeaters):
- Most controllers are rated for 5 Amps per channel.
- If your zone needs 8 Amps, you cannot hook it directly to the controller. You will fry the transistors.
- Solution: You install an RGBW Data Repeater (Amplifier). The controller sends a signal, and the Amplifier draws fresh power from the PSU to drive the massive load. This is mandatory for large rooms.
Conclusion
Color-changing lighting has evolved from a gimmick to a powerful architectural tool.
- Specify High-Density RGB COB (840 LEDs/m) for seamless, dot-free color mixing in visible areas.
- Choose RGBW if the room needs to function as a workspace and an entertainment space.
- Use Magic (Pixel) Strips for moving effects, but ensure you understand the SPI data requirements.
- Invest in Hybrid Controls (RF + Smart) to give your client the reliability of physical buttons with the convenience of app control.
At Rhstriplighting, we don’t just sell the strips; we help you engineer the entire ecosystem so your install is safe, bright, and stunning. Stop settling for dots and start selling lines of pure light.
-
Learn about the technology behind Magic Color strips for stunning visual effects in your lighting projects. ↩
-
Explore this link to understand how 60 LEDs per meter can enhance lighting efficiency and design. ↩
-
Discover the benefits of RGB 840 LEDs/m for achieving a seamless lighting experience in your projects. ↩
-
Understanding data protocols is essential for optimizing your projects and ensuring compatibility with various systems. ↩
-
Learn about voltage drop to prevent issues in your lighting projects and ensure consistent performance across your installations. ↩
-
Explore this link to understand how RF technology can enhance your home automation experience with its reliability and ease of use. ↩
-
Discover how DeFi/Zigbee can transform your home into a smart environment, enabling voice control and automation. ↩
-
Explore this link to understand the versatility and applications of 24V RGBW COB lighting in various projects. ↩
-
Learn why using 18AWG or 16AWG wire is crucial for preventing voltage drop and ensuring safety in RGBW installations. ↩
Interested in Our LED Solutions?
Get professional consultation and customized LED lighting solutions for your projects. Contact our expert team today.
Related Articles

How Do You Build Profitable Custom Vehicle and RV Interior LED Rope Lights?
You lose RV installation contracts because your interior lights fail on rough roads. Standard strips show bright dots on glossy…

How to Perfect Bookshelf and Display Cabinet LED Rope Lighting?
You lose retail clients when bookshelves look incredibly dark. Ugly shadows hide expensive products inside display cabinets daily. You need…

How to Master Mirror and Vanity LED Rope Light Installation?
Your clients complain about ugly shadows in their bathroom mirrors. Bad lighting ruins expensive vanity designs. You lose future contracts…
