
Creating Custom Shapes and Figures with LED Rope Lights: Is Your Signage Stuck in the Past?
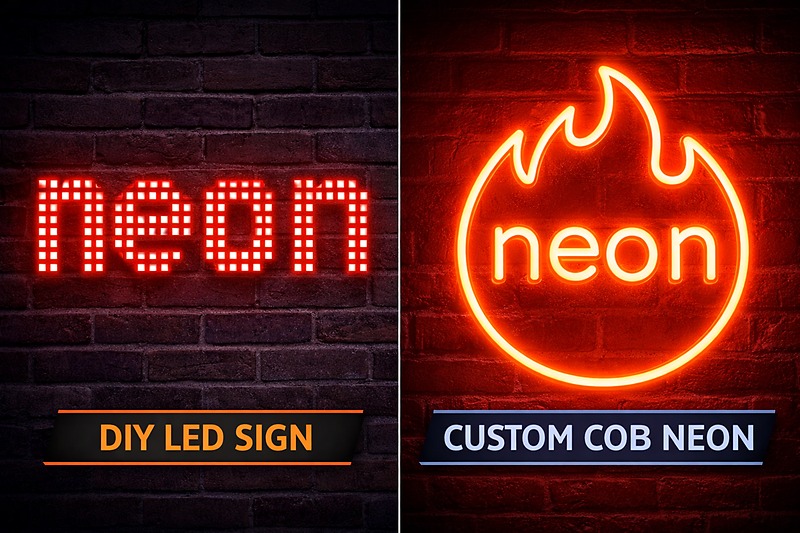
You have seen them—the blurry, dotted, amateur-looking LED signs hanging in storefront windows that scream "DIY project gone wrong." As a business owner or contractor, you know that first impressions are everything. If you are trying to sell high-end architectural lighting or custom branding to your clients, you cannot rely on standard off-the-shelf rope lights that refuse to hold a shape.
To fabricate professional-grade custom figures and signage, you must abandon standard strip lights and switch to High-Density COB LED Neon Flex. By utilizing "Side-Bend" silicone extrusion profiles and precision-cut 2.5cm segments, you can manipulate light into intricate logos, script lettering, and sharp geometric shapes that mimic the seamless glow of traditional glass neon without the fragility.
In my years managing a factory that exports to the most demanding markets in North America and Japan, I have seen the shift firsthand. Designers are no longer satisfied with straight lines. They want curves, letters, and art. But realizing these designs requires specific hardware specs that most importers overlook. Let’s explore how to source the right materials to turn light into art.
Why Do Most "Flex" Lights Fail to Make Sharp Corners?
I often see contractors struggling to bend a thick PVC rope light into a letter "W" or "M," only to have the light snap back or the jacket crack. This is because they are fighting physics with the wrong material profile.
You must specify the correct bending direction—specifically "Side-View" or "Horizontal Bend" profiles—and ensure the bend radius supports your design (R > 15mm). Standard top-bend lights are designed for arches, not letters. Combining the right profile with a high-density COB engine allows for tight, secure curves that hold their shape without damaging the internal circuitry.

The Geometry of Fabrication
When you are fabricating a custom shape—let’s say a restaurant’s script logo—you are essentially sculpting. If the material fights you, the project fails.
The "Side-Bend" Necessity:
Most standard LED ropes are "Top-Bending." Think of a roller coaster track; it goes up and down.
- The Problem: If you try to bend a Top-Bend strip left or right to make the curve of a letter "S", you are twisting the copper PCB against its grain. It will ripple, and eventually, the solder joints will snap.
- The Solution: For signage and figures, you need Side-Bend (Horizontal)1 neon. The internal PCB is mounted perpendicularly to the light face. This allows it to slither like a snake on a flat wall. Our engineering datasheets explicitly warn: "Please do not bend it horizontally" for standard strips, which is why sourcing the specific Side-Bend profile is non-negotiable.
The Radius Rule (R > 15mm):
Even with the right profile, there is a limit.
- The Stress Point: Our factory tests show that the minimum reliable bending diameter is 15mm. If you force a bend tighter than this (like a sharp 90-degree angle on a square), you risk delaminating the silicone from the PCB.
- The Workaround: For sharp corners (like the tip of a star or the corner of a square), do not bend the light. Instead, cut and solder. You cut the strip, create the angle with wires or corner connectors, and glue the silicone ends together. This creates a razor-sharp corner that bending alone cannot achieve.
Material Memory2:
Cheap PVC neon has "memory"—it wants to curl back into the shape of the roll. Silicone is dead-set. Once you mount it into a channel or glue it down, it stays. It is softer, easier to manipulate, and doesn’t get brittle in cold weather, making it the only choice for exterior shapes.
How Do You Eliminate the "Dots" in Your Design?
For a custom figure to look like a premium product, the light must be continuous. If your client sees individual chips or "beads" of light, the illusion is broken. It looks cheap.
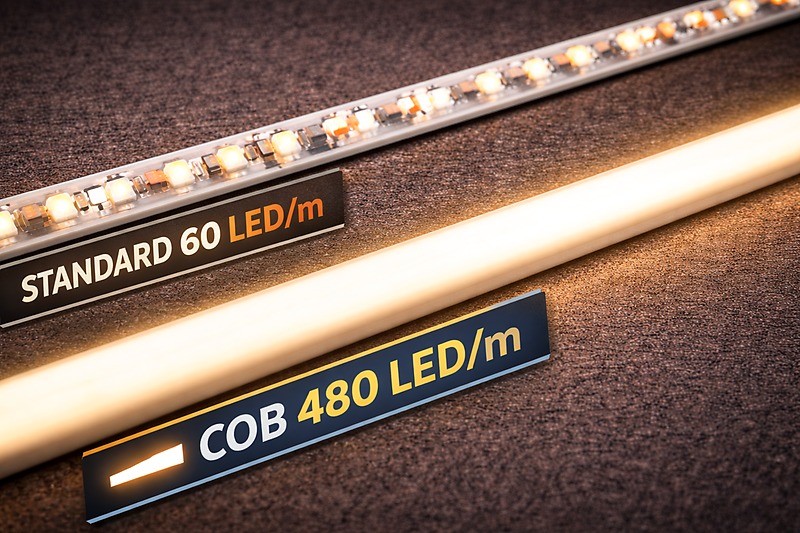
Utilize COB (Chip on Board) technology with a density of at least 320 to 512 LEDs per meter. Unlike traditional SMD strips that leave dark gaps between chips, COB packs hundreds of diodes directly onto the board, creating a "no dark area" solid line of light even before you add the silicone diffuser.
Density is the Key to Fluidity
When creating a shape, any interruption in light acts like a crack in a neon tube. It ruins the aesthetic.
From Beads to Lines:
- Old Tech (SMD): Traditional 5050 or 2835 strips have LEDs spaced apart. Even with 120 LEDs/m, you have nearly 8mm of dark space between light sources. When you bend this, the dark space expands on the outside of the curve, creating a "zebra stripe" effect.
- New Tech (COB): Our high-density COB strips3 feature 320, 480, or even 512 LEDs per meter. The distance between chips is microscopic. The yellow phosphor layer covers the entire strip.
- The Result: "No light spots, no dark areas". This is critical for tight curves. Even when stretched around a radius, the light remains uniform.
The "Soft Light" Factor:
COB technology offers "soft light4" with high luminous efficiency. In signage, you often don’t want blinding brightness; you want a glow.
- Visual Comfort: COB emits light at a 180-degree angle. This wide dispersion means the light fills the silicone tube completely, eliminating shadows on the edges of your letters.
- Color Consistency: Because the phosphor layer is continuous, the color temperature (whether 3000K or 6000K) is perfectly uniform across the entire figure. You won’t get that "pinkish" drift at the ends that you see with cheap beads.
| Feature | Standard SMD Strip | High-Density COB |
|---|---|---|
| LEDs per Meter | 60 – 120 | 320 – 512 |
| Light Appearance | Dotted / Pixelated | Solid / Seamless |
| Bending Effect | Dark spots appear on curves | Uniform light on curves |
| Application | Hidden cove lighting | Direct-view signage |
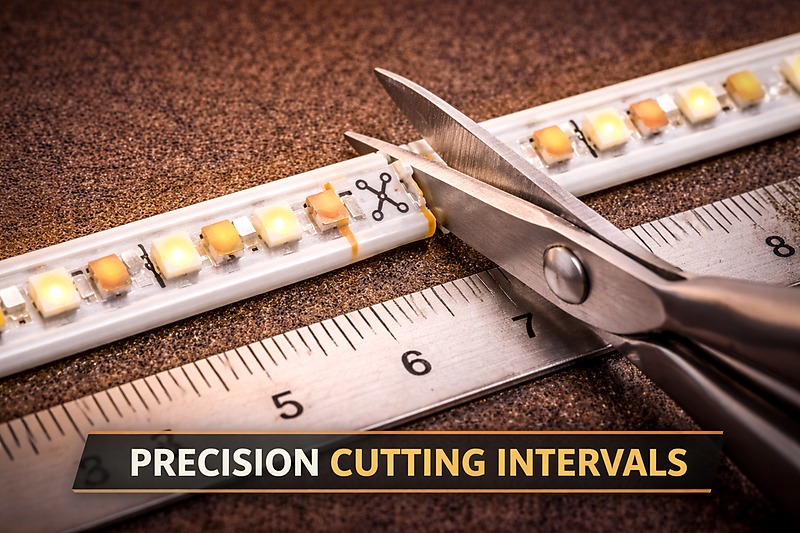
How Precision Can You Get With Your Cuts?
Imagine you are making the letter "A". You need the crossbar to fit exactly between the two legs. If your LED strip can only be cut every 4 inches, you are in trouble. You will have dark spots or overlapping lights.
You need "Short-Cut" PCB designs. Specialize in 24V COB strips with cutting increments as small as 50mm, or 12V COB strips that can be cut every 10mm to 25mm. This millimeter-precision allows you to trim the light usage exactly to your design file, ensuring that corners and junctions meet perfectly without shadowing.
The Mathematics of Customization
In custom fabrication, waste is cost, and fit is quality. The "Cutting Unit" is the most important spec on the datasheet for a sign maker.
The Voltage vs. Cut Length Trade-off:
There is usually a trade-off between voltage (run length) and cutting precision.
- 12V Systems: These are generally better for intricate, small signs.
- Why? Our 12V COB 480 LEDs/m5 strip achieves a cutting length of 25mm (about 1 inch) . Some specialized models even go down to 10mm. This gives you incredible freedom. You can make a 3-inch letter "E" perfectly.
- 24V Systems: Better for larger outdoor figures due to less voltage drop.
- The Catch: The cutting unit6 is usually longer, typically 50mm (2 inches) .
- The Innovation: However, we now offer overlapping circuit designs in 24V that maintain shorter cut lengths. Always check the "Scissor Blades" icon on the datasheet.
Avoiding the "Dark End":
If your design calls for a 38cm line, and your strip cuts every 5cm, you have to choose between 35cm (leaving a 3cm dark gap) or 40cm (physically too long).
- The Strategy: With a 25mm or 10mm cutting unit, you can cut at 38cm exactly.
- PCB Width: Also consider the width. For delicate lettering, use our 4mm or 5mm PCB widths . Standard strips are 8mm or 10mm. A 4mm strip allows for much narrower neon tubes, enabling finer script fonts and more detailed logos.
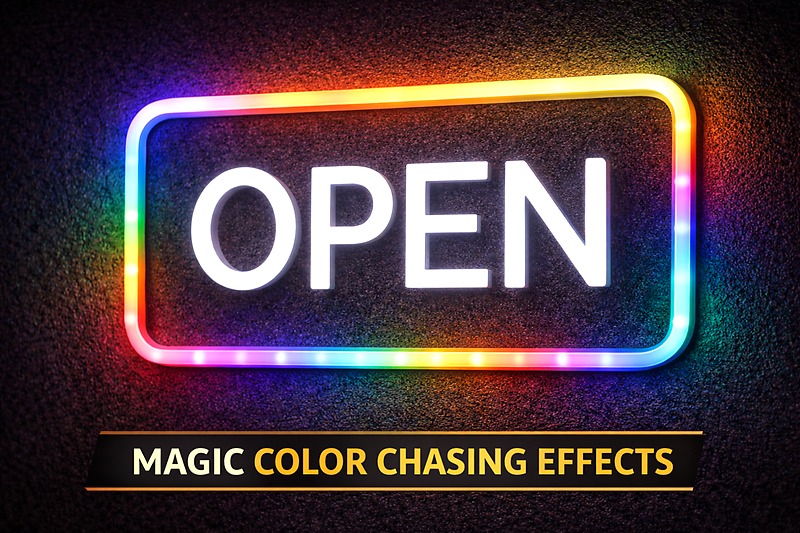
How Do You Add Motion and Color to Your Figures?
A static sign is nice; a moving sign prints money. Why settle for a single color when your snowflake could shimmer, or your arrow could chase?
Upgrade to Digital RGB+IC Technology ("Magic Color"). By utilizing addressable chips like WS2811 or native ICs embedded in the COB strip, you can animate your custom shape. This allows for rainbow gradients, chasing effects, and breathing patterns that turn a simple geometric figure into a dynamic visual anchor.
The Brains Behind the Light
"Magic Color" or "Chasing Light" adds a layer of complexity but massive value.
The Hardware:
You are looking for RGB+IC7 on the datasheet.
- The Chip: A standard RGB strip changes the whole roll to blue. An IC strip (Pixel) controls specific segments.
- Density Matters Again: We produce 720 LEDs/m8 COB RGB+IC strips. This is insane density. It means the color mixing is flawless, and the "pixels" are blended smoothly. You don’t see jerky motion; you see fluid liquid light flowing through your shape.
Powering the Animation:
These systems run on 12V or 24V .
- Current Draw: Animated figures draw ample power. A full white 720 LED/m strip might draw 24W per meter. You must calculate your power supply headroom carefully.
- Control: This requires an external controller. You cannot just plug it into a wall. You need a Bluetooth or Wi-Fi controller to tell the IC chips what to do (Meteor, Breathing, or Static Color).
Application in Shapes:
Imagine a Christmas Tree shape.
- Static: Green tree. Nice.
- Magic Color: The tree is green, but "ornaments" (specific pixels) sparkle red and gold randomly. Or the outline "draws" itself from the bottom up. This is achievable with the addressable segments—usually every 50mm is one unique pixel.
| Spec | Standard RGB | RGB + IC (Magic Color) |
|---|---|---|
| Control | Entire strip changes | Segments change independently |
| Effects | Flash, Fade, Strobe | Chase, Flow, Rainbow, Meteor |
| Wiring | 4 Wire (R,G,B,+) | 3 Wire (+, -, Data) |
| Best For | Mood Lighting | Attention-Grabbing Signage |
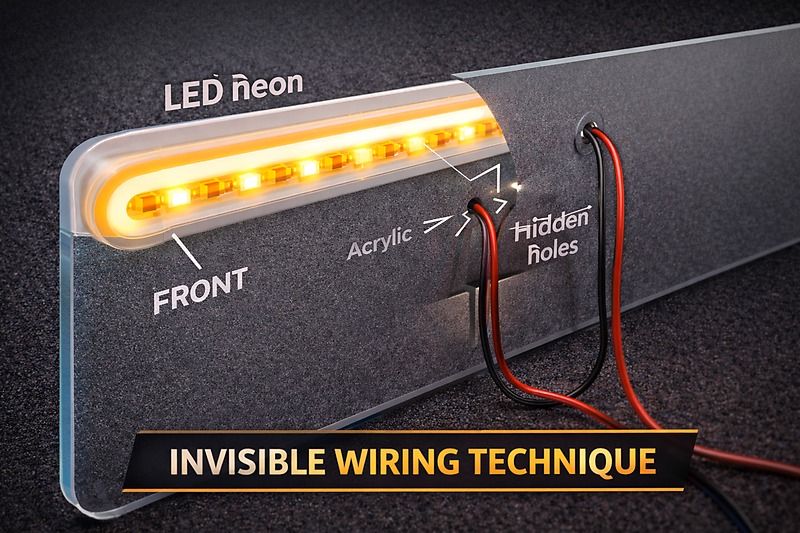
How Do You Power Complex Shapes Without Messy Wires?
When you have a sign with five separate letters (e.g., "H-E-L-L-O"), you don’t want five ugly black power cables running down the wall.
Implement a "Back-Wiring" or "Acrylic Sandwich" technique using narrow PCB strips. By drilling pass-through holes in your mounting substrate (usually clear acrylic) and soldering wires to the back of the 8mm or 5mm cut points, you can hide all interconnects behind the sign, creating a floating, magical appearance.
%[Technical illustration showing the cross-section of an acrylic board with LED neon mounted on front and wires passing through hidden holes to the back.] (https://rhstriplighting.com/wp-content/uploads/2026/01/invisible_wiring_technique_realistic_800x533.jpg "Invisible Wiring Technique")
Professional Assembly Techniques
The difference between a $100 sign and a $1,000 sign is wire management.
The Drilling Method:
- Preparation: Your COB strip has copper pads at every cut point (e.g., every 25mm).
- The Drill: drill a small hole through your acrylic backing board exactly where the strip ends.
- The Connection: Instead of using a bulky clip connector, you solder 20AWG or 22AWG wire directly to the pads.
- The Feed: Feed the wire through the hole to the back of the sign.
- Narrow PCB Advantage: Using a 5mm or 8mm PCB is crucial here. If the PCB is too wide, it blocks your ability to drill discreet holes or requires a wider neon tube that looks clunky.
Voltage Drop in Figures:
Custom shapes often involve many small cuts.
- Parallel Wiring: Do not wire the letters in series (forming a giant snake). By the time power gets to the last letter, it will be dim.
- Bus Bar Method: Run a main 24V line (Bus) on the back of the acrylic, and tap each letter into it individually. This ensures the "H" and the "O" are exactly the same brightness.
- Product Choice: Use 24V COB [4] for these interconnects. The higher voltage pushes through the thin connecting wires with less loss than 12V.
Conclusion
Creating custom LED figures is where engineering meets art. By sourcing Side-Bend Silicone Profiles for flexibility, ensuring R > 15mm bend radiuses to protect circuitry, selecting High-Density COB (480+ LEDs/m) for seamless light, and utilizing Precision Cut Units (10-25mm), you can fabricate signage that commands attention. In my factory, we provide the raw materials—the rest is your creativity.
-
Explore this link to understand the benefits of Side-Bend neon for custom signage, ensuring durability and flexibility in design. ↩
-
Learn about Material Memory to make informed choices in neon fabrication, ensuring your designs maintain their shape and integrity. ↩
-
Explore the advantages of high-density COB strips for uniform lighting and aesthetic appeal in various applications. ↩
-
Learn how soft light enhances visual comfort and eliminates harsh brightness in signage, making it more appealing. ↩
-
Explore this link to understand how 12V COB 480 LEDs/m can enhance your custom fabrication projects with precision and flexibility. ↩
-
Learn why the cutting unit is crucial for achieving quality and efficiency in custom fabrication, ensuring optimal results. ↩
-
Understanding RGB+IC technology can enhance your lighting projects, offering better control and effects. ↩
-
Discover how 720 LEDs/m can improve your lighting design with superior density and color mixing. ↩
Interested in Our LED Solutions?
Get professional consultation and customized LED lighting solutions for your projects. Contact our expert team today.
Related Articles

How Do You Build Profitable Custom Vehicle and RV Interior LED Rope Lights?
You lose RV installation contracts because your interior lights fail on rough roads. Standard strips show bright dots on glossy…

How to Perfect Bookshelf and Display Cabinet LED Rope Lighting?
You lose retail clients when bookshelves look incredibly dark. Ugly shadows hide expensive products inside display cabinets daily. You need…

How to Master Mirror and Vanity LED Rope Light Installation?
Your clients complain about ugly shadows in their bathroom mirrors. Bad lighting ruins expensive vanity designs. You lose future contracts…
