
How Can You Integrate LED Strips into a Professional Smart Home System?
Your client loves their new LED lighting, but they’re using five different apps to control it. The system is clunky, unreliable, and feels anything but "smart." Now they’re questioning the value of your investment and, by extension, your expertise.
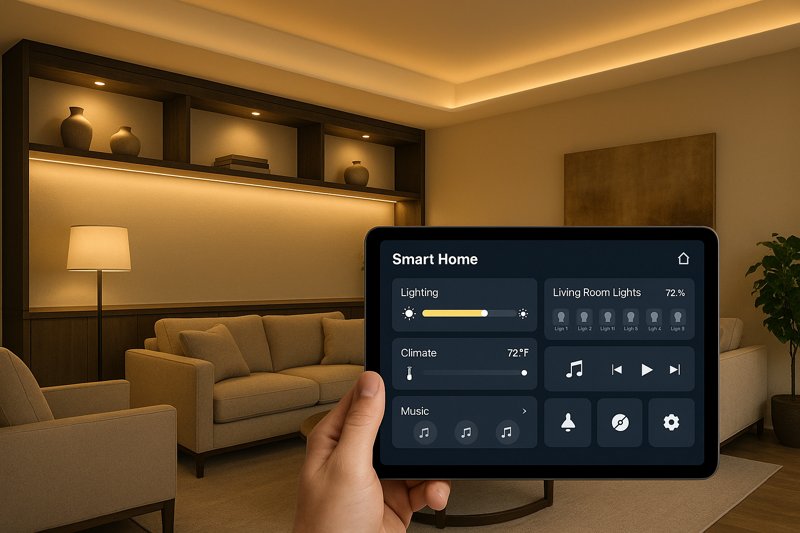
A professional smart lighting setup integrates LED strips into a central home automation hub using robust protocols like Zigbee or Z-Wave. This creates a single, reliable system for controlling lighting, scenes, and schedules alongside other smart devices, all from one interface.
I remember a project a few years back with an architect in California. He had spec’d our highest-end LED strips for a beautiful Malibu home. The installation was physically perfect, but the client-hired "smart home guy" used a patchwork of consumer-grade Wi-Fi controllers. The result was a disaster. Lights would randomly disconnect, scenes would fail, and the homeowner, who spent a fortune on the system, was furious. We were eventually brought in to consult, and we replaced the entire control system with a centralized Zigbee setup. The difference was night and day. That experience taught me a crucial lesson that I pass on to all my professional clients like Tom: the project’s success isn’t just about the quality of the light, it’s about the quality of the control. A truly advanced setup is a unified, reliable ecosystem, and building it requires making the right choices from the very beginning.
Which Smart Protocol is Best for LED Strips: Wi-Fi, Zigbee, or Z-Wave?
Your client’s cheap Wi-Fi lights keep failing. Their "smart" home is now a dumb, frustrating mess. You get a callback for an issue that isn’t even about your installation quality, but the unreliable network connection of consumer-grade electronics.
For professional reliability, Zigbee or Z-Wave are superior to Wi-Fi. They create a dedicated mesh network for your smart devices, reducing Wi-Fi congestion and improving response time, which is essential for large, high-end installations where dependability is non-negotiable.
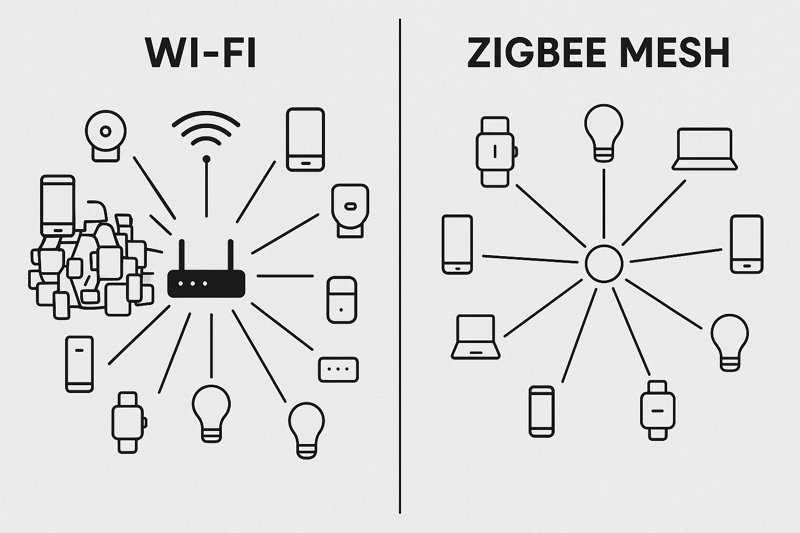
This is the single most important decision you will make in a smart lighting project. It’s the foundation upon which the entire smart home experience is built. When clients tell me about issues with their smart strips, 9 times out of 10, the root cause is an overloaded Wi-Fi network. Think about the modern home: every smart TV, laptop, phone, camera, and speaker is screaming for bandwidth. Throwing 20 or 30 individual Wi-Fi-controlled light strips on that same network is a recipe for disaster. The lights will drop connection, respond slowly, and create a frustrating experience. As a professional, your reputation depends on reliability, and Wi-Fi is simply not a professional-grade protocol for anything but the most basic, single-room setups.
Why Wi-Fi is the "Consumer" Choice
Wi-Fi’s primary appeal is its simplicity for the end-user—no hub is required. This is great for a company selling a single smart bulb at a big-box store, but it’s a huge liability in a professional installation.
- Network Congestion and Interference1: A standard home router can only handle so many simultaneous connections. In a device-rich environment, adding 20-40 Wi-Fi light controllers can bring the network to its knees, slowing down everything from Netflix streaming to Zoom calls. It also competes for bandwidth on the crowded 2.4GHz frequency, leading to interference and packet loss.
- The Single Point of Failure2: The router is the central command for every device. If the router reboots, loses power, or needs a firmware update, your entire lighting system goes offline. If the homeowner changes their Wi-Fi password, you may need a service call to reconfigure every single device individually.
- Security Risks3: Many low-cost Wi-Fi IoT devices have notoriously poor security, creating potential backdoors into your client’s home network. A dedicated, separate network for smart devices significantly mitigates this risk.
Zigbee and Z-Wave: The Professional Standard
These protocols were designed from the ground up for home automation. They avoid Wi-Fi’s pitfalls by creating a completely separate, low-power network for your smart devices.
- The Power of the Mesh4: This is the key advantage. Each mains-powered device (like an in-wall switch, smart outlet, or LED controller) acts as a repeater. A signal doesn’t have to make a long journey back to a central router; it just hops to the nearest node. This makes the system incredibly fast, robust, and self-healing. If one node fails, the signal automatically reroutes through another. The more devices you add, the stronger and more reliable the network becomes.
- The Hub as a Local Brain5: Both protocols require a central "hub" or "gateway." This is not a weakness; it’s the system’s greatest strength. This hub acts as the local brain, processing commands and automations without relying on an internet connection. If the home’s internet goes down, all the internal schedules, scenes, and sensor-based automations will continue to function perfectly. This is a critical feature for a high-end, reliable system.
What About the New ‘Matter’ Protocol?
You’ve likely heard about Matter. It’s a new, royalty-free connectivity standard backed by the biggest names in tech (Apple, Google, Amazon, etc.). A professional like Tom needs to understand it.
- Matter is not a protocol like Zigbee; it’s an application layer. Think of it as a universal translator. Its goal is to allow devices from different brands to talk to each other seamlessly. A Matter-certified light from Brand A can be controlled by a Matter-certified switch from Brand B using any Matter-compatible app or voice assistant.
- Matter runs on top of existing network technologies, primarily Wi-Fi and Thread. Thread is particularly interesting for us; it’s a low-power, IP-based mesh networking protocol very similar in concept to Zigbee.
- The Future: Matter promises to solve the "walled garden" problem of smart homes. As more Matter-certified controllers and devices come to market, it will simplify specification and guarantee interoperability. For now, a solid Zigbee 3.0 or Z-Wave 700 series system is the proven, reliable choice, but keep an eye on Matter. It will become increasingly important.
What Hardware Do You Need for a Reliable Smart LED Strip System?
You’ve sold the client on a Zigbee system. Now you need to order the parts. You see hundreds of controllers online with different specs, and you’re not sure which ones are compatible, which are high-quality, and which are just cheap clones that will fail in six months.
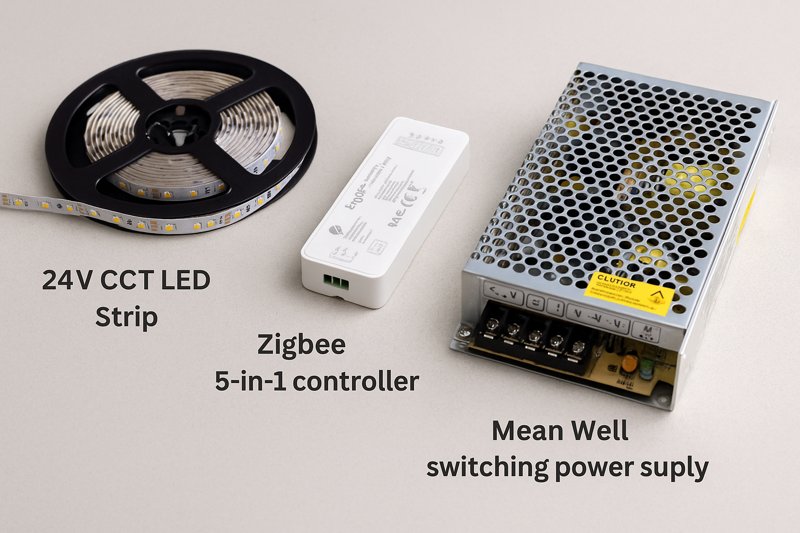
A rock-solid smart LED system requires three key components chosen to work together: 1) a professional-grade, 24V LED strip, 2) a high-quality Zigbee/Z-Wave controller with high-frequency PWM, and 3) a correctly sized, Class 2 certified power supply.
As a manufacturer, I see the results when installers try to cut corners on hardware. A premium LED strip paired with a cheap, underpowered controller or a non-certified power supply is a failed system waiting to happen. The controller might flicker, the power supply will overheat, and the client will blame the entire installation. For a professional like Tom, specifying and installing a complete, high-quality system is key. Every component in the chain must be professional-grade, and understanding the nuances of each is what sets you apart.
The LED Strip Light: The Foundation
- Voltage: Always specify 24V for smart home installations. The longer run lengths and lower current draw make for a more efficient and stable system. This is a non-negotiable starting point for any serious project.
- Type: Match the strip to the client’s needs and your controller’s capability (Single Color, CCT/Tunable White, RGBW, or RGB+CCT). Tunable White (CCT)6 is often the most valuable for creating high-end wellness and circadian rhythm scenes.
The Smart Controller: Beyond the Basics
- Protocol: Match the controller to the hub (Zigbee 3.0 is the most common and versatile).
- PWM Frequency7: This is a critical technical detail. Pulse Width Modulation (PWM) is how LED controllers dim the lights—by turning them on and off very rapidly. Cheaper controllers use a low PWM frequency (a few hundred Hz). While invisible to the naked eye, this can cause noticeable flickering on smartphone cameras, which is unacceptable in a high-end home. Professional-grade controllers use high-frequency PWM (2000Hz or higher) for perfectly smooth, flicker-free dimming at all brightness levels. Always check this spec.
- Power and Channel Rating: Ensure the controller can handle the total amperage of the strip and has the correct number of channels for your chosen strip type. A "5-in-1" controller is a versatile choice that can be configured for any type of strip, reducing the amount of inventory you need to carry.
The Power Supply and Wiring Strategy
- Certification and Sizing: Only use UL-listed, Class 2 power supplies8. This is critical for safety, code compliance, and reliability. Remember the 20% rule: size the power supply’s wattage to be at least 20% greater than the strip’s total load. An 80-watt load needs at least a 96-watt (realistically, a 100W or 120W) driver.
- Placement Strategy: Where you place your power supplies is a major design decision.
- Centralized: For a whole-home system, placing all power supplies and controllers in a central, well-ventilated location (like a utility closet) is the best practice. You then run low-voltage wiring from the panels to each lighting location. This makes maintenance and troubleshooting incredibly easy.
- Localized: For smaller projects or retrofits, you might place a smaller power supply locally (e.g., above the kitchen cabinets). This simplifies the wiring runs but can make future access more difficult.
- Wiring and Connections: The most professional connection is a soldered one. While high-quality clip-on connectors exist, they introduce a potential point of failure. For permanent architectural installations, soldering is always the superior choice. Use the correct American Wire Gauge (AWG) for your low-voltage runs to minimize voltage drop before the power even reaches the strip.
How Do You Create Advanced Automations and Scenes with LED Strips?
The lights are installed and connected to the hub. They turn on and off with an app. Your job is done, right? But the client asks, "Can you make the lights slowly brighten in the morning to wake me up?" or "Can the lights turn blue when my security system is armed?"
Advanced automation is achieved within the smart home hub’s software, not the individual light’s app. By creating rules, scenes, and schedules in the hub (like Home Assistant or Hubitat), you can link the LED strips to triggers from sensors, time of day, or other devices.
This is where you graduate from an installer to a true smart home integrator. Being able to program these advanced features is a massive value-add that a typical electrician cannot offer. When I talk to my most successful clients, they spend almost as much time programming the system as they do installing it. The hardware is just the foundation; the automation is the magic that clients will rave about to their friends. You are not just installing lights; you are crafting experiences.
High-Impact Automations That Sell Projects
These are the kinds of features that truly define a high-end smart home. They are all programmed within the central hub, using logic to connect different devices.
- Circadian Rhythm & Wellness Lighting9: This is a huge selling point.
- The Program: Using CCT strips, you create a schedule that automatically adjusts color temperature throughout the day. It’s not just a single change; it’s a gradual, imperceptible transition. The lights might slowly fade in at 6:30 AM at a cool 4500K, brighten to 5000K by noon, then begin a slow, gentle shift in the afternoon, reaching a warm 2700K by sunset, and finally dimming to a very warm 2200K "ember" glow in the late evening.
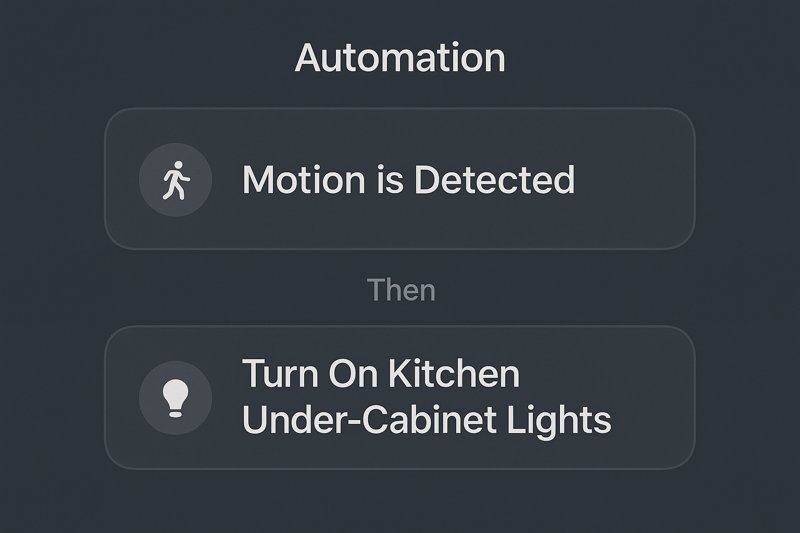
- Context-Aware Motion Lighting10: This is far more advanced than just turning lights on.
- The Program: You use "if-then-else" logic. For a hallway: "IF motion is detected, check the time. IF the time is between sunset and 10 PM, turn on the lights to 70% brightness at 3000K. ELSE IF the time is between 10 PM and sunrise, turn on the lights to only 5% brightness at 2200K." This creates a gentle pathway light at night instead of a jarring blast of full-power light.
- Multi-Layered Scene Control11: A "scene" isn’t just one setting; it’s a complete environmental change.
- "Movie Night" Scene: A single button press does more than dim the lights. It triggers the following sequence: 1) Main cove lights fade to 10% brightness at 2700K over 10 seconds. 2) The accent strip behind the TV shifts to a static deep blue. 3) The under-sofa "floating" light turns off. 4) The smart blinds close. 5) The smart thermostat adjusts the temperature down two degrees. This is a fully integrated experience.
- Security Integration and Visual Notifications12:
- "Away" Mode: When the client arms their security system, the hub automatically runs a "simulated occupancy" lighting sequence, turning various lights on and off in a random pattern to make it look like someone is home.
- Visual Alert: "IF the front door contact sensor is opened AND the security system is armed in ‘Away’ mode, THEN flash all interior and exterior lights red at 100% brightness and send a notification to the homeowner." This is a powerful deterrent.
Conclusion
Successfully integrating LED strips is about building a reliable system. Choose professional protocols like Zigbee, specify high-quality 24V hardware paying attention to details like PWM frequency, and master the hub’s software to craft automations that transform a house into a truly intuitive, intelligent home.
-
Understanding network congestion can help you optimize your smart home setup and avoid common pitfalls. ↩
-
Learn about the vulnerabilities in Wi-Fi networks to better secure your smart home devices. ↩
-
Explore the security challenges of IoT devices to protect your home network from potential threats. ↩
-
Discover how mesh networking enhances reliability and performance in smart home installations. ↩
-
Understanding the hub’s function can help you choose the right smart home setup for your needs. ↩
-
Discover how Tunable White lighting enhances wellness and supports circadian rhythms in your home. ↩
-
Understanding PWM Frequency is crucial for achieving flicker-free dimming in high-end lighting systems. ↩
-
Explore the significance of UL-listed power supplies for safety and compliance in LED lighting projects. ↩
-
Explore how this innovative lighting can enhance your well-being and improve your home’s ambiance. ↩
-
Learn about the advanced features of motion lighting that adapt to your lifestyle and enhance safety. ↩
-
Discover how scene control can transform your home environment with just one button press. ↩
-
Find out how these features can enhance your home’s security and provide peace of mind. ↩
Interested in Our LED Solutions?
Get professional consultation and customized LED lighting solutions for your projects. Contact our expert team today.
Related Articles

How Do You Build Profitable Custom Vehicle and RV Interior LED Rope Lights?
You lose RV installation contracts because your interior lights fail on rough roads. Standard strips show bright dots on glossy…

How to Perfect Bookshelf and Display Cabinet LED Rope Lighting?
You lose retail clients when bookshelves look incredibly dark. Ugly shadows hide expensive products inside display cabinets daily. You need…

How to Master Mirror and Vanity LED Rope Light Installation?
Your clients complain about ugly shadows in their bathroom mirrors. Bad lighting ruins expensive vanity designs. You lose future contracts…
