
How Can You Transform Your Pergola With LED Strip Lighting?
Your beautiful pergola or gazebo is the centerpiece of your yard during the day. But once the sun goes down, it becomes a dark, hulking frame, a forgotten space instead of an inviting destination.
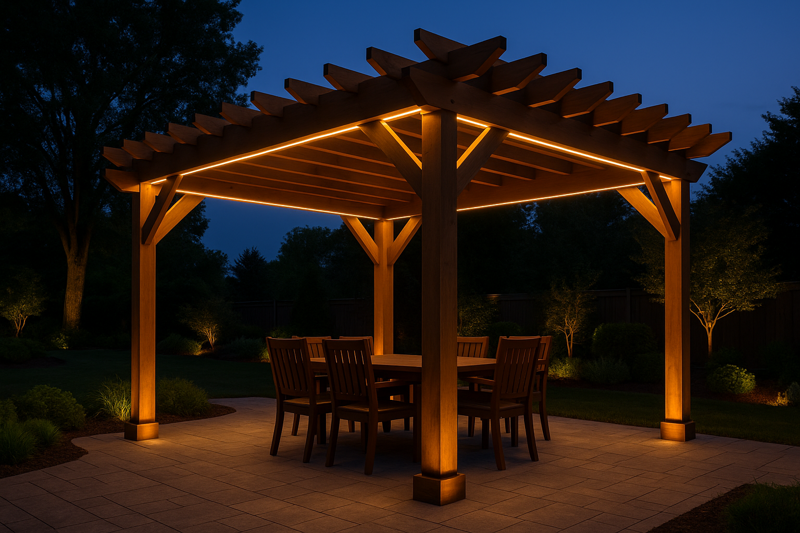
By strategically integrating layers of LED strip lighting, you can transform it into a stunning outdoor room. Use hidden uplighting for architectural drama, functional downlighting for dining or seating areas, and soft perimeter glows to define the space and create an enchanting ambiance.
As a manufacturer of these lighting systems, I’ve seen them turn simple wooden structures into high-end architectural features. The key is to think like a designer. The goal isn’t just to make the space bright; it’s to use light to create mood, provide function, and highlight the beauty of the structure itself. This guide will walk you through the professional approach to designing and executing a pergola lighting system that looks intentional, luxurious, and built to last.
What Are the Main Design Goals for Pergola Lighting?
You know you need to add lights, but you’re not sure where to start. Just sticking a string of lights along a beam often looks temporary and unplanned, failing to impress your client or add real value.
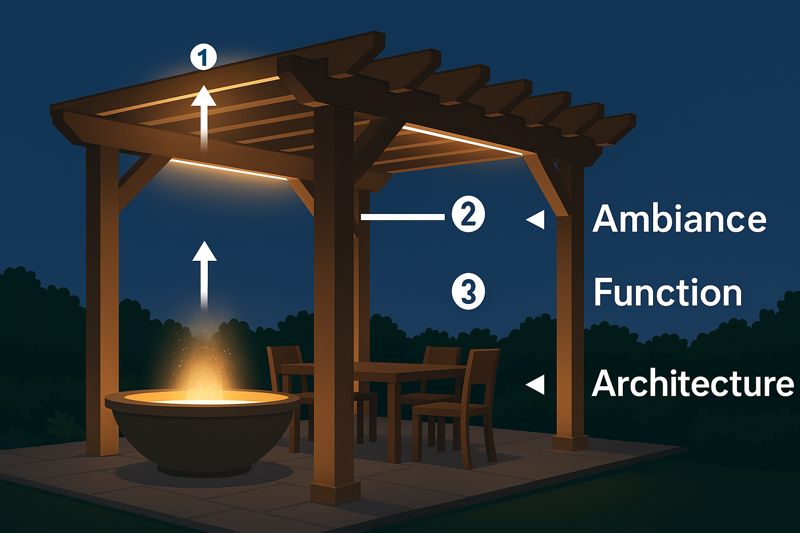
A professional design focuses on three distinct goals: creating Ambiance for mood, providing Function for activities like dining, and highlighting Architecture to showcase the structure itself. Layering these three types of light creates a cohesive, high-end result.
This is the foundational thinking that separates an amateur from a pro. Instead of just adding light, you are creating layers of light, each with a specific job. This layered approach adds depth and sophistication to the space. For a contractor or designer, being able to explain these three goals to a client demonstrates your expertise and helps them understand the value of a comprehensive lighting plan. You are not just selling them lights; you are selling them a complete outdoor experience.
A Deeper Dive into the Three Layers of Light
Let’s explore how to execute each of these fundamental design goals.
-
Creating Ambiance (The Mood Layer)
This layer sets the overall tone of the space. The goal is a relaxed, inviting, and comfortable atmosphere.
- The Technique: Indirect lighting is key. This means the light source is hidden, and you see only its soft, reflected glow. The most common technique is uplighting the roof structure. By placing LED strips on top of the lower crossbeams (purlins) and aiming them up, you create a beautiful, diffuse glow that emanates from the ceiling of the pergola.
- The Light: For ambiance, always use a warm white color temperature (2700K – 3000K)1. This mimics candlelight and firelight, which is psychologically comforting. Crucially, the system must be dimmable2. The right light level for a lively dinner party is much brighter than for a quiet, late-night conversation. Control is everything.
-
Providing Function (The Task Layer)
This layer provides useful light exactly where it is needed for specific activities.
- The Technique: This is where downlighting shines. The primary function in a pergola is usually illuminating a dining table, seating area, or outdoor kitchen counter. This requires direct, glare-free light. The best method is to integrate LED strip channels into the underside of the main beams directly above these key zones.
- The Light: This light should also be warm (3000K) to maintain a cohesive feel. The most important specification here is a high Color Rendering Index (CRI of 90+)3. A high CRI ensures that food on the table looks delicious and natural, and people’s skin tones look healthy, not washed out.
-
Highlighting Architecture (The Accent Layer)
This layer uses light to celebrate the form and material of the structure itself.
- The Technique: Use "grazing" or "washing" to accentuate vertical elements. You can integrate a vertical strip into a corner of the main support posts to make them glow. Or, if the posts are made of textured material like stone or rough-hewn wood, you can place a small, powerful uplight at the base to graze the surface and make the texture pop.
| Design Goal | Primary Technique | Best Placement | Key Light Specification |
|---|---|---|---|
| Ambiance | Indirect Uplighting | On top of cross-beams, aimed at the ceiling. | 2700K-3000K CCT, Dimmable |
| Function | Integrated Downlighting | Routed into the underside of beams over task areas. | 3000K CCT, High CRI (90+) |
| Architecture | Grazing or Washing | Along vertical posts or at the base. | Narrow beam for grazing, wider for washing. |
| Definition | Perimeter Glow | Along the full outside edge of the roof structure. | Low brightness, continuous line. |
What Are the Best Installation Techniques for a Professional Look?
Simply tacking an exposed LED strip to a beam looks cheap and unfinished. Wires are visible, the individual LED "dots" are distracting, and the strip itself is vulnerable to damage from weather and pests.
The professional standard is to fully integrate the lighting. This means routing channels into the wood for a flush finish, using diffused covers for a smooth line of light, and carefully planning all wiring to be completely hidden from view.

As an OEM factory, we manufacture these components precisely for this purpose. The difference between a DIY job and a high-end installation is in these finishing details. A client like Tom knows that hiding the mechanics of the system is what creates the "magic." It makes the light seem as if it’s an organic part of the structure. This level of craftsmanship is a major selling point and justifies a higher price for the project. The key is planning the installation before the pergola is even fully assembled.
A Deeper Dive into Pro Installation Methods
Let’s look at the specific methods that achieve this seamless, integrated look.
-
Technique 1: Routing Channels for a Flush Finish4
This is the gold standard for integrated downlighting.
- The Process: Before the final assembly of the pergola, use a router with a straight bit and a guide to cut a channel into the underside of the main beams. The channel should be wide and deep enough to perfectly fit the aluminum channel you are using.
- The Result: The aluminum channel and its diffuser then sit perfectly flush with the surface of the wood. It looks like a custom-made, built-in light fixture. This is the cleanest possible look and offers the best protection for the LED strip.
-
Technique 2: Hiding Wires Before Assembly5
Visible wires are the number one sign of an amateur job.
- The Process: Think about the path of your low-voltage wires. Plan to drill holes through the center of posts and beams where they will be invisible. Run the wires through these hidden pathways during assembly. All wires from the different strips should run to a central, concealed location where they can connect to the power supply.
- For Existing Structures: If the pergola is already built, you can still hide wires. Use a router to cut a small "V" groove on the top, unseen side of a beam. Lay the wire in the groove, and then fill it with a matching wood filler or caulk.
-
Technique 3: Using the Right Channel and Diffuser6
The channel is not just for protection; it shapes the light.
- For Uplighting: When placing strips on top of beams for ambient uplighting7, you might not even need a diffuser if the light is completely indirect. However, a simple, flat-cover channel is still essential for heat dissipation and protection.
- For Downlighting: For any visible downlighting8, a diffused cover is mandatory. A heavily frosted or "opal" diffuser will do the best job of eliminating hot spots from the individual LEDs and creating a single, uniform line of light.
| Technique Detail | Goal | Best For | Professional Tip |
|---|---|---|---|
| Routing Channels | Create a seamless, flush-mount appearance. | Downlighting in main beams. | Do this before the pergola is stained or sealed. The fit should be snug. |
| Hiding Wires | Achieve a clean, "wireless" look. | All professional installations9. | Plan your wiring path like a road map before you drill a single hole. Label your wires! |
| Using Diffusers | Eliminate "dots" and create a smooth line. | All visible downlighting or direct-view strips. | Deeper channels with diffusers further from the strip create better diffusion. |
What Specific Hardware Do You Need for a Durable Pergola Installation?
You’ve planned the design and the installation methods. But if you choose components that can’t handle the outdoors, your beautiful design will fail—lights will flicker, dim, or die completely after the first storm or heatwave.
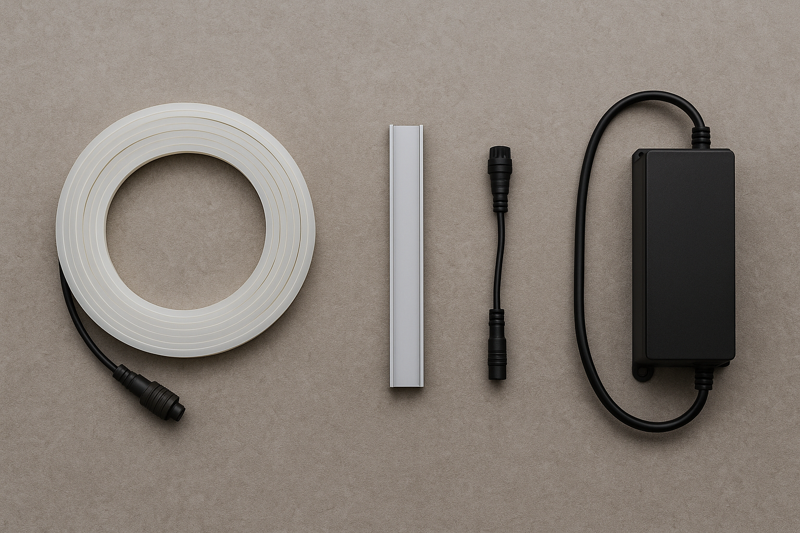
A durable system requires a complete, matched set of outdoor-rated hardware: a high-quality IP67 silicone LED strip, protective aluminum channels, and a correctly sized, outdoor-rated Class 2 power supply. Using anything less invites failure.
This is the most critical part, and where my expertise as a factory owner comes in. We see firsthand what happens when contractors try to cut corners. A lighting system is only as strong as its weakest link. A fantastic IP67 strip will still fail if it’s connected to a cheap, indoor power supply that gets wet. A professional guarantees their work, and that’s only possible by using a complete system of components that are all designed to work together and withstand the elements for years.
A Deeper Dive into the Essential Hardware System
Let’s break down the role of each component and why the specifications are so important.
-
Component 1: The IP67 Silicone LED Strip
This is the light engine, and it must be tough.
- IP67 Rating: This is non-negotiable. It means the strip is dust-tight and can withstand being submerged in water up to 1 meter. It will handle driving rain, snow, and hose-downs without any issue.
- Silicone Coating: This is the most crucial detail for longevity. Many cheaper "waterproof" strips use an epoxy resin or a simple PVC sleeve. These materials will yellow, become brittle, and crack when exposed to UV sunlight and temperature changes. Only a solid silicone extrusion maintains its flexibility and waterproof seal for years. It costs more upfront and saves you from a costly callback.
-
Component 2: The Aluminum Channel System
This is the strip’s armor and heatsink.
- Heat Dissipation: Heat is the primary killer of LEDs, reducing their brightness and lifespan. The aluminum channel acts as a heat sink, pulling heat away from the strip and radiating it into the air. This can double the life of your LEDs.
- Physical and Environmental Protection: It provides a rigid housing that protects the strip from impacts, pests, and debris. It also physically separates the strip from direct contact with treated lumber, which can contain corrosive chemicals.
-
Component 3: The Power Supply and Controls
This is the heart of the system.
- Outdoor Rating: The power supply (or "driver") must have its own weather-resistant rating, like IP65 or be housed in a NEMA 3R enclosure. It needs to be able to handle moisture and temperature extremes.
- Class 2 Certification: This is a key safety standard in North America. Class 2 power supplies have limited voltage (under 60V DC) and wattage (under 100W), making the system much safer to install and reducing fire risk.
- Correct Sizing: Never run a power supply at 100% of its rated load. A professional always builds in a 20% "headroom." To calculate the size you need, add up the total wattage of all your LED strips and multiply by 1.2. (Example: 75W of strips x 1.2 = 90W. You need at least a 96W power supply).
Conclusion
A brilliantly lit pergola is a system. It combines thoughtful design layers, professional installation techniques that hide all wiring, and a robust set of matched, outdoor-rated hardware. This ensures a stunning transformation that adds value and lasts for years.
-
Understanding warm white color temperature helps create a cozy atmosphere, essential for effective lighting design. ↩
-
Dimmable lighting allows for flexibility in ambiance, making spaces adaptable for different occasions. ↩
-
A high CRI ensures colors appear true and vibrant, enhancing the visual appeal of spaces and objects. ↩
-
Explore expert techniques for achieving a seamless look in lighting installations, ensuring a professional finish. ↩
-
Learn innovative methods to conceal wires for a clean, professional appearance in your lighting setups. ↩
-
Discover how the right channel and diffuser can enhance lighting quality and aesthetics in your projects. ↩
-
Find out how to create beautiful ambient uplighting that transforms outdoor areas into inviting spaces. ↩
-
Get insights into effective downlighting techniques that enhance visibility and style in your home. ↩
-
Understand the key elements that make lighting installations professional and visually appealing. ↩
Interested in Our LED Solutions?
Get professional consultation and customized LED lighting solutions for your projects. Contact our expert team today.
Related Articles

How Do You Build Profitable Custom Vehicle and RV Interior LED Rope Lights?
You lose RV installation contracts because your interior lights fail on rough roads. Standard strips show bright dots on glossy…

How to Perfect Bookshelf and Display Cabinet LED Rope Lighting?
You lose retail clients when bookshelves look incredibly dark. Ugly shadows hide expensive products inside display cabinets daily. You need…

How to Master Mirror and Vanity LED Rope Light Installation?
Your clients complain about ugly shadows in their bathroom mirrors. Bad lighting ruins expensive vanity designs. You lose future contracts…
