
How Can You Use LED Strips to Transform a Living Room?
Your client’s living room has a single, harsh overhead light. The space feels flat and uninviting, lacking the warmth and sophistication they see in design magazines.
To transform a living room, use LED strips to create layers of indirect accent light. This includes installing them in ceiling coves for soft ambiance, backlighting media units to create a focal point, and integrating them into shelving to add depth and highlight decor.
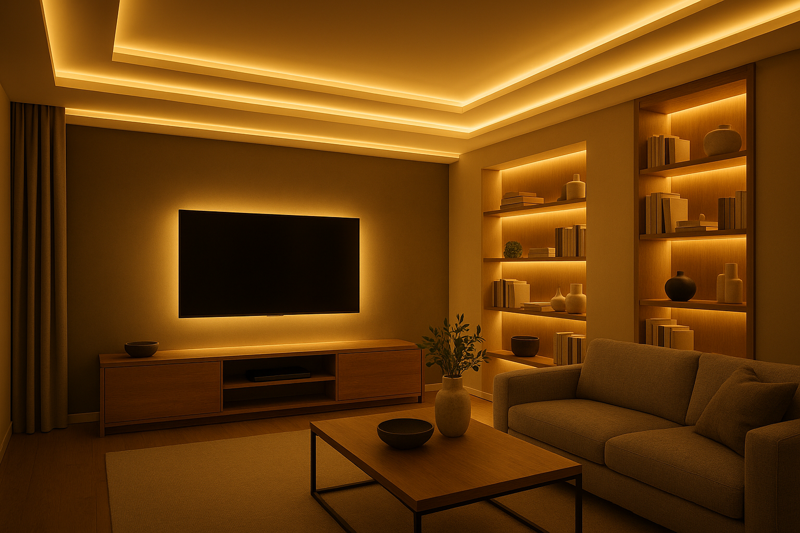
From my perspective as a factory owner, I don’t just see reels of LED strips; I see the potential for incredible design. I have the privilege of seeing the project plans from some of the best lighting designers in the world who purchase our products. They don’t just add light; they sculpt with it. They use layers to create mood, draw attention to architectural features, and make a room feel custom and luxurious. I’m going to share four of their most effective and popular techniques so you can bring that same level of design to your own projects.
How Can You Use Cove Lighting to Add Drama and Ambiance?
The room feels small and the ceiling is just a blank, boring surface. The main light fixture is functional but does nothing to create a sense of mood or architectural interest.
Cove lighting uses LED strips hidden in a ledge or trough to cast a soft, indirect glow up onto the ceiling. This creates an illusion of height and provides a beautiful, glare-free ambient light that dramatically enhances the room’s atmosphere.

This is the quintessential technique for creating a high-end, architectural feel. Instead of light shining down into your eyes, it shines up onto a surface and reflects back, filling the room with a comfortable, diffuse light. It’s a signature look in hotels, restaurants, and luxury homes because it feels sophisticated and intentional. As a professional, mastering cove lighting is a key skill that can significantly elevate the perceived value of your work. The client isn’t just getting lights; they are getting an architectural upgrade.
Executing Cove Lighting Flawlessly
A successful cove lighting installation depends on a few critical details. Getting these right is the difference between a smooth, luxurious glow and a messy, distracting failure.
- Placement is Everything: The placement of the strip within the cove determines the effect. You must decide if you want to wash the ceiling with light or the upper wall.
- Ceiling Wash (Most Common): Mount the strip on the room-side of the cove, aimed straight up. This pushes the light across the ceiling, making the room feel larger and the ceiling higher.
- Wall Graze: Mount the strip on the wall-side of the cove, aimed up and slightly angled towards the wall. This will highlight the texture of the wall surface—beautiful on brick or textured plaster, but it will also highlight any imperfections on a poorly finished drywall surface.
- Choose the Right Brightness and Color1: Cove lighting2 is for ambiance, not task lighting.
- Brightness: A strip with a moderate output of 400-600 lumens per meter (around 120-180 lm/ft) is usually perfect. Too bright, and it becomes the primary light source and loses its subtle, ambient quality. For clients who want flexibility, installing a dimmable driver is a must.
- Color Temperature (CCT): For a living room, a warm white in the range of 2700K to 3000K is the standard choice. It creates a cozy, inviting, and relaxing atmosphere, similar to incandescent lighting.
- Technical Considerations3 for a Seamless Look:
- Use Channels, But No Diffuser: Since the strip is completely hidden from view, you do not need a diffuser. However, I still recommend mounting the strip in a simple aluminum channel. The channel provides a straight, rigid guide for a perfectly linear installation and, more importantly, acts as a heat sink to prolong the life of the LEDs.
- Mind the Corners: As discussed in seamless installations, dark spots at corners will ruin the effect. You must use soldered jumper wires to navigate 90-degree corners to maintain a continuous, unbroken line of light.
- Power for Long Runs4: For coves that run around the entire perimeter of a room, voltage drop is a certainty. You must use the parallel wiring technique, running a heavier gauge feeder wire from a central power supply to power each 5-meter section of the strip independently. This ensures perfect, uniform brightness all the way around the room.
How Do You Backlight a TV or Media Center Effectively?
Watching TV in a dark room causes eye strain and headaches for your client. They also have a large, black TV that dominates the wall and looks like a "black hole" when turned off.
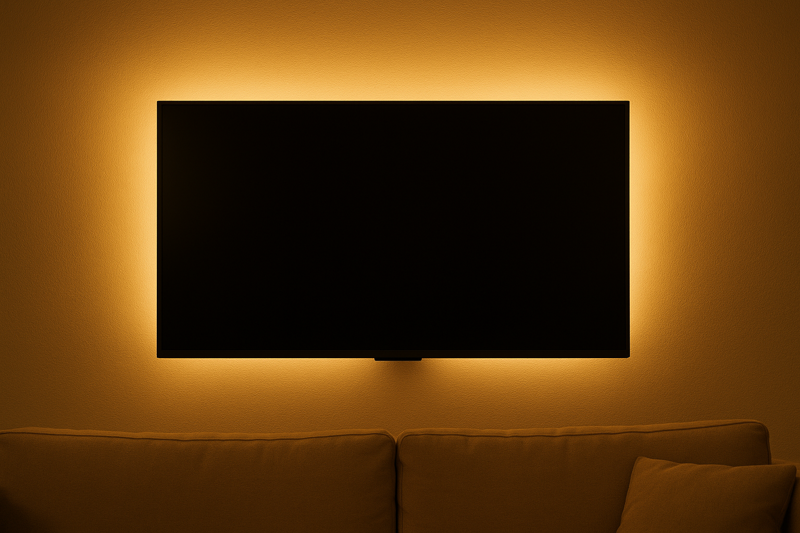
Backlighting a TV with an LED strip, a technique called "bias lighting," reduces eye strain by softening the contrast between the bright screen and the dark wall. It also creates a beautiful halo effect that makes the TV appear to float, turning it into a stylish design feature.
This is one of the easiest and most impactful upgrades you can offer. It solves a real, physical problem—eye fatigue—while adding a huge "wow" factor. From a professional standpoint, it’s a fantastic value-add. For a relatively low cost in materials and an hour of your time, you can dramatically improve your client’s viewing experience and the overall aesthetic of their main entertainment wall. This is the kind of thoughtful detail that gets you referrals. I often see designers using our high-CRI strips for this to ensure the light quality is excellent, even though it’s an indirect effect.
Best Practices for Professional Bias Lighting
While there are many cheap, USB-powered DIY kits for this, a professional installation is far superior in quality, control, and appearance.
- Choosing the Right Light Source:
- Color Temperature5: The industry standard for true bias lighting, as used by video professionals, is a neutral white 6500K (D65). This is a cool, daylight-white that provides the most accurate color perception on screen. However, many homeowners prefer the cozier look of a warmer white (2700K – 3000K) to match their other decor. This is an important conversation to have with the client. It’s a choice between technical accuracy and ambient warmth. Tunable CCT strips offer the best of both worlds.
- Color Rendering Index (CRI)6: Always use a high-CRI (90+) strip. Even though the light is indirect, a low-CRI light source can subtly skew the colors of the wall and the surrounding environment, which can be distracting.
- Brightness7: You don’t need a super bright strip. The goal is to create a soft glow, not a spotlight. Look for a strip in the 300-500 lumens per meter range and always install it with a dimmer so the client can adjust the intensity to their preference.
- Mounting for an Even Glow:
- Placement: The ideal placement is to mount the strip facing away from the screen, about 2-4 inches in from the edge of the TV on all four sides. This creates a soft, even halo. Avoid mounting it right at the edge, which can create a harsh line.
- Surface Cleaning: The back of a TV is often made of a low-surface-energy plastic and can be dusty. It is absolutely critical to clean the surface thoroughly with isopropyl alcohol before adhering the strip. For some plastics, using an adhesion promoter like 3M Primer 94 may be necessary for a permanent bond.
- Wiring and Control8:
- Power Source: Do not use the TV’s USB port. They are often underpowered and can’t provide the stable, clean voltage a quality LED strip needs. Use a dedicated, high-quality 12V or 24V DC power supply.
- Hiding Wires: This is key to a professional look. Plan a path for the low-voltage wire to run from the back of the TV, through the wall or a cable raceway, to a hidden power supply (inside the media console, in a nearby closet, etc.).
- Control Integration: Connect the power supply to a smart plug, an RF remote, or a wall switch that is convenient for the client. The goal is for the bias light to be as easy to operate as the TV itself.
How Do You Light Bookshelves and Display Cabinets?
Your client has beautiful bookshelves filled with books, art, and personal objects, but at night they disappear into dark, shadowy rectangles. The display lacks depth and focus.
By integrating slim LED strips vertically or horizontally within bookshelves, you can transform them into stunning focal points. This technique highlights the objects, adds a sense of depth to the room, and provides a sophisticated layer of low-level accent light.

This is where the quality of your light source truly matters. You are directly illuminating objects that your client values. Using a cheap, low-CRI strip here would be a disaster—it would make colors look dull and inaccurate. As a supplier, I always recommend our CRI 95+ strips for these applications. This is a perfect opportunity for an installer like Tom to demonstrate the value of investing in quality light. The difference is not subtle; it’s immediately obvious, and it’s the kind of detail that justifies a premium price for the installation.
Techniques for High-End Shelf Lighting
The goal is to see the light, not the source. This requires careful planning and a bit of craftsmanship.
- Placement Strategy:
- Front-Mounted (Downlighting): The most common and effective method is to place the strip in a very slim aluminum channel mounted just behind the front lip of each shelf, aiming the light down and slightly back. This "grazes" the front of the objects on the shelf below and creates a beautiful scalloped effect on the back wall of the bookshelf.
- Back-Mounted (Backlighting): You can also mount the strip at the back of the shelf, aiming the light upwards along the back wall. This creates a silhouette effect for objects placed in front of it and adds a lot of depth.
- Vertical Mounting: For bookshelves with thick vertical supports, you can run a strip vertically along the inside front edge of the supports. This washes light horizontally across the shelves.
- Choosing the Right Hardware:
- Ultra-Slim Channels9: The key to hiding the light source is using a very low-profile, slim aluminum channel with a diffuser. This makes the installation look integrated and purpose-built, not like an afterthought. Some channels are even designed to be recessed into a routed groove in the shelf for a completely flush, invisible finish.
- High-CRI is Non-Negotiable10: As mentioned, specify a strip with a CRI of 95 or higher. This will render the colors of book spines, artwork, and decor accurately and vibrantly.
- Lower Brightness11: Shelf lighting is purely an accent. A lower-output strip (200-400 lm/m) is ideal. It should provide a gentle glow, not a blast of light. Dimmability is highly recommended.
- Mastering the Wiring:
- This is the most challenging aspect of shelf lighting. The goal is to make all wiring disappear. You need to plan how to get the low-voltage power from shelf to shelf.
- Drilling: The most common method is to drill small, discreet holes vertically through the shelves and cabinet structure, typically at a back corner.
- Chiseled Grooves: For the ultimate professional finish, you can use a router or chisel to create a small channel in the back edge or underside of the shelf supports to hide the thin connecting wires.
- Flat Conductor Wire12: Specialized, paper-thin "ghost wire" can be used. It’s an adhesive-backed flat wire that can be stuck to surfaces and then painted over, making it virtually invisible.
Is It a Good Idea to Put LED Strips Under or Behind Furniture?
The living room has a beautiful modern sofa or a heavy media console that feels bulky and disconnected from the space. The client wants a more contemporary, "lighter" feel.
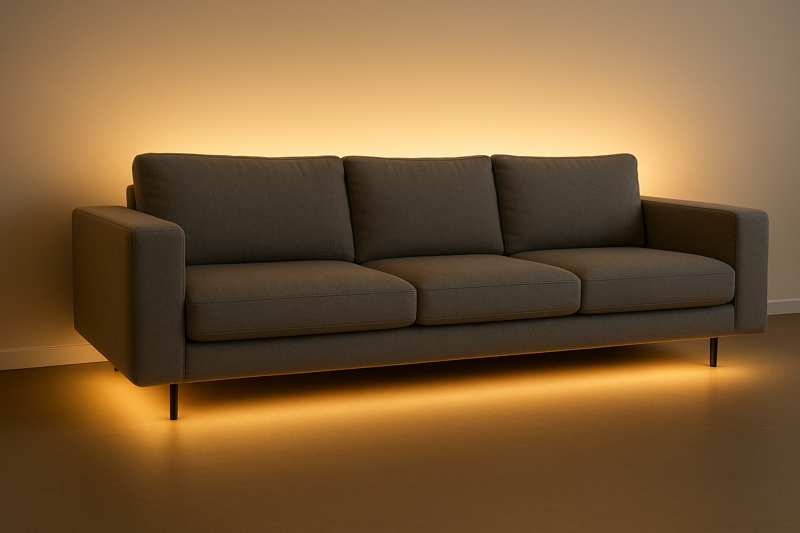
Placing LED strips on the underside of furniture like sofas, beds, and media consoles creates a "floating" effect. This modern technique makes heavy furniture appear weightless and provides a unique, ultra-modern layer of low-level mood lighting.
This is a design-forward technique that can completely change the character of a piece of furniture and the room itself. It’s a detail that feels custom and unexpected. For a contractor or designer, suggesting this kind of creative application shows that you are not just thinking about basic lighting, but about creating a unique and curated experience for your client. It works best with furniture that has at least a few inches of clearance from the floor and a solid frame or lip to which the strip can be attached.
How to Create the "Floating" Effect
The success of this effect relies on hiding the source perfectly and ensuring the light is soft and even.
- Ideal Furniture Candidates:
- Sofas and sectionals with legs and a solid perimeter frame.
- Media consoles and credenzas.
- Platform beds.
- Even heavy coffee tables with a solid base.
- Mounting Technique:
- Mount Inward: The most important rule is to mount the strip on the underside of the furniture’s frame, but set back several inches from the outer edge. You want the light to spill out softly from underneath. If you mount it right at the edge, you will see the hardware and the reflection of the individual LED dots on the floor, which ruins the illusion.
- Aim Down, Not Out: Mount the strip so it is pointing straight down at the floor. This creates a soft pool of light rather than a harsh line projected outwards.
- Clean and Prepare: Furniture undersides are often untreated wood or fabric. For wood, clean the surface well. For fabric, you may need to first adhere a thin strip of plastic or metal to the frame to create a suitable surface for the LED strip’s adhesive. A simple aluminum channel can also serve this purpose.
- Light Source and Power:
- Low Brightness is Key: This should be the most subtle layer of light in the room. Use a low-output strip (150-300 lm/m). You want a gentle glow, not an under-car neon effect.
- Warm Color Temperature: A warm 2700K light is perfect for this application, as it creates a cozy, inviting pool of light on the floor.
- Wiring is Critical: This is the make-or-break detail. The wire from the furniture to the wall outlet must be managed perfectly. The best solution is to position the furniture over a floor outlet. If that’s not possible, use a thin, color-matched cord that can be run neatly along a baseboard to the nearest wall outlet where the power adapter is plugged in. For floating media consoles mounted on a wall, the wiring should be run inside the wall, just like for a TV.
Conclusion
By layering these four techniques—cove, bias, shelf, and furniture lighting—you can transform any living room from a simple space into a sophisticated, dynamic, and inviting environment, adding immense value for your clients.
-
This resource will guide you in selecting the perfect brightness and color temperature for your cove lighting, enhancing your ambiance. ↩
-
Explore this link to learn essential tips and techniques for achieving stunning cove lighting in your space. ↩
-
Discover important technical aspects that ensure a seamless and effective cove lighting setup. ↩
-
Learn about effective wiring techniques to maintain uniform brightness in extensive cove lighting installations. ↩
-
Understanding color temperature is crucial for achieving the perfect ambiance and accurate color perception in your space. ↩
-
A high CRI ensures that colors appear true and vibrant, enhancing the overall visual experience in your environment. ↩
-
Finding the right brightness level is essential for creating a comfortable viewing experience without harsh glare. ↩
-
Proper wiring and control integration are key to achieving a professional and seamless bias lighting setup. ↩
-
Explore how Ultra-Slim Channels can enhance your lighting design while keeping the source hidden. ↩
-
Learn why a High Color Rendering Index is crucial for accurately displaying colors in your space. ↩
-
Discover the importance of lower brightness in creating a subtle and inviting ambiance. ↩
-
Find out how Flat Conductor Wire can simplify your wiring process and keep it discreet. ↩
Interested in Our LED Solutions?
Get professional consultation and customized LED lighting solutions for your projects. Contact our expert team today.
Related Articles

How Do You Build Profitable Custom Vehicle and RV Interior LED Rope Lights?
You lose RV installation contracts because your interior lights fail on rough roads. Standard strips show bright dots on glossy…

How to Perfect Bookshelf and Display Cabinet LED Rope Lighting?
You lose retail clients when bookshelves look incredibly dark. Ugly shadows hide expensive products inside display cabinets daily. You need…

How to Master Mirror and Vanity LED Rope Light Installation?
Your clients complain about ugly shadows in their bathroom mirrors. Bad lighting ruins expensive vanity designs. You lose future contracts…
