
How Do Extreme Temperatures Really Affect Outdoor LED Strip Lights?
You installed a beautiful outdoor lighting system that looked perfect in the fall. But after the first major heatwave or deep freeze, sections start to flicker and fail. Your client is on the phone, and your reputation is on the line.
Extreme temperatures attack every component of an LED strip. Heat accelerates lumen decay and causes voltage drop, while cold makes materials brittle and can crack solder joints. True reliability comes from strips engineered with high-quality materials, like flexible PCBs and silicone housings, designed to handle thermal stress.

From my perspective as a factory owner, the spec sheet tells only half the story. A temperature range of -20°C to 50°C looks good on paper, but it doesn’t account for the brutal reality of thermal cycling on a job site. The real test isn’t if a strip can operate at a certain temperature; it’s if it can survive being frozen solid, then baked in the sun, day after day, for years. This guide goes beyond the marketing numbers to explain what is physically happening to your lighting in extreme weather and how to choose a product that is truly built to last.
What Happens to LED Strips in Freezing Temperatures?
You installed a lighting project in a northern climate. It worked perfectly until mid-winter. After a week of sub-zero temperatures, entire sections are dead. Now you’re facing a difficult and cold repair job, wondering what went wrong.
In freezing temperatures, inferior materials like PVC or epoxy become rigid and brittle. Thermal contraction puts immense stress on the entire strip, leading to cracked solder joints and open circuits. Only strips with high-quality silicone housings that remain flexible in the cold will survive.
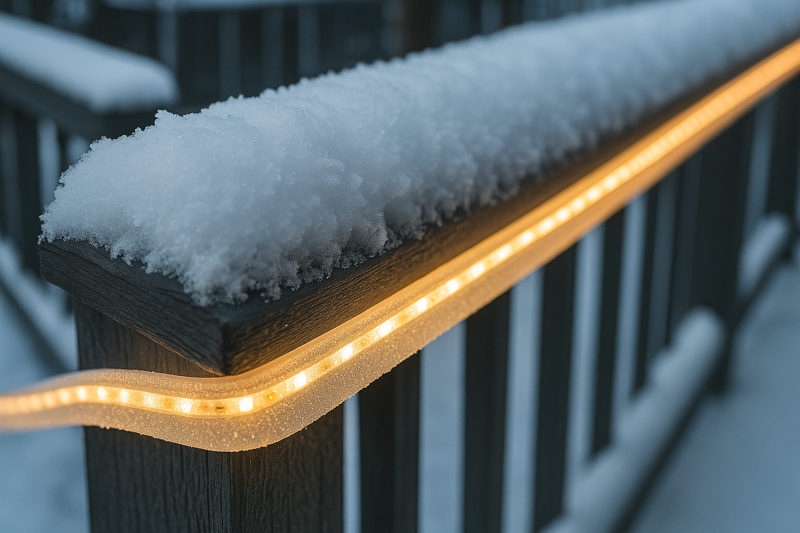
Working with clients in North America and Japan, I’ve learned that cold is a silent killer of outdoor electronics. Most people worry about water, but the physical stress of contraction in a deep freeze is just as destructive. A cheap outdoor-rated strip might be waterproof on day one, but it’s not "cold-proof." The materials used in its construction determine its fate. When the temperature plummets, a poorly made strip will literally tear itself apart on a microscopic level. This is why we focus so heavily on material science; it’s the key to surviving a real winter.
A Deeper Dive into Cold-Weather Failure
Let’s break down the two primary ways the cold destroys an LED strip. It’s a combination of material science and physics.
-
Material Embrittlement1: The Breaking Point
Everything shrinks in the cold, but different materials shrink at different rates. The biggest problem is the protective housing.
- Cheap Materials (Epoxy, PU, PVC): These plastics have a high "glass transition temperature," meaning they become rigid and glass-like at temperatures common in winter. A flexible strip becomes a rigid bar. When the surface it’s mounted on (like wood or metal) contracts at a different rate, the brittle plastic can’t flex and instead develops micro-cracks.
- The Result: These cracks are a fatal breach. They instantly compromise the IP rating, allowing moisture from melting snow or frost to seep in and corrode the electronics. What was once an IP67-rated strip is now completely vulnerable after one cold snap.
-
Solder Joint Failure2: The Electrical Weak Link
This is an even more insidious problem. Inside the strip, you have dozens of components soldered to a flexible copper PCB.
- The Stress of Contraction: As the strip cools, the flexible PCB, the copper traces, the solder, and the components themselves all shrink at slightly different rates. This differential contraction puts immense mechanical stress on the tiny, fragile solder joints connecting the LED chips and resistors.
- The Result: Over time, or during a sudden deep freeze, this stress can cause the solder joint to crack. This creates an open circuit, and every LED downstream from that break goes dark. It’s like a link in a chain snapping. At our factory, we use a specialized, more ductile solder alloy and a robust PCB design specifically to withstand the rigors of this thermal stress, a detail often overlooked by low-cost manufacturers.
| Material | Behavior at -20°C (-4°F) | Result After Cold Exposure |
|---|---|---|
| Epoxy/PU Coating | Becomes hard, glass-like, and brittle | High risk of cracking. |
| PVC Jacket | Becomes stiff and inflexible | Can crack if bent or impacted. |
| Silicone Housing3 | Remains flexible and resilient | Maintains seal and integrity. |
| Standard Solder | Becomes brittle, prone to fracture | Risk of open circuits, section failure. |
| Ductile Solder Alloy4 | Retains some flexibility | Resists stress from contraction. |
How Does Extreme Heat Damage Outdoor LED Strips?
You’ve completed a beautiful installation in a hot climate like a Las Vegas patio or a south-facing wall in Singapore. Within a year, the lights seem dimmer, and the color has shifted from a clean white to a yellowish hue.
Extreme heat is the number one enemy of an LED’s lifespan. It dramatically accelerates lumen depreciation (dimming), causes color shift, and can even melt low-quality solder. Proper thermal management, primarily through aluminum mounting channels, is not optional; it is essential.
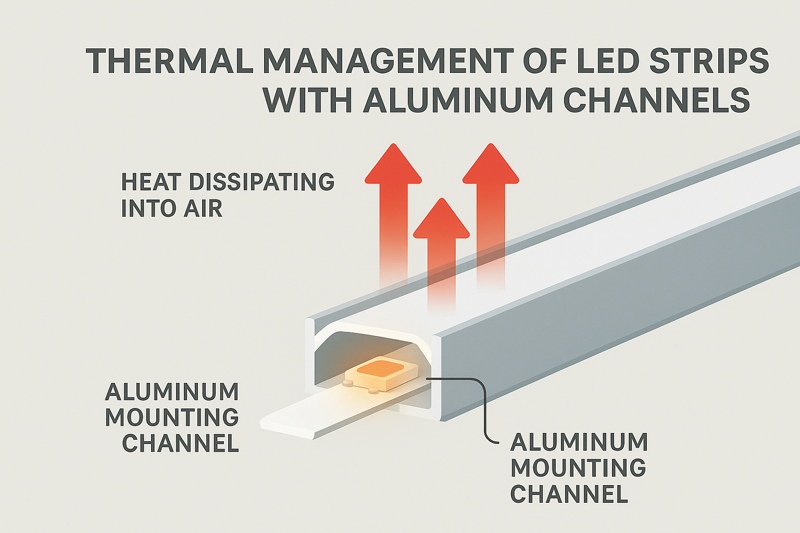
Every conversation I have with a lighting designer about a project in a hot climate involves one key topic: thermal management. The LEDs themselves generate heat during normal operation. When you add high ambient temperatures and direct solar radiation, the total heat load can quickly exceed the safe operating limits of the chip. An LED is not a light bulb; it’s a sensitive semiconductor. Running it too hot is like running a computer’s CPU without a fan. It will work for a while, but you are drastically shortening its life and degrading its performance with every degree above its optimal temperature.
A Deeper Dive into Heat-Related Failure
Heat is a more gradual killer than cold, but it is just as certain. Here are the three main ways it degrades your installation.
-
Lumen Depreciation and Reduced Lifespan5
This is the most critical factor. The lifespan of an LED (e.g., L70 at 50,000 hours) is calculated based on it operating at a specific junction temperature (around 85°C).
- The Science: For every 10°C increase in an LED’s junction temperature above its target, you can cut its expected lifespan in half. Heat accelerates the natural degradation processes within the semiconductor materials.
- The Result: A strip that should have lasted for ten years might become noticeably dim in just two or three. The light still works, but it no longer delivers the brightness the client paid for, leading to dissatisfaction.
-
Color Shift (Chromaticity Shift)6
Heat also affects the phosphor coating on white LEDs that is responsible for creating the "white" light.
- The Science: When the phosphor gets too hot, its efficiency degrades, and its chemical properties can change. This causes its light output to shift along the color spectrum, typically towards the warmer, yellower end.
- The Result: Your carefully chosen 4000K neutral white now looks like a dim 3000K warm white. Even worse, if different parts of the strip run at different temperatures, you can have visible color differences along the same run, which looks unprofessional.
-
Voltage Drop and Material Degradation7
Heat has a direct impact on the electrical and physical properties of the strip.
- Increased Resistance: The electrical resistance of the copper traces on the PCB increases with temperature. This leads to a more pronounced voltage drop, especially on longer runs. The end of the strip will be noticeably dimmer and warmer in color than the beginning.
- Solder and Adhesion: Very low-quality strips may use solder with a low melting point, which can literally reflow and fail in extreme heat. The 3M adhesive backing on all strips is also rated for a specific temperature range; excessive heat can cause it to fail, leading the strip to peel and sag.
The only professional solution is to mount the strip in an aluminum channel8. The channel acts as a giant heat sink, pulling thermal energy away from the strip and dissipating it into the air, keeping the LEDs within their optimal temperature range.
Why is Rapid Temperature Change (Thermal Cycling) the Biggest Threat?
Your installation seems fine in the middle of summer and the dead of winter. But failures happen in the spring and fall, when days are warm and nights are cold. You can’t figure out the pattern.
Rapid temperature change, or thermal cycling, is the most destructive force. The constant expansion and contraction stresses every component at different rates, fatiguing materials and leading to failure. This is why material compatibility and build quality are paramount.
From a manufacturing and engineering standpoint, this is our biggest challenge. It’s not just about surviving hot or cold; it’s about surviving the journey between them, over and over, for thousands of cycles. A desert environment is a perfect example: the surface of a wall can be 60°C in the afternoon sun and drop to 10°C after sunset. This 50°C swing causes every part of the strip to expand and then contract, every single day. This relentless cycle acts like bending a paperclip back and forth. Eventually, it will break.
A Deeper Dive into Thermal Cycling Failure
Let’s break down how this daily expansion and contraction cycle works to destroy an LED strip from the inside out.
-
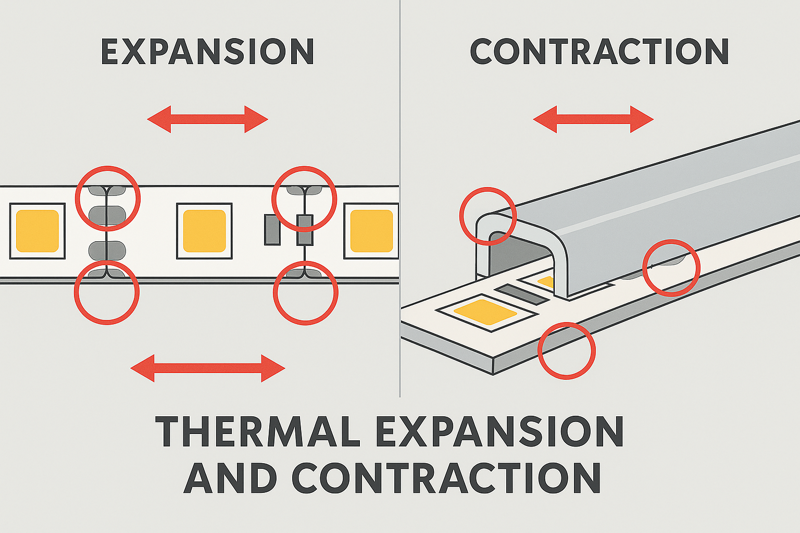
The Physics of Differential Expansion
This is the core of the problem. Different materials expand and contract at different rates when their temperature changes. This is known as the Coefficient of Thermal Expansion (CTE).
- The Mismatch: An LED strip is a composite of many materials: a flexible polyimide PCB, copper traces, solder, silicon LEDs, and a silicone or epoxy housing. Each has a different CTE.
- The Process: When the strip heats up, the copper trace wants to expand more than the PCB it’s bonded to. The solder joint, which connects them both, is caught in the middle of a tiny tug-of-war. The outer housing expands at yet another rate. When it cools down, the entire process happens in reverse, with everything contracting.
-
Failure Through Fatigue
This daily cycle creates fatigue in the materials, accumulating damage over time.
- Solder Joint Fatigue: This is the most common failure point. The repeated push-and-pull on the solder joints creates micro-fractures. Over hundreds or thousands of cycles, these fractures grow until the electrical connection is broken. This is why a strip can work for a year and then suddenly fail—it has reached its fatigue limit. Our choice of solder alloy and the design of the solder pads are obsessed with maximizing fatigue resistance.
- Housing Delamination: The bond between the protective housing (especially a cheap epoxy coating) and the PCB is also under constant stress. The cycling can cause the coating to peel away from the strip (delaminate), creating air gaps where moisture can condense and get trapped, leading to corrosion. A high-quality silicone extrusion, which is chemically bonded to the strip, is far more resistant to this type of failure.
This is why we invest in accelerated aging tests in our lab. We put our products in a thermal chamber and cycle them from -40°C to 100°C, over and over, 24 hours a day. This simulates years of outdoor life in just a few weeks and allows us to see which designs and materials can truly withstand the stress.
Conclusion
Surviving extreme weather is not an accident; it is a result of intentional engineering. Choosing strips made with high-quality silicone and always mounting them in aluminum channels is the professional approach to ensure reliability from freezing winters to scorching summers.
-
Understanding material embrittlement is crucial for selecting durable LED strips that withstand cold temperatures. ↩
-
Learn about solder joint failure to ensure your LED strips are designed to last in extreme conditions. ↩
-
Explore the benefits of silicone housing for LED strips to maintain performance in freezing temperatures. ↩
-
Discover how ductile solder alloy enhances the durability of LED strips in cold environments. ↩
-
Understanding lumen depreciation is crucial for maintaining LED performance and longevity. Explore this link for in-depth insights. ↩
-
Color shift can ruin the aesthetic of your lighting. Learn how to prevent it and maintain consistent color quality. ↩
-
Voltage drop can significantly impact LED efficiency. Discover solutions to mitigate this issue and enhance performance. ↩
-
Using aluminum channels can greatly improve LED lifespan and performance. Find out how they work and their advantages. ↩
Interested in Our LED Solutions?
Get professional consultation and customized LED lighting solutions for your projects. Contact our expert team today.
Related Articles

How Do You Build Profitable Custom Vehicle and RV Interior LED Rope Lights?
You lose RV installation contracts because your interior lights fail on rough roads. Standard strips show bright dots on glossy…

How to Perfect Bookshelf and Display Cabinet LED Rope Lighting?
You lose retail clients when bookshelves look incredibly dark. Ugly shadows hide expensive products inside display cabinets daily. You need…

How to Master Mirror and Vanity LED Rope Light Installation?
Your clients complain about ugly shadows in their bathroom mirrors. Bad lighting ruins expensive vanity designs. You lose future contracts…
