
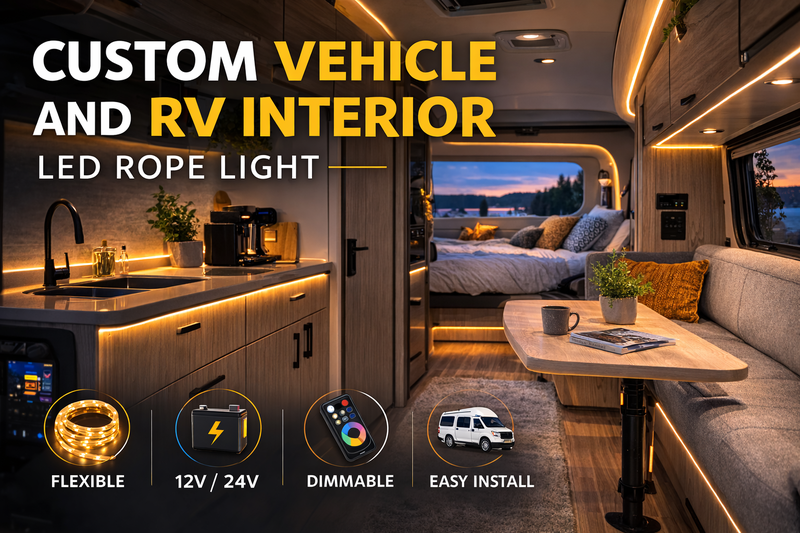
How Do You Build Profitable Custom Vehicle and RV Interior LED Rope Lights?
You lose RV installation contracts because your interior lights fail on rough roads. Standard strips show bright dots on glossy ceiling panels. You need professional materials to upgrade luxury vehicles.
To customize RV interior lights, install highly durable 12VDC or 24VDC COB high-density strips. Maintain a strict 15mm bending radius around tight van corners, cut on factory marks, and use proper silicone sealants.
I am Jeremy Hou. I own Rhstriplighting in China. I sell B2B B2C led strip lights wholesale. I talk to American buyers like Tom very often. Tom sells our commercial lighting products to custom van builders and RV contractors across the United States. His clients used to hate standard light strips. The cheap lights rattled loose during highway driving. The visible light dots looked terrible on custom wood cabinets. I helped Tom fix these mobile installation problems. Here is how to build stunning vehicle interiors and secure major profits.
Why Do Standard LED Strips Fail in Custom RV Interiors?
You install standard lights inside a custom dark van. The customer turns them on. Ugly dotted reflections ruin the glossy ceiling finish. You lose their future business.
Standard SMD strips leave massive empty spaces between the light chips. These gaps create harsh dotted reflections on shiny vehicle surfaces. You must upgrade to COB high-density flexible strip lights.
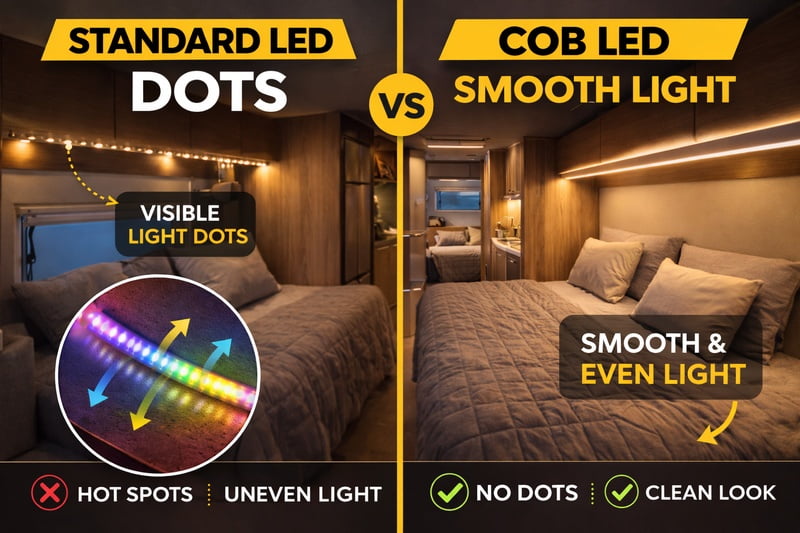
Overcoming Dotted Ceiling Reflections
Standard LED strips use old manufacturing technology. They place individual light chips very far apart on the flat circuit board. When you install these old strips inside a modern recreational vehicle, the van ceiling acts like a mirror. The human eye sees every single bright dot. This dotted look destroys the luxury feel of a custom mobile home. High-paying clients want a smooth and continuous wave of pure bright light. They refuse to look at cheap dotted lines inside their expensive custom vans. Standard lights fail this visual test.
We solve this problem by integrating COB high-density flexible strip light technology1. We pack up to 480 LED chips tightly together per meter into one single line. This creates a smooth light source. Our high-density boards have no dark areas. The light transmittance is high. These strips offer a soft light. This light creates a warm living space inside the tight vehicle. There is no sense of LED bead particles. The entire van fills with a wash of continuous illumination2. Tom faced huge issues when his contractors used old SMD lights. The end users complained about glare. The builders demanded refunds. Tom switched to our COB series. The builder complaints stopped. His sales volume doubled in six months.
You also need excellent color representation inside a dark vehicle environment. Standard strips use cheap materials. These materials make custom wood cabinets look dirty or yellow. Our COB strips feature Ra90 high color rendering3. This feature shows true natural colors. Expensive wood grains look rich. The leather seats look premium. Tom only sells these smooth COB strips to his custom van builders. His buyers love the continuous look. You protect your brand reputation.
| Lighting Feature | Standard SMD Strip | COB High-Density Strip | Visual Impact in RV |
|---|---|---|---|
| Chip Spacing Rule | Placed very far apart | Packed tightly together | Eliminates dotted ceiling reflections4 |
| Continuous Light | Uneven | Smooth | Creates luxury mobile living spaces |
| Color Quality | Low CRI | High Ra90 CRI | Shows true natural wood colors |
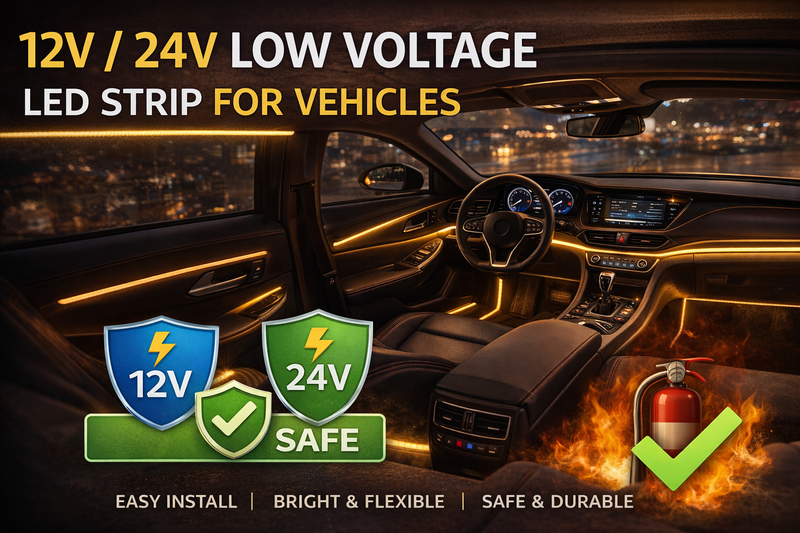
How Does Low Voltage Architecture Keep RV Interiors Safe?
You use poor power choices inside a metal vehicle frame. The wiring gets hot. The heavy load drains the battery too fast. The client gets stuck in the dark woods.
Recreational vehicles run on direct current battery setups. You must match this by installing 12VDC or 24VDC low voltage LED strips. This ensures safe operation and prevents electrical vehicle fires.
Protecting the Van Battery System
Recreational vehicles operate on direct current house battery power. They do not use standard home grid electricity unless they plug into a heavy shore power cord. If an installer uses standard high-voltage lights with a cheap bulky converter, the system becomes unstable. Vehicles vibrate on rough dirt roads. High voltage lines can rattle loose. A loose high voltage wire inside a conductive metal van creates a deadly shock hazard. You must avoid this installation risk. Tom warns all his contractors about this. One of his former clients burned down an entire class B camper by mixing 110V components with cheap wiring.
We manufacture our COB light strips using strict low voltage safety architecture. We offer both 12VDC and 24VDC custom power options. These voltages match common vehicle battery banks5. The low voltage design consumes very little raw battery power. This fact is important for off-grid stealth camping. Campers need their house batteries to last for many dark days. Low voltage lighting ensures they get bright interiors without draining their expensive battery bank dry. The 12V and 24V options give builders flexibility.
Low voltage architecture produces low heat. RV wooden walls are thin. Trapped heat damages the internal foam insulation. We build our strips with thick double copper boards. This thick double copper board pulls the heat away from the light chips. It spreads the thermal energy6 across the line. The flexible LED tape stays cool to the human touch. The custom vehicle remains safe from fire risks7. Builders love this feature. They can mount the strips deep inside tight wooden channels. The lights do not melt the plastic housing limits.
| Power Source Type | Battery Drain Rate | Heat Level Generated | Vehicle Shock Safety Hazard |
|---|---|---|---|
| 110V/220V High Voltage | High | Dangerous | High fatal risk in metal vans |
| 12VDC Low Voltage | Low | Cool | Zero risk for 12V van systems |
| 24VDC Low Voltage | Low | Cool | Zero risk for large 24V RV buses |
Why Is the 15mm Bending Rule Critical for Vehicle Cabinets?
You bend the light strip tight to fit around a sharp wooden van cabinet. You hear a tiny sharp crack. Half of the expensive interior lighting goes dark.
You must protect the internal electrical paths. Never fold the delicate strips in half. Keep all vertical curves gentle with a bending radius greater than 15mm.
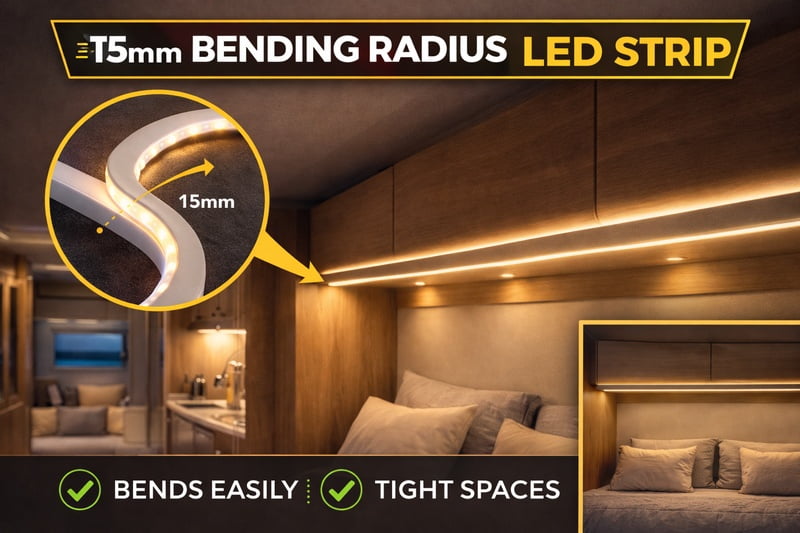
Surviving Tight Custom Woodwork
Custom camper vans feature many strange tight corners. Installers must run the lights around custom beds, curved ceilings, and tiny wooden kitchens. Installers grab the flexible strip. They bend it hard into the deep corner like a piece of cheap sewing string. This action destroys the premium product. The silicone cover hides a delicate real metal circuit board. When you fold a piece of thin flat metal, it breaks into two useless pieces. The electrical current stops. Tom handles warranty claims every week. He discovered that contractors were bending the 8mm and 10mm boards at 90-degree angles. He started sending training guides to stop this bad habit.
We print precise warning guidelines for all our B2B commercial partners. You must pay exact attention to the basic schematic diagram. The physical bending diameter8 must remain larger than 15mm. If you bend the strip tighter than 15mm, you stretch the top sensitive layer too far. You rip the required metal trace apart. You must curve the strip gentle inside the dark van cabinet area. Please do not fold it tight in half. The copper traces9 will fail.
You must understand the rigid horizontal bending limit. The copper base board is flat. It only curves up and down with ease. Please do not bend it horizontal. Do not force the flat tape to bend sideways along a straight smooth van wall. It will tear the fragile copper pads apart. To make a sharp square corner on a flat vertical surface, you must use scissors and wire jumpers.
| Physical Bending Move | Factory Approval | Immediate Impact on Strip |
|---|---|---|
| Curve up/down (R > 15mm) | Yes | Safe to power up inside RV |
| Fold flat tight in half | No | Breaks the tiny metal trace |
| Bend sideways | No | Rips pure copper base apart |
How Do Factory Cutting Marks Save Your Mobile Installations?
You reach the bottom floor edge of the van. The strip is too long. You cut it blind. The whole bottom lighting edge goes permanently dark.
You must cut the strip on the precise factory printed lines. Use sharp scissor blades to cut precisely and keep circuits active.
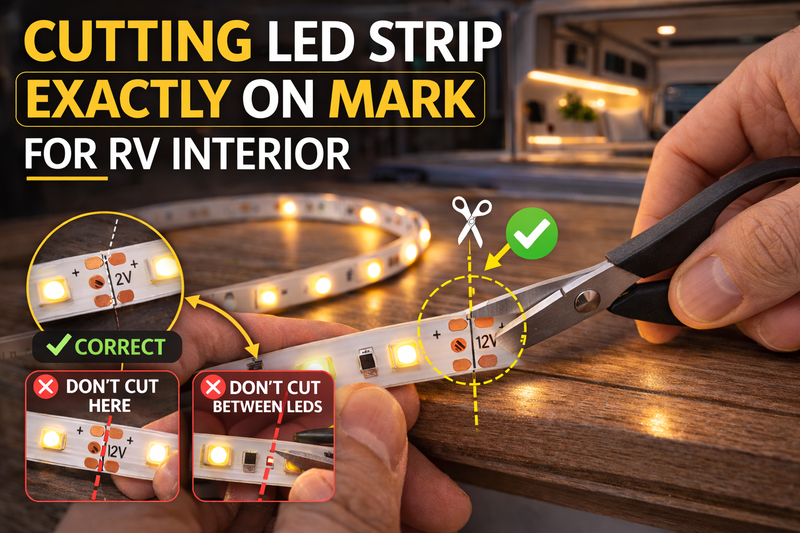
Securing Perfect Component Lengths
Custom camper vehicles feature random size dimensions. A basic standard factory roll of our light strip measures 5000mm long. Installers will need to cut the delicate material to exact size. Amateur van builders grab a dull toolbox knife. They cut the flexible tape in random spots. They ruin the whole section. The inner circuits separate from the power source. The client gets angry because the strip has blind spots. Tom educates his clients about this step. He tells his buyers to buy the correct voltage version to match their cutting length10 needs.
We engineer obvious cutting lines onto the back of every light strip. The specific voltage changing the cutting distance. Our 12VDC COB led strip lights have a cutting length of 25mm. Our 24VDC COB led strip lights have a longer cutting length of 50mm. You check the bare brown back. You notice a bright bold line marked exact. You measure the custom van wall. You select the closest cutting mark. You use professional wire cutters11 or sharp scissors. You snap the board at the marked line.
If you miss the proper line, you ruin the circuit forever. You break the series connection. This creates a horrible ugly dark large spot. After you process a good cut, you must seal the end. You use pure neutral silicone to block nasty dust. Modern vans accumulate road dirt. You apply a waterproof end cap over the fresh cut. You protect the naked copper points from water. Your mobile installation stays bright for years. Your commercial buyers order from you again.
| Installer Cutting Action | Chosen Tool Type | Exact Cut Location | Final Visual Strip Result |
|---|---|---|---|
| Random reckless cut | Dull cheap toolbox knife | Anywhere random | Creates dead ugly dark sections |
| Proper professional cut | Sharp clean scissor blades | At 25mm or 50mm marks | Keeps vehicle light active |
| Crucial post-cut step | Silicone glue and cap | Freshly exposed edge | Blocks van dust |
Conclusion
Customizing RV interiors demands professional installation habits. Obey the 15mm bending limits, utilize 12VDC or 24VDC systems, and cut on the printed 25mm or 50mm marks to build flawless mobile lighting.
-
Explore this link to understand how COB technology enhances lighting quality and aesthetics in modern RVs. ↩
-
Find out how continuous illumination can transform spaces and improve overall ambiance in mobile living environments. ↩
-
Learn about the significance of high color rendering in achieving true color representation for luxury interiors. ↩
-
Discover effective solutions to avoid dotted reflections and enhance the visual appeal of your RV’s interior. ↩
-
Learn about battery banks and their importance in RVs, ensuring you have enough power for off-grid camping. ↩
-
Discover how effective thermal energy management in LED lighting can prevent overheating and enhance safety in your RV. ↩
-
Understand the potential fire risks in RV electrical systems and how to mitigate them for safer travels. ↩
-
Understanding bending diameter is crucial for maintaining the integrity of electrical components in custom woodwork. ↩
-
Exploring copper traces will help you grasp their role in ensuring reliable electrical connections in custom installations. ↩
-
Understanding cutting length is crucial for ensuring proper installation and avoiding damage to LED strips. ↩
-
Using professional wire cutters ensures clean cuts, preventing damage and ensuring the longevity of your LED strips. ↩
Interested in Our LED Solutions?
Get professional consultation and customized LED lighting solutions for your projects. Contact our expert team today.
Related Articles

How to Perfect Bookshelf and Display Cabinet LED Rope Lighting?
You lose retail clients when bookshelves look incredibly dark. Ugly shadows hide expensive products inside display cabinets daily. You need…

How to Master Mirror and Vanity LED Rope Light Installation?
Your clients complain about ugly shadows in their bathroom mirrors. Bad lighting ruins expensive vanity designs. You lose future contracts…

How Do You Build Profitable Custom LED Rope Light Signs and Letters?
You lose commercial clients because your custom signs look cheap. Standard lights show dark spots and break easily. You need…
