
How Do You Buy Outdoor LED Strips Like a Professional?
You’ve meticulously planned a high-end exterior lighting project. You think you’ve found the right product, but a nagging doubt remains. One mistake in the specifications—be it brightness, color accuracy, or waterproofing—and the entire project’s integrity, and your reputation, are on the line.
To buy outdoor LED strips like a professional, you must evaluate four key areas: 1) The waterproofing method (silicone, not epoxy) and IP rating, 2) The light quality (lumens, CCT, and CRI), 3) The system integrity (voltage, power supplies, and connectors), and 4) The installation hardware (mounting channels).
As a manufacturer, I field questions from lighting professionals every day. I see where the confusion lies and what small oversights lead to big project failures. A successful outdoor installation isn’t about finding one "best" product; it’s about making a series of correct choices to build a complete, robust system. This guide is the checklist I share with my most discerning clients, like Tom, who need to get it right the first time. We will walk through every step, from the raw materials to the final installation, so you can specify and source your next outdoor project with absolute confidence.
How Do You Ensure the Strip Survives a Harsh Outdoor Environment?
You specified an IP67-rated strip. It looked great for the first season, but now it’s yellow, cracked, and full of condensation. The IP rating was correct, so what failed? The marketing material didn’t tell you the whole story about durability.
True outdoor durability comes from the combination of the correct IP rating (IP65/IP67/IP68) for the location and, more importantly, the use of a UV-stable, full silicone extrusion material. Cheaper epoxy or PU coatings will inevitably fail under sun exposure, rendering the IP rating useless.
This is the most critical lesson in outdoor lighting: not all "waterproof" products are created equal. The IP rating only tells you a product’s water resistance when it’s brand new. It doesn’t tell you if it will maintain that resistance after a year of relentless sun, rain, and temperature swings. I have seen clients burned by this countless times. They choose a product that technically meets the IP spec but is made with inferior materials. The sun’s UV rays break down the cheap coating, the seal fails, and water gets in. As a factory owner whose reputation is built on reliability, I advise my clients to make material science their first consideration.
A Deeper Dive into Durability: Materials and Ratings
Let’s break this down into a two-step validation process that every professional buyer should use.
-
Step 1: Choose the Right IP Rating1
First, match the Ingress Protection rating to the environment. For outdoor use, the first digit must be a ‘6’ (dust-tight). The second digit is for water:- IP65: Protects against water jets. Ideal for areas protected from direct downpours, like covered porches or soffits, that might get hit with wind-driven rain.
- IP67: Protects against temporary immersion (up to 1m for 30 mins). This is the workhorse for most landscape and facade lighting where the strip might sit in puddles or be hit by sprinklers.
- IP68: Protects against continuous submersion. This is only necessary for underwater applications like inside pools, fountains, or ponds.
-
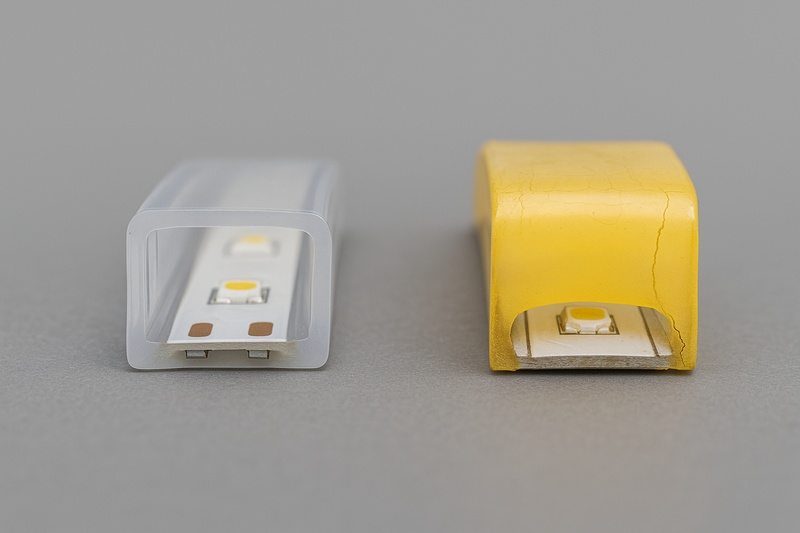
Step 2: Scrutinize the Waterproofing Material2
This is the professional’s litmus test. Once you’ve chosen the IP rating, you must confirm how that rating is achieved.- Avoid: Epoxy Resin3 or Polyurethane (PU) Glue Coating. This method is cheap. The strip is just covered with a clear glue. This material has poor UV stability. It will turn yellow, which pollutes the color of the light. It will also become hard and brittle, developing micro-cracks that let in moisture. This is a guaranteed point of failure.
- Insist On: Full Silicone Extrusion4. In this process, the strip is encased in a jacket of high-grade silicone. Silicone is naturally immune to UV damage, so it won’t yellow or crack. It stays flexible in extreme heat and cold. This is the only method that ensures the strip will maintain its IP rating for years, not months.
| Material | UV Stability | Durability | Professional Recommendation |
|---|---|---|---|
| Epoxy / PU Resin | Poor | Becomes yellow, hard, and brittle. Cracks easily. | Reject. Unsuitable for any serious, long-term outdoor project. |
| Silicone Extrusion | Excellent | Stays clear and flexible. Resists cracking. | Mandatory. The only reliable choice for professional outdoor use. |
How Do You Choose the Right Brightness and Color Quality?
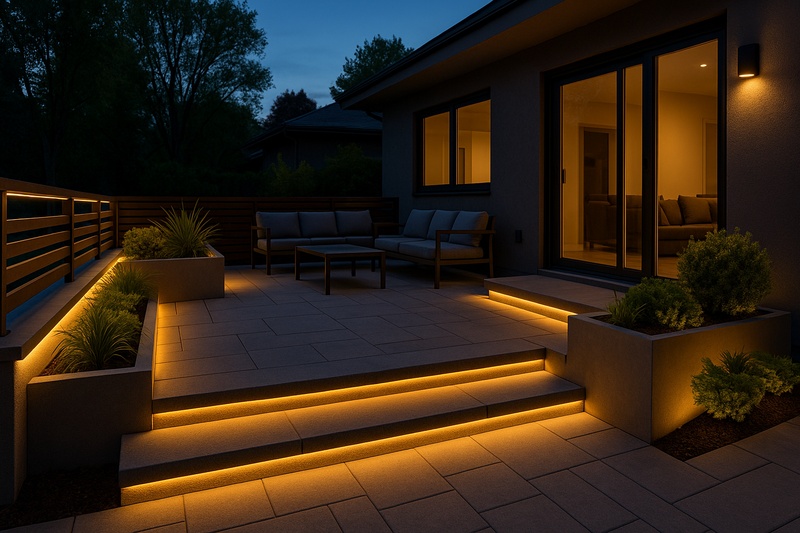
The outdoor lights are installed, but the effect is disappointing. The facade lighting is too dim to make an impact, or the light on the beautiful stone patio makes it look washed out and dull. The light is on, but it’s not doing its job.
Select brightness based on lumens per meter/foot, not just watts. For color, choose the correct CCT (e.g., 3000K for warmth) and insist on a high CRI (90+) to ensure the colors of landscape and building materials are rendered beautifully and accurately.
Once you’ve ensured the product will survive, you need to ensure it performs. The quality of the light itself is what creates the mood and reveals the beauty of the architecture or landscape. This is where many buyers focus only on price and overlook the specifications that directly impact the visual outcome. An experienced buyer like Tom knows that his clients aren’t just buying lights; they are buying an effect. Using light with poor color rendering can make a multi-million dollar project look cheap. Understanding lumens, CCT, and CRI is essential to controlling the final aesthetic.
A Deeper Dive into Light Quality Metrics
Let’s demystify these three key performance indicators so you can specify them with confidence.
-
Brightness: Lumens, Not Watts
Wattage tells you how much energy a strip uses, not how much light it produces. The correct metric for brightness is lumens5.- Accent & Ambiance (e.g., under railings): 300 – 600 lumens/meter (approx. 100-200 lm/ft) is often sufficient.
- Architectural Highlighting (e.g., washing a wall): 800 – 1500 lumens/meter (approx. 250-450 lm/ft) is a good target.
- Functional Task Lighting (e.g., outdoor kitchen): 1200 – 2000+ lumens/meter (approx. 350-600+ lm/ft) may be needed.
Always check the lumens-per-meter/foot on the spec sheet. If a supplier can’t provide it and only talks about watts, it’s a red flag.
-
Color Temperature: Correlated Color Temperature (CCT)6
This measures the color appearance of the light, from warm to cool, measured in Kelvin (K).- ~2700K: Very warm, intimate, candle-like glow. Great for residential patios and seating areas.
- 3000K: Warm white. The industry standard for creating a welcoming yet clean look on most architectural materials.
- 4000K: Neutral/cool white. Good for modern commercial facades or for highlighting greenery (can make greens "pop").
- 5000K+: Daylight/cool blue. Can feel sterile and is best reserved for security or very specific commercial applications.
-
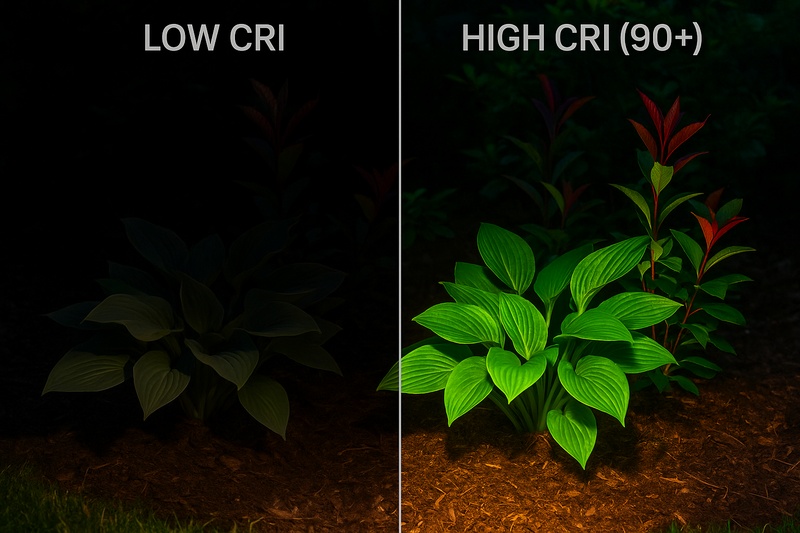
Color Accuracy: Color Rendering Index (CRI)7
CRI measures how accurately a light source reveals the true colors of objects, on a scale of 0-100. The sun is 100 CRI. For outdoor use, this is critical.- CRI 80+: The absolute minimum acceptable for any professional job.
- CRI 90+: The professional standard. This ensures that the rich browns of wood, deep greens of plants, and nuanced tones of stonework are all rendered vibrantly and naturally. Using a low-CRI light can make expensive materials look flat and lifeless. As a quality-focused factory, we use high-CRI-binned LEDs8 for all our professional-grade strips.
What Power and Control System Do You Need?
You found the perfect high-CRI, IP67 silicone strip. But it’s a 24V strip, and you only planned for 12V power supplies. Or worse, you cut the strip and realize the waterproof connectors you bought from another vendor don’t fit. The whole project grinds to a halt.
Standardize on a 24V system for better stability over long runs. Calculate total wattage, then oversize your IP67-rated power supply by 20%. Critically, use a system of factory-installed, injection-molded waterproof connectors to ensure every connection point is secure and reliable.
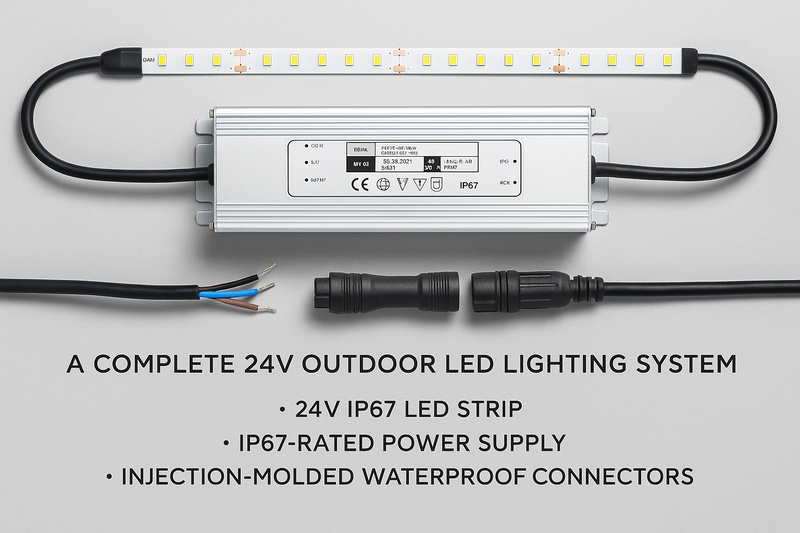
A lighting strip is not a standalone product; it’s the final piece of an electrical system. Getting the system architecture right is just as important as selecting the strip itself. This is where planning prevents poor performance. Issues like voltage drop (where lights get dimmer at the end of a long run) and failed connections are the most common installation headaches. As a solutions provider, my goal is to help clients like Tom build an end-to-end system where every component is matched and rated for the job, eliminating guesswork and ensuring a smooth installation.
A Deeper Dive into System Architecture
Let’s build a reliable system by making three key decisions upfront.
-
1. Choose Your Voltage: 24V is the Professional Standard9
While 12V strips exist, 24V is superior for almost all professional outdoor projects. According to Ohm’s Law, for the same power (wattage), a higher voltage system draws less current (amps). Less current means less voltage drop.- 12V DC: Prone to noticeable voltage drop after just 5 meters (16 ft). Requires more wiring and more power supplies for long projects.
- 24V DC: Can typically run up to 10 meters (32 ft) with minimal voltage drop. This means fewer power supplies, less complex wiring, and more consistent brightness. For professional outdoor jobs, 24V is the default choice.
-
2. Select the Power Supply: The IP67 Workhorse
The power supply (driver) must be as tough as the strip.- Rating: It must be IP67 rated10. This means it’s fully sealed against dust and water. Do not use an indoor power supply in an outdoor junction box; it will fail from condensation.
- Sizing: This is crucial. Calculate the total wattage of your LED strip run (
Watts per Meter x Total Meters). Then, multiply that total by 1.2. This 20% headroom is a safety margin that prevents the power supply from being overworked, ensuring a long and reliable life. A 50W strip run needs at least a 60W power supply.
-
3. Demand Waterproof Connectors: The Weakest Link Fortified
Every time you cut a waterproof strip, you create a potential point of failure.- The only reliable solution is a factory-made, injection-molded connector11. At the factory, we solder the cable to the strip and then use a machine to mold a thick, waterproof jacket around the entire joint. It becomes one solid piece.
- Always plan your runs and order your strips in the custom lengths you need with these connectors pre-installed. This small planning step eliminates the single biggest risk in any outdoor strip lighting installation.
Conclusion
To buy outdoor LED strips like a pro, you must be systematic. Prioritize a silicone-extruded body and the correct IP rating. Demand high-CRI light for true color, standardize on a 24V system with an oversized IP67 power supply, and use factory-molded connectors. This is how you build a system that lasts.
-
Understanding IP Ratings is crucial for selecting the right lighting for outdoor environments, ensuring durability and safety. ↩
-
Discovering the best waterproofing materials can significantly enhance the longevity and performance of outdoor lighting installations. ↩
-
Exploring the limitations of Epoxy Resin helps buyers avoid common pitfalls in outdoor lighting durability. ↩
-
Silicone Extrusion offers superior UV stability and durability, making it the best choice for long-lasting outdoor lighting solutions. ↩
-
Understanding lumens is crucial for selecting the right lighting for your space, ensuring optimal brightness and energy efficiency. ↩
-
Exploring CCT helps you choose the perfect light color for your environment, enhancing mood and aesthetics. ↩
-
Learning about CRI is essential for ensuring that colors appear true and vibrant under artificial lighting. ↩
-
Discovering the advantages of high-CRI-binned LEDs can elevate your lighting projects, ensuring quality and visual appeal. ↩
-
Understanding the advantages of 24V systems can enhance your outdoor project efficiency and reliability. ↩
-
Learn about the importance of IP67 ratings to ensure your power supply withstands outdoor conditions. ↩
-
Explore the benefits of using factory-made connectors for a reliable and durable outdoor lighting installation. ↩
Interested in Our LED Solutions?
Get professional consultation and customized LED lighting solutions for your projects. Contact our expert team today.
Related Articles

How Do You Build Profitable Custom Vehicle and RV Interior LED Rope Lights?
You lose RV installation contracts because your interior lights fail on rough roads. Standard strips show bright dots on glossy…

How to Perfect Bookshelf and Display Cabinet LED Rope Lighting?
You lose retail clients when bookshelves look incredibly dark. Ugly shadows hide expensive products inside display cabinets daily. You need…

How to Master Mirror and Vanity LED Rope Light Installation?
Your clients complain about ugly shadows in their bathroom mirrors. Bad lighting ruins expensive vanity designs. You lose future contracts…
