
How Do You Choose Between Addressable and Non-Addressable LED Strips?
Your client has a vision. For one project, they want a clean, elegant, single-color glow in a ceiling cove. For another, they want a dynamic, color-chasing media wall for a corporate event. You know LED strips are the answer, but you see two very different types at vastly different price points. If you choose the wrong one, you either fail to deliver the effect or waste a huge amount of money on technology you don’t need.
The choice is simple and depends entirely on your desired lighting effect. Choose Non-Addressable strips for static, uniform color applications where the entire strip is one color at a time. Choose Addressable "pixel" strips when you need dynamic, chasing, or multi-color effects where sections of the strip light up independently.

As a manufacturer, this is one of the most critical conversations I have with my clients. Understanding this single difference is the key to designing correctly, quoting accurately, and delivering exactly what the end-user expects. A savvy buyer like Tom knows that specifying the wrong technology can kill a project’s budget or its creative impact. The technology inside these two types of strips is fundamentally different, which affects their cost, control systems, and ideal applications. Let’s go deep into what makes each type tick, so you can make the right choice with 100% confidence.
What Makes a Non-Addressable LED Strip Work?
Your project requires beautiful, consistent under-cabinet lighting. You need it to be dimmable, reliable, and uniform—that’s all. You see options for complex controllers and coding, and it seems like massive overkill. How does the standard, simple LED strip actually function?
A non-addressable LED strip is a simple parallel electrical circuit. All the LEDs on the strip are wired together and receive the same command simultaneously. The entire strip functions as a single, controllable light source; it can only be one color and one brightness level across its entire length at any given moment.
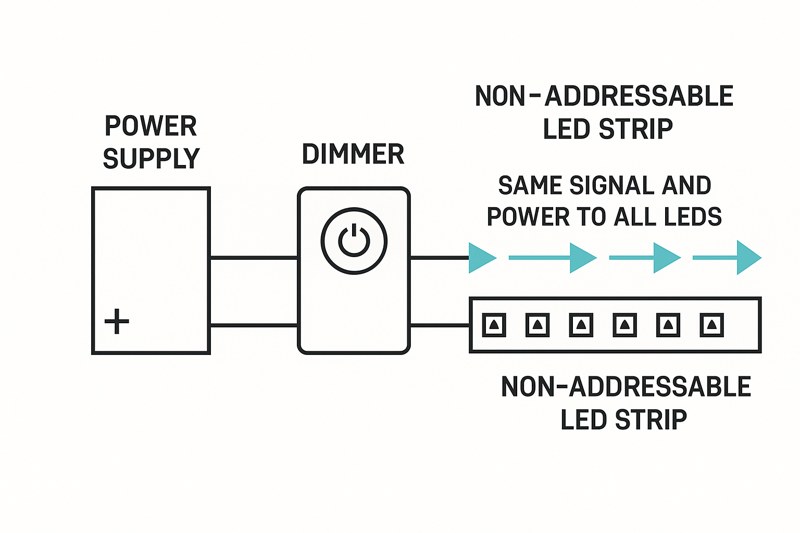
Think of a non-addressable strip as the workhorse of the lighting world. It is the evolution of the fluorescent tube—incredibly versatile, efficient, and perfect for the majority of general lighting applications. Its beauty lies in its simplicity. Because there are no complex integrated circuits on the strip itself, it is extremely reliable and cost-effective to manufacture. This is the product you need for 80% of architectural and ambient lighting jobs: ceiling coves, task lighting, accent lighting, backlighting displays. The control is straightforward: for single-color strips, you use a simple PWM dimmer. For RGB strips, you use a basic RGB controller that tells the whole strip to change color at once.
A Deeper Dive into Non-Addressable Technology
This is the foundational technology that every lighting professional must know inside and out. It’s reliable, predictable, and delivers excellent results when used for its intended purpose.
-
The Circuitry: Simplicity is Strength
The strip is essentially two, three, or four parallel copper tracks (one for ground, and one for each color channel: R, G, B, or W). The tiny SMD LEDs are soldered across these tracks in small groups with a resistor. When you apply 24V power, every group of LEDs receives that power and lights up. There is no data signal, no logic, and no digital communication. This simple, robust design is what makes it so dependable for long-term installations where maintenance is difficult. As a manufacturer, we can ensure high quality by using a thick copper PCB for better heat management and minimal voltage drop, and by using high-quality-binned LEDs1 for perfect color consistency along the entire reel. -
Control Methods:
The control is analog in nature, even if the controller is digital. It works by modulating the power.- Single Color: A Pulse Width Modulation (PWM)2 dimmer controls brightness. It’s essentially a very fast switch that turns the power on and off thousands of times per second. The longer it stays "on" in each cycle, the brighter the light appears.
- RGB/RGBW: A simple controller has separate PWM channels for Red, Green, and Blue (and sometimes White). To create purple, it sends a high-power signal to the Red and Blue channels and a low signal to the Green channel. Every LED on the strip receives this blend of power and displays the exact same color.
| Application | Why Non-Addressable is the Right Choice |
|---|---|
| Architectural Cove Lighting | Provides a smooth, uniform, and elegant ambient glow. |
| Under-Cabinet & Task Lighting | Delivers bright, consistent light exactly where needed. |
| General Backlighting (Signs/Displays) | Creates an even, brilliant halo effect without distracting movement. |
| Retail Shelf Lighting | Highlights products with high-quality, high-CRI light that is consistent. |
| Landscape/Soffit Lighting | Offers durable and reliable outdoor illumination3 with a uniform appearance. |
Choosing non-addressable strips for these jobs ensures you get a high-quality result without paying for control features that would go unused.
What is a Truly "Addressable" LED Strip?
Your client wants the front desk of their hotel to come alive with a subtle, slow-flowing wave of the company’s brand colors. They want the lighting to be a feature, a dynamic piece of art. How can one strip of light show different colors in different places at the same time?
An addressable LED strip has a tiny microchip (an Integrated Circuit, or IC) controlling each individual LED or small group of LEDs. This IC gives each section a unique "address," allowing a controller to send commands to specific points along the strip, telling them what color and brightness to be, independent of all the others.
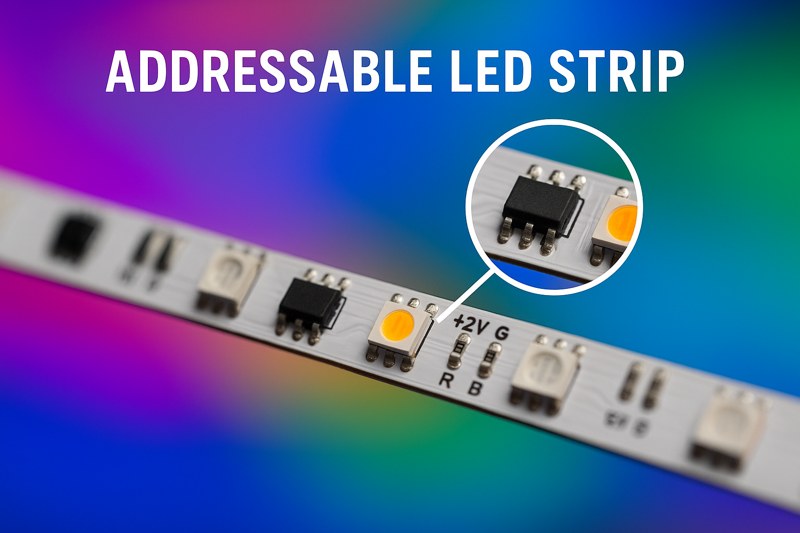
This is where the magic happens. The addition of that tiny IC transforms the LED strip from a simple light source into a low-resolution video screen. It’s often called a "pixel strip" for this reason—each controllable section is one pixel of light. This technology is the key to creating all dynamic effects: rainbow waves, color chases, meteor effects, and even mapping video content onto the lights. The strip requires more than just power; it needs a constant stream of digital data from a specialized controller. This complexity means a higher cost and a steeper learning curve, but it unlocks a universe of creative possibilities that are impossible with standard strips. This is the product you absolutely must use for media facades, stage and event lighting, and any "wow-factor" feature installation.
A Deeper Dive into Addressable Technology and Control
For a professional like Tom looking to offer high-end, custom solutions, mastering this technology is a huge competitive advantage.
-
The Technology: Data is King
An addressable strip has the usual power and ground lines, but it also has at least one crucial Data line4. A controller sends a digitally encoded signal down this line. The IC at the first pixel "reads" the part of the signal intended for it (e.g., "Pixel 1, turn Red at 80%"), acts on that command, and then passes the rest of the data signal down the line to the next pixel. This happens thousands of times per second, allowing for fluid animation. -
The Control System: The Brains of the Operation
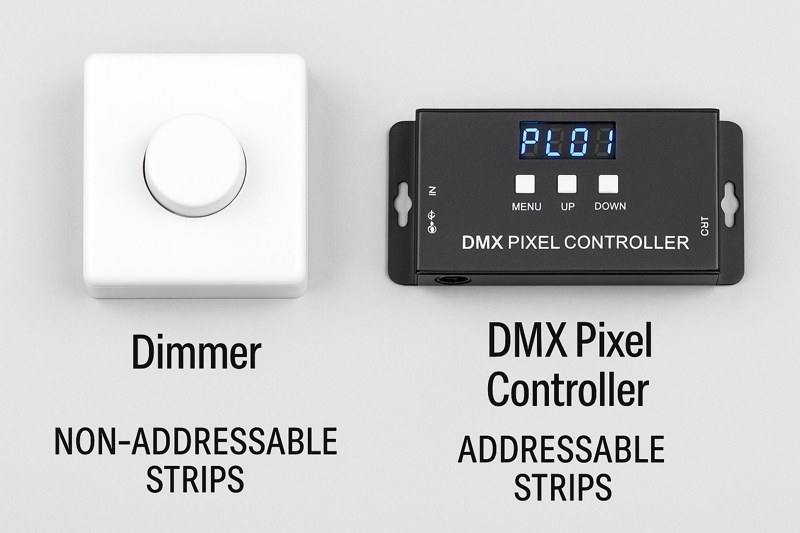
You cannot use a simple dimmer. You need a pixel controller6.- Basic Controllers: Many come with pre-programmed scenes and effects that you can select with a remote.
- Advanced Controllers: For custom effects, you need a controller that connects to software (like Madrix, Resolume, or custom code on an Arduino/ESP32). This is where the industry standard DMX512 protocol7 comes in. A DMX decoder translates the signal from professional lighting software into the language the strip’s ICs can understand. This gives designers frame-by-frame control over every single pixel, synchronizing the lighting perfectly with music or video.
| Feature | Non-Addressable Strip | Addressable Strip |
|---|---|---|
| Core Concept | One single light source | Hundreds of individual light sources (pixels) in one strip |
| Circuitry | Simple parallel circuit (power only) | Includes IC microchips and a data line |
| Control | Basic Dimmers & RGB Controllers | Requires a dedicated Pixel Controller (DMX, SPI) |
How Do You Choose the Right Controller and Power Supply?
You’ve selected the perfect LED strip, but now you’re looking at a list of controllers and power supplies. It can feel overwhelming. If you choose the wrong components, your lights might flicker, fail to turn on, or even get permanently damaged.
For any LED strip, first calculate the total wattage and choose a power supply that is 20% larger. For non-addressable strips, select a simple dimmer or controller rated for that wattage. For addressable strips, you must choose a specialized pixel controller that supports your strip’s IC chip and total pixel count.
Getting the power and control system right is just as important as choosing the strip itself. I’ve seen projects delayed because of incompatible controllers or under-specced power supplies. The good news is that it’s a straightforward process once you know the rules. The core principle is that the power supply (or driver) provides the raw energy, while the controller tells that energy what to do. The requirements for these two components change dramatically depending on whether your strip is addressable or not. Let’s break down the selection process for each system to make it foolproof.
A Deeper Dive into System Components
Let’s approach this logically. Power is the foundation, and the controller is the brain. You must spec both correctly.
The Universal Foundation: Calculating Power
No matter which type of strip you use, the power calculation8 is the same. This is step one, always.
- Find the watts per meter (or foot) on your strip’s spec sheet.
- Multiply that by the total length of your strip in meters. This gives you the total power consumption.
- Multiply that total by 1.2. This adds a critical 20% safety headroom. This prevents the power supply from overheating and failing prematurely.
- Formula:
(Watts per Meter x Total Meters) x 1.2 = Required Power Supply Wattage
A 10-meter run of a strip that uses 14.4W/meter needs a power supply of at least (14.4 10) 1.2 = 172.8W. In this case, you would choose the next standard size up, likely a 200W, 24V power supply.
- Formula:
Matching Components to Your Strip Type
Once you have your power supply size, you can select the right controller. This is where the paths diverge.
-
For Non-Addressable Strips: The system is simple. Power flows from the power supply, through the controller, and to the strip. The controller’s job9 is to modulate this power. Your main concern is ensuring the controller can handle the total amperage of your strip.
-
For Addressable Strips: This is more complex. The power supply often powers the controller and the strips separately (or in parallel). The controller’s primary job is to send a low-voltage data signal to the strip. Its an entirely different job. Your focus here is on data compatibility10, not power handling capacity.
| Component | Non-Addressable System | Addressable System |
|---|---|---|
| Power Supply | Sized based on total wattage + 20% headroom. | Sized based on total wattage + 20% headroom. (The rule is the same). |
| Controller | Simple PWM Dimmer or RGB/W Controller. | Specialized Pixel Controller. |
| Key Consideration | Controller’s Amperage/Wattage rating must exceed the strip’s total load. | Controller must be compatible with the strip’s IC Chip and Pixel Count. |
| Wiring Logic | Power -> Controller -> Strip | Power -> Strip & Controller (in parallel). Data -> Controller -> Strip |
Conclusion
The choice between non-addressable and addressable strips is not about which is "better," but which is the right tool for the job. For reliable, uniform lighting, use non-addressable strips with a simple controller. For dynamic effects, use addressable strips with a compatible pixel controller. Always power your system with a correctly sized power supply.
-
Exploring high-quality-binned LEDs can enhance your knowledge of color consistency and quality in lighting applications. ↩
-
Understanding PWM is crucial for optimizing brightness control in lighting systems, ensuring efficiency and performance. ↩
-
Discovering techniques for outdoor illumination can help you create effective and long-lasting lighting solutions. ↩
-
Understanding the Data line is crucial for mastering addressable technology and enhancing your projects. ↩
-
Discovering the different IC chips will enable you to select the best components for your specific lighting needs. ↩
-
Learning about pixel controllers will help you choose the right one for your projects, ensuring optimal performance. ↩
-
Exploring the DMX512 protocol will provide insights into advanced lighting control techniques and enhance your design capabilities. ↩
-
Understanding power calculation is crucial for ensuring your LED strips function safely and efficiently. ↩
-
Exploring the controller’s job will help you grasp how to effectively manage your LED strip’s performance. ↩
-
Learning about data compatibility can enhance your understanding of how to optimize addressable LED strips. ↩
Interested in Our LED Solutions?
Get professional consultation and customized LED lighting solutions for your projects. Contact our expert team today.
Related Articles

How Do You Build Profitable Custom Vehicle and RV Interior LED Rope Lights?
You lose RV installation contracts because your interior lights fail on rough roads. Standard strips show bright dots on glossy…

How to Perfect Bookshelf and Display Cabinet LED Rope Lighting?
You lose retail clients when bookshelves look incredibly dark. Ugly shadows hide expensive products inside display cabinets daily. You need…

How to Master Mirror and Vanity LED Rope Light Installation?
Your clients complain about ugly shadows in their bathroom mirrors. Bad lighting ruins expensive vanity designs. You lose future contracts…
