
How Do You Connect and Extend Outdoor LED Strips?
Your outdoor lighting looks perfect, but one connection fails. Now a whole section is dark, ruining the effect. Repairing a sealed connection on-site is a nightmare.
To extend strips, cut only on the designated copper pads. For the most reliable connection, solder the wires and seal the joint with adhesive-lined heat shrink tubing. For an easier method, use IP67-rated waterproof connectors filled with silicone sealant before closing.
A bad connection is the weakest link in any installation. I’ve seen countless projects in the US where installers used indoor "clip-on" connectors for outdoor jobs. They failed within the first season. As the owner of Rhstriplighting, I want to share the factory-level techniques that ensure your connections are as durable as the strips themselves. Getting this right prevents frustrating callbacks and protects your reputation.
Should You Solder or Use Connectors for Outdoor Strips?
You need to join two strips or add a power lead. You see quick-fit connectors, but you’ve also heard that soldering is better. You’re worried one method will fail in the rain.
Soldering provides the most durable and electrically reliable connection. However, it requires skill. Waterproof connectors are much faster to install but can be a point of failure if not sealed correctly with dielectric grease or silicone.
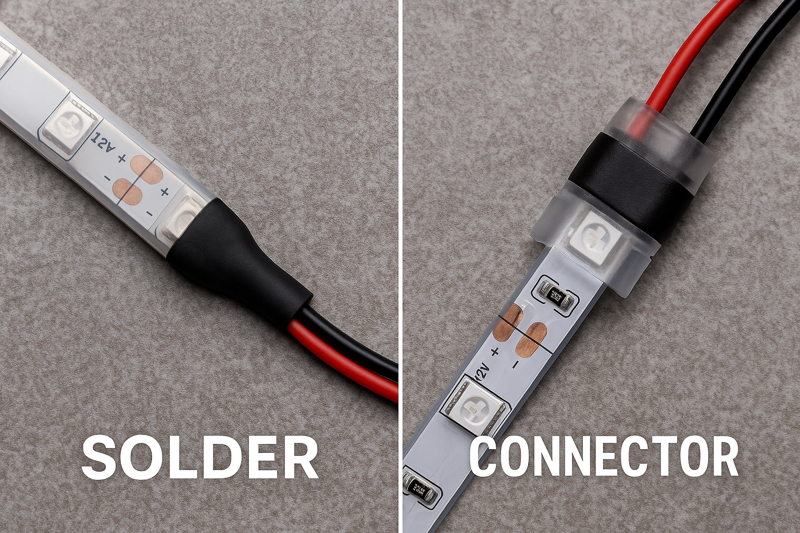
For professionals, this is a big debate: speed versus reliability. Many contractors I work with prefer connectors because time is money. A good quality, IP67-rated connector can work well, especially if you add extra waterproofing. But from an engineering standpoint, a properly soldered joint is superior. It’s a direct, permanent, metal-to-metal bond that won’t loosen with vibration or temperature changes. It also has a lower profile, making it easier to hide. I once worked with a high-end lighting designer in California who specified soldered joints for a multi-million dollar coastal home. He knew that the salty, humid air would corrode anything but a perfectly sealed, soldered connection. While connectors are convenient, soldering is the method I trust for projects where failure is not an option.
Solder vs. Connector: A Professional’s Choice
The right choice depends on the project’s demands for longevity, budget, and the installation environment.
| Feature | Soldering | Waterproof Connector1 | Recommendation |
|---|---|---|---|
| Reliability | Excellent. A permanent, low-resistance bond. | Good to Fair. Can loosen over time; contact points can corrode. | For mission-critical or inaccessible locations, always solder. |
| Waterproofing | Excellent. Sealed with adhesive heat shrink tubing. | Good. Relies on gaskets and requires extra sealant. | Solder provides a more robust, integrated seal. |
| Installation Speed | Slow, requires skill and tools (soldering iron). | Fast, requires only basic tools. | Connectors win for speed and ease on large projects. |
| Profile / Size | Very low profile, easy to hide. | Can be bulky and hard to conceal. | For a clean aesthetic, especially in channels, solder2. |
Where Do You Safely Cut Outdoor LED Strips?
You need to shorten an LED strip to fit a specific length. You’re afraid that cutting it in the wrong place will destroy the entire section, wasting material and time.
You can only cut an LED strip on the designated "cut lines." These are clearly marked, usually with a scissors icon, and run through the center of the copper solder pads. Cutting anywhere else will damage the circuit and cause that segment to fail.

This is a fundamental skill, but it’s surprising how often it goes wrong on a job site. The LED strip is not one continuous circuit; it’s a series of short, independent circuits. The cut lines are the points between these circuits. For example, a 24V strip is typically designed with circuits of 6 LEDs. The cut mark appears after every 6th LED. If you cut in the middle of a 6-LED segment, that whole segment will fail because you’ve broken its circuit. Before starting any project, I always advise my OEM clients to train their installers to identify these marks. For outdoor, silicone-coated strips, it requires an extra step: you must use a sharp craft knife to carefully cut away the silicone sleeve first to expose the cut line and pads clearly before making the final cut. A clean cut is essential for getting a good connection, whether you are soldering or using a connector.
Understanding LED Strip Segments
Knowing the segment length helps in the design phase, not just during installation.
| Voltage | Typical LEDs per Segment | Typical Cut Interval3 | Impact on Design4 |
|---|---|---|---|
| 12V DC | 3 LEDs | ~5 cm (2 inches) | Offers more precise length adjustments. |
| 24V DC | 6 or 7 LEDs | ~10 cm (4 inches) | Less precise, but better for longer runs. |
| High Voltage AC | Varies widely | ~50-100 cm (20-40 inches) | Very imprecise; suitable only for long, straight runs. |
| Actionable Insight | Always check the product spec sheet for the exact cut interval before finalizing project measurements. |
How Do You Make Your Connections Fully Waterproof?
You’ve connected your outdoor strips, but you know that moisture is the number one killer of LED systems. A single drop of water in a connection can cause a short circuit.
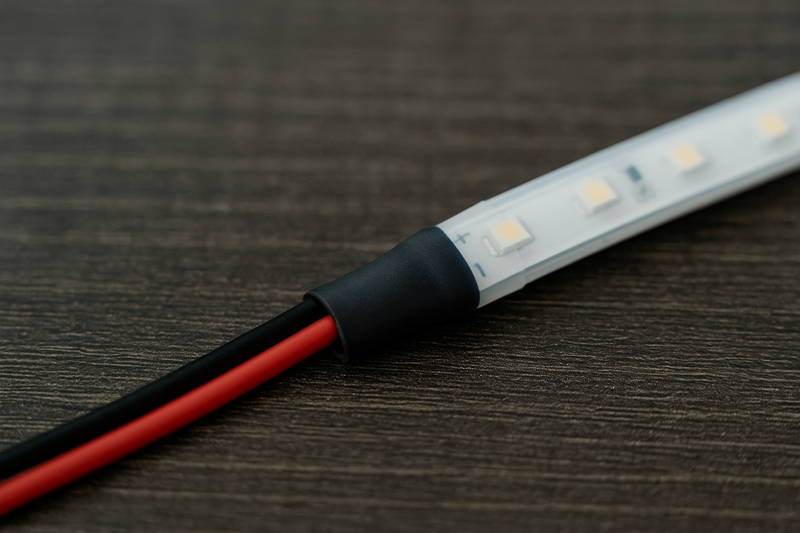
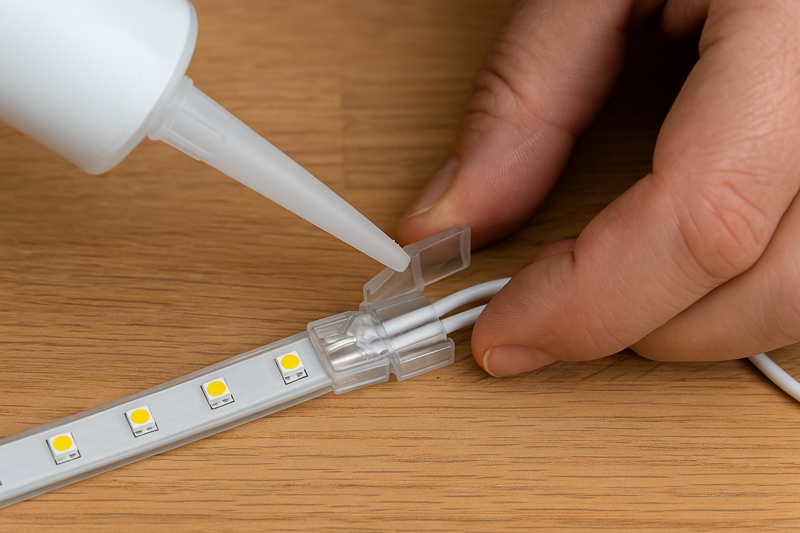
To fully waterproof a connection, you must use a multi-layer approach. For soldered joints, use adhesive-lined heat shrink tubing. For connectors, inject non-conductive silicone sealant or dielectric grease inside the connector before closing it to displace all air and moisture.
This is where many installations fail. An outdoor LED strip is rated IP67, which is great. But the moment you cut it, you create an unrated connection point. You have to restore that waterproof rating yourself. Adhesive-lined heat shrink tubing is my preferred method. When you heat it, a special glue on the inside melts and flows around the joint, creating a solid, impenetrable seal. It’s the same technology used in marine and automotive applications. For connectors, simply clamping them shut is not enough. Tiny air gaps will remain, and over time, condensation can form inside. By injecting silicone sealant, you physically push out all the air and create a void-free, waterproof block around the electrical contacts. This is a simple ten-second step that turns a good connection into a great one that will survive years of rain and snow.
Waterproofing Methods Comparison
Choose your sealing method based on the connection type.
| Method | Connection Type | Process | Durability |
|---|---|---|---|
| Adhesive Heat Shrink5 | Soldered Wires | Slide tube over joint, apply heat until adhesive flows out. | Excellent. Creates a factory-grade, permanent seal. |
| Silicone Injection6 | Waterproof Connectors | Partially close connector, inject sealant, fully close. | Good. Effective, but depends on thorough application. |
| End Caps with Silicone | End of a Strip Run | Fill the end cap with silicone, then press it onto the strip end. | Excellent. The standard way to terminate a run. |
| Non-Waterproof Methods | Electrical Tape, standard heat shrink | Not for outdoor use | Failure is guaranteed. Avoid at all costs. |
How Do You Power Long, Extended Runs Without Dimming?
You need to create a very long, continuous line of light. You’re worried that if you connect too many strips end-to-end, the lights will get dimmer and dimmer the farther they are from the power source.
To avoid dimming (voltage drop) on long runs, you must power them correctly. Never connect more than 10-15 meters of 24V strip end-to-end. For longer runs, run a separate power wire from the power supply to the start of each new section (parallel connection).
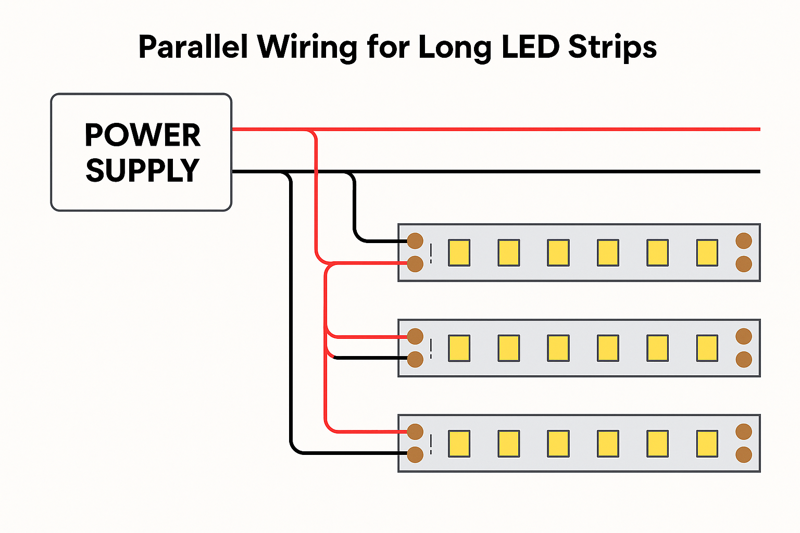
This is a system design issue that I discuss daily with lighting designers. Think of the thin copper traces on the LED strip like a tiny wire. They can only carry so much current over a certain distance before the voltage starts to drop. Connecting strips in a long series (daisy-chaining) forces all the power for the entire run through that first strip. It gets overloaded, and the voltage at the far end plummets, causing dimming. The professional solution is to run a thicker "bus" wire, usually a 14 or 16-gauge outdoor-rated cable, alongside your installation. Then, every 10 meters or so, you tap into that main power line to start a new, fresh run of the LED strip. This is called a parallel or star connection. It ensures every section of the strip gets the full, correct voltage directly from the source.
Power Injection7 Strategies for Long Runs
This table outlines the best strategies for different project lengths.
| Total Length | Connection Method | Wiring Diagram | Why it Works |
|---|---|---|---|
| Up to 10m (32ft) | Single end connection | Simple: Power Supply -> Strip | The run is short enough that voltage drop is minimal. |
| 10m – 20m (32-65ft) | Center feed or dual end feed | Power Supply -> Middle of Strip, or wires to both ends. | Halves the distance the power has to travel along the strip. |
| Over 20m (65ft+) | Parallel "power injection" | Power Supply -> Main Bus Wire -> Multiple Strip Sections | Each section gets a fresh connection to the main power line. |
| Key Takeaway | Do not daisy-chain long runs. Always plan for power injection points in your design phase. |
Conclusion
Master outdoor connections by soldering for reliability, using connectors for speed, and always waterproofing with heat shrink or silicone. For long runs, use parallel wiring to prevent dimming.
-
Explore this link to understand the benefits and limitations of waterproof connectors in various applications. ↩
-
Discover why soldering is often the best choice for reliability and performance in electrical projects. ↩
-
Understanding the typical cut interval is crucial for precise design and installation of LED strips. ↩
-
Exploring the impact on design will help you make informed decisions for your LED strip projects. ↩
-
Explore this link to understand the benefits and applications of Adhesive Heat Shrink for creating durable, waterproof seals. ↩
-
Learn more about Silicone Injection to see how it can effectively seal waterproof connectors and ensure reliability. ↩
-
Understanding Power Injection is crucial for maintaining consistent brightness in long LED runs. Explore this link for expert insights. ↩
Interested in Our LED Solutions?
Get professional consultation and customized LED lighting solutions for your projects. Contact our expert team today.
Related Articles

How Do You Build Profitable Custom Vehicle and RV Interior LED Rope Lights?
You lose RV installation contracts because your interior lights fail on rough roads. Standard strips show bright dots on glossy…

How to Perfect Bookshelf and Display Cabinet LED Rope Lighting?
You lose retail clients when bookshelves look incredibly dark. Ugly shadows hide expensive products inside display cabinets daily. You need…

How to Master Mirror and Vanity LED Rope Light Installation?
Your clients complain about ugly shadows in their bathroom mirrors. Bad lighting ruins expensive vanity designs. You lose future contracts…
