
How Do You Connect Cut LED Strips Without Connectors?
Those bulky, plastic clip-on connectors create ugly dark spots and are notorious for failing. You’re trying to create a seamless, professional line of light, but these clips ruin the look and the reliability.
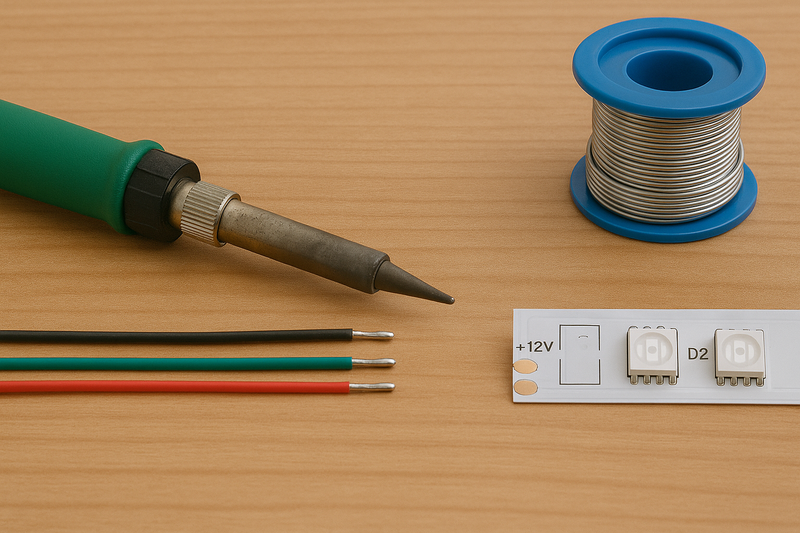
The best and most reliable way to connect cut LED strips is by soldering wires directly to the copper pads. This professional method creates a permanent, low-profile, and highly conductive bond that will not fail over time, unlike mechanical clip-on connectors.
From the factory floor, I can tell you that every internal connection within an LED strip is soldered. Clip-on connectors were designed for hobbyists, not for professionals who need an installation to last a decade. If you want a connection that is as reliable as the strip itself, you need to use the same method we do. This guide will show you how.
What is the Professional Method for Connecting Cut LED Strips?
You need to join two strips in a custom installation. But you know that clip-on connectors are the weakest link, guaranteed to cause flickering or failure down the line.
Soldering is the professional standard. By applying solder, you create a direct, fused metal bond between the wire and the strip’s copper pads. This results in a permanent electrical and mechanical connection that is far superior to any pressure-based clip.
When you get a call back to a job site, it’s almost never because the LEDs themselves have failed; it’s because a connection has failed. Using a clip is like using tape to hold a pipe together—it might work for a while, but it’s not a permanent solution. Soldering is like welding that pipe. It makes the connection point as strong, or even stronger, than any other part of the system. It is the only method I recommend to my professional clients.
Why Soldering is Superior
A soldered joint is fundamentally different from a clip-on connector. It’s a metallurgical bond, not just two pieces of metal being pushed together.
- Maximum Reliability1: A clip relies on physical pressure, which can loosen over time due to vibrations or thermal expansion and contraction. This leads to intermittent connections and flickering. A solder joint is a solid piece of metal that will not loosen.
- Lowest Profile: Soldered connections are incredibly compact. They can easily fit inside slim aluminum channels without causing shadowing or preventing the diffuser from snapping on. Clip-on connectors are bulky and often create an unsightly bulge.
- Better Conductivity2: A clean solder joint has extremely low electrical resistance, ensuring that maximum power reaches the next strip segment. Poor connections from clips can cause resistance, leading to heat buildup and voltage drop.
| Feature | Solderless Connector (Clip) | Soldered Connection |
|---|---|---|
| Reliability | Poor (Prone to failure) | Excellent (Permanent) |
| Appearance | Bulky, causes dark spots | Low-profile, seamless |
| Durability | Weak, loosens over time | Strong, resists vibration |
| Best For | Temporary mock-ups, hobbyists | Professional, permanent installations |
Is There a Reliable Way to Connect Strips Without Soldering?
You understand the benefits of soldering, but you’re looking for a faster, easier method on the job site. Is there any "solderless" option that doesn’t compromise the entire project?
Frankly, no. While some specialized piercing or compression connectors exist, they all rely on mechanical pressure. For professional use where reliability is key, soldering is the only method that guarantees a stable, long-term connection without introducing a significant point of failure.
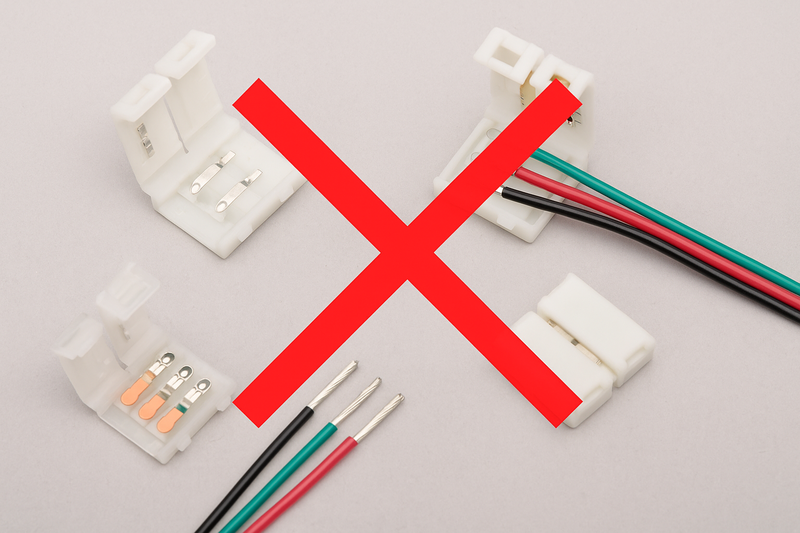
I get this question a lot, especially from installers looking to save time. The hard truth is that any time-saving from using a clip will be lost tenfold when you have to return to the site to fix it. These clips work by using tiny metal teeth to bite into the copper pads. Over time, moisture, and even just air, will cause those contact points to oxidize and corrode, leading to a failed connection. There is no magic product that can reliably replace a properly soldered joint.
The Trade-Off of Convenience
The desire for a solderless solution is understandable, but it’s important to analyze what you are giving up in exchange for convenience.
- The Myth of the "Pro" Connector: Some manufacturers market heavier-duty connectors. While they might be slightly better than the cheapest options, they still operate on the same flawed principle of pressure and piercing. They are not a substitute for soldering.
- The Inevitability of Corrosion3: When two different metals (the copper pad and the connector’s tine) are pressed together, a small amount of moisture is all it takes to start galvanic corrosion. This process eats away at the conductive surfaces, increasing resistance until the connection fails completely.
- The Risk vs. Reward4: The reward for using a clip is saving a few minutes per connection. The risk is the failure of the entire lighting installation, a damaged professional reputation, and the cost of a return visit. For a professional like Tom, that calculation is simple: the risk is never worth the reward.
| Connection Method | Installation Time | Long-Term Risk | Professional Grade |
|---|---|---|---|
| Solderless Clip | Fast (2 minutes) | High (Will Fail) | No |
| Soldering | Slow (5-10 minutes) | Very Low (Permanent) | Yes |
How Do You Power an LED Strip Without a Plug?
Your installation is sleek and integrated into the architecture, but the power solution is a clumsy wall adapter plugged into an outlet. How do you create a cleaner, fully hardwired system?
Professionals hardwire the strip’s power leads directly to a low-voltage, direct-wire power supply. This power supply is safely installed out of sight (e.g., in a closet or a NEMA box) and is connected to the building’s 120V AC wiring, often controlled by a standard wall switch.
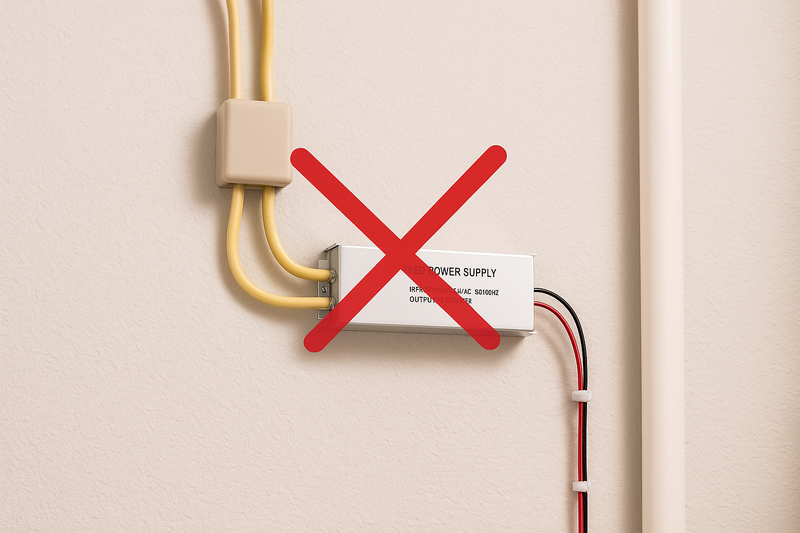
A plug-in adapter is a dead giveaway of a DIY or temporary installation. A permanent, professional project requires a hardwired power source. This method not only looks cleaner but is also safer and more reliable. It integrates the lighting into the building’s electrical system, allowing for control from a central wall dimmer or smart switch, just like any other architectural light fixture. This is the only way to deliver a truly high-end result for a client.
Integrating Power for a Seamless Look
Hardwiring is the process of moving from a portable plug to a permanent fixture.
- The Core Component: The key is a Class 2, UL-Listed direct-wire power supply5 (also called a driver). These are designed to be safely connected to your building’s main AC power by a qualified electrician.
- The Wiring Path: The high-voltage AC power (e.g., 120V in North America) connects to the input side of the power supply. The power supply then converts this to safe, low-voltage DC power6 (e.g., 24V). This low-voltage power is then run via appropriate in-wall rated wire to the location of the LED strip.
- The Final Connection: The low-voltage wires are then connected to the start of the LED strip. And what’s the best way to make that final connection? By soldering the wires directly to the strip’s copper pads for maximum reliability, bringing us right back to our main principle.
| Power Method | Appearance | Reliability | Installation |
|---|---|---|---|
| Plug-in Adapter | Clumsy, exposed wires | Fair | DIY, easy but unprofessional |
| Hardwired Supply | Clean, invisible | Excellent | Professional, integrated |
Can You Really Reattach an LED Strip After Cutting?
You’ve cut a strip to length for a project. Now you have a leftover piece. Is that expensive, high-quality strip now just waste, or can it be reused?
Yes, absolutely. Any piece of an LED strip can be reattached or reused as long as it has a set of exposed copper solder pads at the end. The strip is designed to be cut and reconnected at these designated points.
This is a fundamental part of the product’s design. We manufacture strips in long reels with the full expectation that installers will cut them to create custom lengths. The copper pads at each cut point are the gateways to the circuit. Think of them as built-in connection terminals. As long as you make your cuts on the marked lines, you preserve these terminals, and the piece can be powered up and used in another project.
Understanding the Cut Points
Knowing where and how to connect is critical.
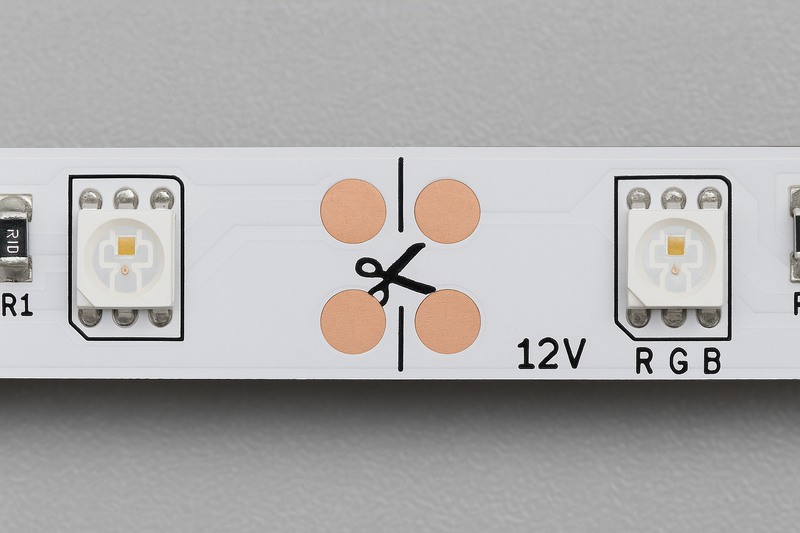
- The Scissor Mark7: All LED strips have a designated cut line, usually marked with a scissor icon. This is the only place you should ever cut the strip. Cutting anywhere else will damage the circuit on that segment.
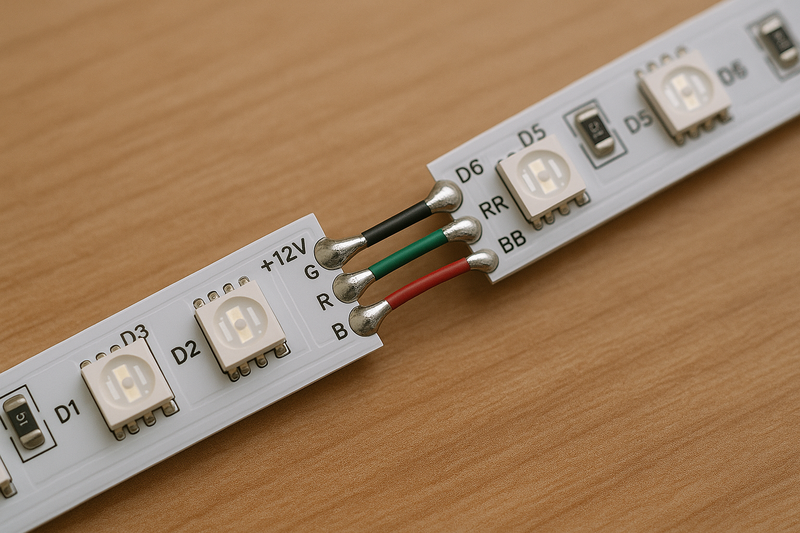
- The Copper Pads8: These small copper dots are the electrical contacts. For a simple single-color strip, you’ll have two pads: a positive (+) and a negative (-). For an RGB strip, you will typically have four pads (12V+, R, G, B). You must connect your wires to the correct corresponding pads for the strip to function properly.
- Reattaching Segments: To join two cut segments, you simply need to bridge these pads. You can do this by soldering a short wire from the (+) pad of the first strip to the (+) pad of the second, and the same for the (-) pad. This creates a continuous circuit, and the light will be seamless.
Conclusion
Skip the unreliable clips. The professional and only truly reliable way to connect cut LED strips is by soldering. It ensures a permanent, invisible, and durable connection that upholds the quality of your work.
-
Understanding maximum reliability in soldered connections can enhance your projects’ durability and performance. ↩
-
Exploring better conductivity will help you grasp how soldering can optimize your electrical systems. ↩
-
Understanding galvanic corrosion is crucial for maintaining reliable electrical connections and preventing failures. ↩
-
Exploring the risks of solderless connections can help professionals make informed decisions and avoid costly mistakes. ↩
-
Understanding this power supply is crucial for safe and effective hardwiring in your projects. ↩
-
Exploring this topic will enhance your knowledge of safe LED installations and energy efficiency. ↩
-
Understanding the scissor mark is crucial for safely cutting LED strips without damaging them. ↩
-
Learning about copper pads will help you connect LED strips correctly for optimal performance. ↩
Interested in Our LED Solutions?
Get professional consultation and customized LED lighting solutions for your projects. Contact our expert team today.
Related Articles

How Do You Build Profitable Custom Vehicle and RV Interior LED Rope Lights?
You lose RV installation contracts because your interior lights fail on rough roads. Standard strips show bright dots on glossy…

How to Perfect Bookshelf and Display Cabinet LED Rope Lighting?
You lose retail clients when bookshelves look incredibly dark. Ugly shadows hide expensive products inside display cabinets daily. You need…

How to Master Mirror and Vanity LED Rope Light Installation?
Your clients complain about ugly shadows in their bathroom mirrors. Bad lighting ruins expensive vanity designs. You lose future contracts…
