
How Do You Design the Perfect Patio and Deck LED Strip Lighting?
Your client has a beautiful new deck, but it becomes a dark, unusable space at night. They want lighting that feels luxurious and inviting, not a few harsh, glaring spotlights that ruin the mood and create trip hazards.
A great design layers indirect light to create ambiance, safety, and architectural focus. It uses warm, high-CRI LED strips in weatherproof channels under railings, stairs, and benches, all powered by a dimmable system to create a truly high-end outdoor living space.
As a manufacturer, I’ve seen countless projects. The difference between an average job and a spectacular one isn’t the amount of light; it’s the design intent behind it. A truly professional design is a complete system. It thinks about where the light goes, what kind of light it is, and what hardware will make it last. This guide is the blueprint for how to approach deck and patio lighting like a high-end lighting designer, ensuring a result that wows your client and protects your reputation.
Where Are the Most Effective Places to Install LED Strips on a Deck?
You know you want to use LED strips, but the large, flat expanse of a deck can be intimidating. Placing lights randomly will look amateurish and messy. Where do you start to get the most impact for your effort?
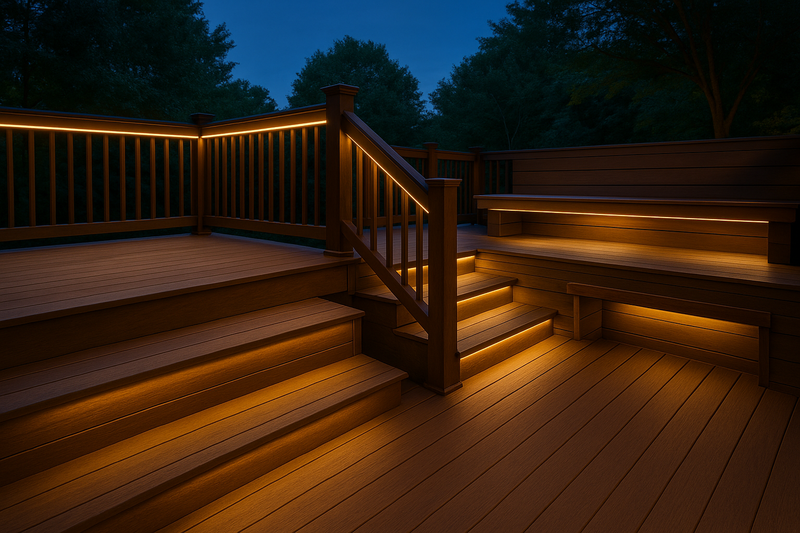
Focus on the three key zones for maximum effect: under the handrails for ambient safety, under the stair treads for dramatic navigation, and beneath built-in benches or counters to create a floating effect. These placements create layers of functional and beautiful indirect light.

This is the foundational principle of deck lighting design: see the light, not the fixture. By hiding the light source in these three strategic areas, you create a soft, glare-free environment that feels professionally designed. Each placement serves a purpose, layering together to form a cohesive and functional space. For a contractor like Tom, mastering these three placements is 90% of the battle. It’s a reliable formula that works on virtually any deck or patio, from a simple platform to a complex multi-level structure.
A Deeper Dive into Strategic Placements
Let’s break down the "why" and "how" for each of these core application zones.
-
Layer 1: The Ambient Layer1 (Under-Railing2)
This is your workhorse. It provides the main ambient light for the entire space.
- Design Goal: To cast a broad, soft wash of light onto the deck floor, defining the perimeter and providing safe general illumination without any glare.
- Technique: The LED strip, housed in a diffused aluminum channel, is mounted on the underside of the top handrail. For wood rails, a channel with a 45-degree lens can help direct the light inward onto the deck. For metal railings, slim channels can be attached with high-bond tape or small screws. The result is a clean, bright edge that makes the space feel secure and inviting.
-
Layer 2: The Safety Layer3 (Under Stairs)
This layer transforms a hazard into a stunning feature.
- Design Goal: To clearly illuminate each step for safe navigation while creating a dramatic "floating stair" visual effect.
- Technique: A strip is tucked into the nosing (the overhang) of each stair tread. It casts light directly onto the riser and tread below it. This is the perfect example of glare-free lighting; the light source is completely invisible to someone walking up the stairs. Careful wiring is key to a clean look.
-
Layer 3: The Accent Layer4 (Floating Features5)
This is where you add the "wow" factor.
- Design Goal: To create architectural interest by making heavy objects like benches, planters, or outdoor kitchen islands appear to float weightlessly.
- Technique: The strip is installed far back from the edge under an overhanging surface. This placement washes the deck or patio below with light, creating a deep shadow line under the object that tricks the eye.
| Placement Idea | Primary Design Goal | Best For | Professional Tip |
|---|---|---|---|
| Under-Railing | Ambient Light & Safety | Virtually any deck with railings. | Use a continuous channel for a seamless line. Avoids dark spots. |
| Under Stair Treads | Safety & Drama | Any set of two or more steps. | Use a durable, IP67-rated strip. These are close to the ground and get wet. |
| Floating Benches | Accent & "Wow" Factor | Decks with built-in seating or planters. | The deeper you hide the strip, the more magical the floating effect. |
| Pergola Beams6 | Overhead Ambiance | Decks with a pergola or other roof structure. | Route channels inside beams before assembly for a truly integrated, wireless look. |
| Patio Edge/Coping | Perimeter Definition | Stone patios or retaining walls. | Highlights the texture of the material and clearly marks the edge of the space. |
What Kind of Light Should You Choose for the Best Ambiance?
You’ve planned the placements, but now you have to choose the actual light strip. The wrong color can make an expensive hardwood deck look cheap and cold, and if it’s not bright enough, the effect will be lost.
For a sophisticated and inviting deck, always choose a warm white color temperature (2700K to 3000K) with a high Color Rendering Index (CRI) of 90+. It must be dimmable and housed in a fully weatherproof (IP67 silicone) strip to ensure longevity.
I cannot overstate this. As a manufacturer, this is the specification we recommend for 99% of high-end residential projects. The human brain associates warm light with fire and candlelight, making us feel relaxed and comfortable. A high CRI ensures that the natural colors of wood, stone, food, and even people’s skin tones are rendered accurately and beautifully. A cheap, low-CRI strip can make a beautiful red cedar deck look like dull, brown plastic. For a professional whose reputation depends on the final look, specifying the right quality of light is non-negotiable.
A Deeper Dive into Light Quality Specifications
Let’s unpack these three critical light quality metrics.
-
Color Temperature (CCT)5 – The Mood
CCT is measured in Kelvin (K). It describes how "warm" or "cool" the white light appears.
- 2700K: This is the color of a traditional incandescent bulb. It’s very warm, cozy, and intimate. Excellent for creating a relaxing, residential feel.
- 3000K: This is a slightly crisper, but still warm, white. It’s often called "soft white." It feels clean and welcoming and is the most popular choice for general outdoor lighting.
- 4000K and above: This is "cool white" or "daylight." It appears bluish and can feel clinical or commercial. I strongly advise against this for residential decks, as it ruins the cozy ambiance.
-
Color Rendering Index (CRI)6 – The Quality
CRI is a scale from 0 to 100 that measures how accurately a light source reveals the true colors of objects.
- Inadequate (CRI < 80): Colors will look washed out, distorted, or "off." Reds will look dull, wood will look flat. This is typical of very cheap LED strips.
- Professional Standard (CRI 90+): This is the minimum you should accept for a quality job. At 90+ CRI, wood grains are rich, plants are vibrant, and food on a plate looks delicious. It makes a huge difference in the perceived quality of the space.
- Our Standard (CRI 95+): At Rhstriplighting, we specialize in high-CRI products because we know designers and architects demand it for their clients. It’s a small detail that has a massive impact.
-
Brightness (Lumens)7 & Dimming – The Control
Brightness is measured in lumens per foot or meter. More is not always better.
- The Right Amount: For indirect deck lighting, you typically want between 150-300 lumens per foot. This is bright enough to be effective without being overwhelming.
- The Power of Dimming: The single most important feature for brightness is control. The "perfect" brightness for a lively party is different from the perfect brightness for a quiet, relaxing evening. Installing a dimmer is essential. It lets the client adjust the mood perfectly, taking your design from static to dynamic.
What Hardware Do You Need for a Professional Installation?
You’ve designed the layout and chosen the perfect light. Now you need to select the hardware that brings it all together and ensures it survives for years outdoors. Using the wrong components can lead to a great design failing in the first season.
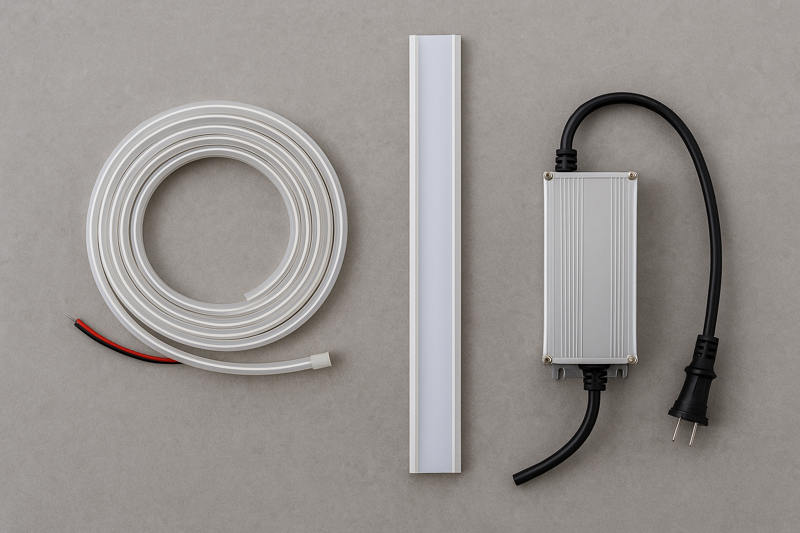
A professional system requires three core components: an IP67-rated silicone LED strip, appropriately sized aluminum channels with diffusers, and a high-quality, outdoor-rated Class 2 dimmable power supply. These components work together to protect the system from weather and heat.
This is where the factory-level expertise comes in. A deck lighting system is a chain, and it’s only as strong as its weakest link. A client like Tom can’t afford a callback because a cheap power supply failed or the strip cracked from sun exposure. That’s why we don’t just sell strips; we provide a complete, engineered solution. Choosing robust, system-matched hardware is the final step to guaranteeing a long-lasting, trouble-free installation.
A Deeper Dive into the System Components
Let’s look at the specific role each piece of hardware plays.
-
The Light Source: IP67 Silicone LED Strip8
This is the heart of the system.
- Why IP67? This rating ensures the strip is protected from dust and can withstand being temporarily submerged in water. It’s essential for rain, snow, and hose-downs.
- Why Silicone? This is critical. Cheaper PVC or epoxy coatings will yellow, crack, and fail under sun (UV) exposure, rendering the IP rating useless. Silicone is inherently UV-stable and remains flexible in the cold. It’s the only choice for a long-term outdoor installation.
-
The Housing: Aluminum Channels
Channels are not just for looks; they are essential for protection and longevity.
- Heat Dissipation: Heat is the enemy of LEDs. The aluminum channel acts as a heat sink, drawing heat away from the strip and extending its lifespan significantly.
- Physical Protection: It protects the strip from being bumped, kicked, or hit by debris.
- Light Diffusion: The frosted or milky plastic cover (diffuser) spreads the light out, eliminating the "dots" of individual LEDs and creating a smooth, professional line of light.
-
The Power Plant: Dimmable Outdoor Power Supply9
This is the most common point of failure in cheap systems.
- Class 2 Rating: This is a crucial safety standard in North America. It limits the power output, making the system safer to install and operate.
- Outdoor Rating: The power supply itself must be weatherproof (e.g., NEMA 3R or IP65+ rated) if it’s going to be installed outside.
- Sizing is Key: The power supply’s wattage must be correctly sized for the total length of the LED strips. A good rule of thumb is to add a 20% buffer (Total Wattage of Strips x 1.2 = Minimum Power Supply Wattage). This prevents overheating and extends its life.
Conclusion
Great deck lighting is a system designed for layers: ambient, safety, and accent. It relies on high-quality warm light and, most importantly, a robust set of hardware—silicone strips, aluminum channels, and proper power—to create a beautiful, lasting outdoor living space.
-
Explore the Ambient Layer to understand how it enhances safety and aesthetics in outdoor spaces. ↩
-
Find out how Under-Railing lighting can enhance safety and ambiance on your deck. ↩
-
Learn about the Safety Layer’s role in creating glare-free, safe stair navigation. ↩
-
Discover how the Accent Layer adds visual interest and drama to outdoor features. ↩
-
Understanding CCT helps you choose the right lighting for mood and ambiance in any space. ↩ ↩
-
Explore how CRI impacts color accuracy and enhances the visual appeal of your environment. ↩ ↩
-
Learn how to achieve the right brightness for different settings, enhancing both functionality and aesthetics. ↩
-
Explore this link to understand why IP67 Silicone LED Strips are essential for durability and performance in outdoor settings. ↩
-
Learn about the advantages of Dimmable Outdoor Power Supplies and how they improve safety and efficiency in lighting. ↩
Interested in Our LED Solutions?
Get professional consultation and customized LED lighting solutions for your projects. Contact our expert team today.
Related Articles

How Do You Build Profitable Custom Vehicle and RV Interior LED Rope Lights?
You lose RV installation contracts because your interior lights fail on rough roads. Standard strips show bright dots on glossy…

How to Perfect Bookshelf and Display Cabinet LED Rope Lighting?
You lose retail clients when bookshelves look incredibly dark. Ugly shadows hide expensive products inside display cabinets daily. You need…

How to Master Mirror and Vanity LED Rope Light Installation?
Your clients complain about ugly shadows in their bathroom mirrors. Bad lighting ruins expensive vanity designs. You lose future contracts…
