
How Do You Install Driveway and Walkway LED Lights That Won’t Crack or Drown?
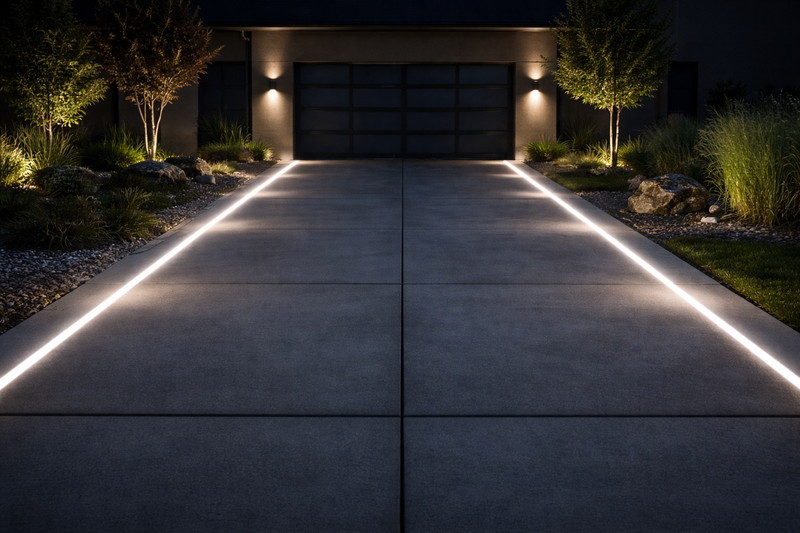
You want to give your client that high-end "runway" look for their driveway or a safe, glowing path to their front door. But in-ground lighting is the most dangerous category of LED installation. If you get it wrong, a car crushes the lens, or a rainstorm shorts out the system, and you are left jackhammering up concrete to fix it.
To successfully install driveway and walkway LED strips, you must use heavy-duty aluminum channels rated IK10 for impact resistance and IP68 for water submersion. Unlike standard strips, these require specific drainage layers underneath, "potted" resin filling for waterproofing, and 48V wiring systems to handle long outdoor runs without dimming.
In my factory in Shenzhen, we produce millions of meters of LED voltage strip. But when a client asks for "drive-over" lights, I stop them. I ask, "Are you ready to do this right, or are you looking for the cheapest option?" Because in the ground, the cheapest option always fails. There is no middle ground. The ground shifts, water accumulates, and cars weigh 4,000 pounds. Let’s look at how to build a system that survives these brutal conditions.
Can LED Strips Actually Withstand the Weight of a Car?
Most contractors think "Aluminum is aluminum." They buy a standard surface-mount channel, silicone it into a crack in the driveway, and walk away. Two weeks later, the homeowner drives their SUV over it, and the plastic cover shatters.
Standard aluminum LED channels are decorative, not structural. For driveways, you must use a specialized In-Ground Profile rated to IK10. These feature thick, tempered walls (often 6063-T5 aviation aluminum) and a reinforced Polycarbonate (PC) cover that can withstand point loads of up to 2,000kg without collapsing.

The Mechanics of "Drive-Over" Ratings
We test our channels by dropping steel hammers on them (the IK impact test) and driving forklifts over them. Here is the engineering reality you need to know.
- The Point Load Danger1: A car tire spreads weight, which is manageable. The real killer is a small stone stuck in the tread of a tire. When that stone hits the plastic lens of your light, it concentrates thousands of pounds of force into a millimeter.
- Standard Lens: PMMA (Acrylic). It is clear but brittle. It cracks instantly under point load.
- Required Lens: Polycarbonate (PC)2 from brands like Mitsubishi or Bayer. It is softer and absorbs impact. It might scratch, but it won’t shatter.
- Thickness: A standard shelf light lens is 1mm thick. A driveway lens needs to be 3mm to 10mm thick depending on the width.
- Support Structure: Look at the cross-section of the aluminum. A standard channel is a "U" shape. A drive-over channel usually has internal vertical support ribs, like an I-beam. These ribs support the lens so it doesn’t bow in the middle when a tire rolls over it.
- The Hollow Sound: If you install a channel and there is a gap between the bottom of the aluminum and the concrete, it will bend. You must ensure 100% mortar contact3 underneath the channel. It needs a solid foundation, just like the foundation of the house.
- The "Flange" Necessity: For driveways, use a channel with "wings" (flanges) on the top edge. Why? As the concrete or pavers shift over freezing winters, a rimless channel might sink or get covered by debris. The flange rests on the finished surface, ensuring the light stays flush with the pavement.
| Feature | Standard Kitchen Channel | Driveway (In-Ground) Channel4 |
|---|---|---|
| Material | Thin 6063 Aluminum | Thick Reinforced 6063-T5 |
| Lens | 1mm Acrylic (PMMA) | 3-5mm Polycarbonate (PC) |
| Rating | IK05 (Fragile) | IK10 (Impact Resistant) |
| Max Load | N/A (Do not step on) | > 2000kg (Drive over) |
How Do You prevent Water From Destroying In-Ground Lights?
You buy an IP67 waterproof strip. You install it in the channel. It rains. The channel fills with water because it’s technically a gutter. The strip sits underwater for 3 days. It dies.
IP67 is only rated for temporary splashing, not permanent underwater submersion. For in-ground installs where water collects, you must use IP68 lighting. The best practice is to "Pot" the strip: filling the aluminum channel completely with clear resin to encase the LEDs, or ensuring catastrophic drainage underneath the channel.
The "Coffin" Method vs. Drainage
Water is the ultimate enemy in ground installations. You can play defense (waterproofing) or offense (drainage). You need both.
- The Trap of IP67: IP67 strips are heat-shrunk in a silicone tube. They are fine for rain. But in a driveway channel, water enters and stays. It becomes a swimming pool. The pressure of standing water eventually forces its way through the silicone end caps.
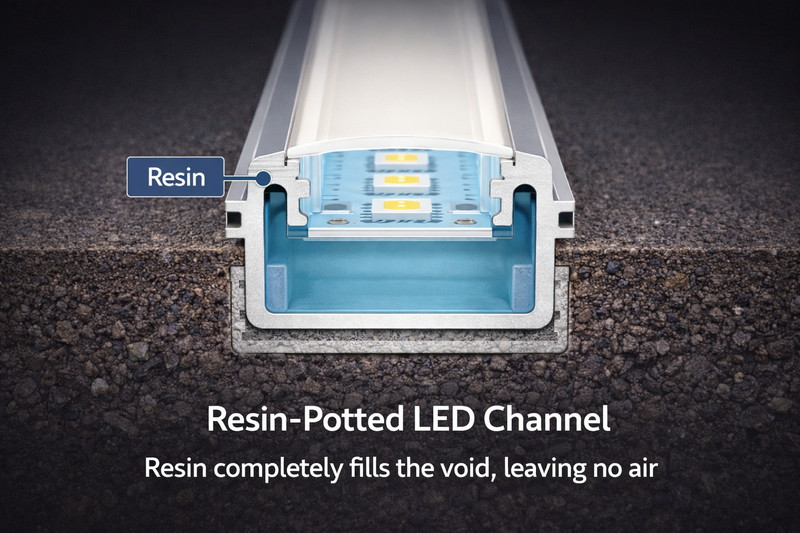
- Strategy A: The Resin Pour (The Coffin):
- This is how high-end fixtures are made in our factory. You stick the LED strip into the aluminum channel.
- Then, you mix a two-part Polyurethane (PU) Resin5.
- You pour this liquid resin into the channel until it covers the strip completely, right up to the lens.
- It hardens into a clear solid block.
- Why PU? Polyurethane is tough and UV stable. Do not use Epoxy (it turns yellow) or Silicone (it is too soft and can be picked out by birds or heels).
- Result: There is no air inside. Water cannot enter because there is no space for it. This is true IP68.
- Strategy B: The Drainage Layer6:
- If you don’t pot the lights, you must ensure the water leaves.
- Never glue an aluminum channel into a sealed slot in concrete.
- The Gravel Bed: You must dig the trench deeper than the light. Put 3 inches of pea gravel (crushed rock) at the bottom.
- Drill holes in the bottom of your aluminum channel.
- When water enters the light, it drains out the bottom into the gravel and away into the soil.
- Warning: If you live in an area with a high water table or clay soil, this doesn’t work. The hole just lets water in from the ground. In wet climates, Resin Potting is the only safe choice.
How Do You Install Lights in Pavers vs. Poured Concrete?
Installing into a finished surface is a nightmare. Do you cut the concrete later? Do you set the channel first? If you get the height wrong, it’s a tripping hazard.
The installation method depends on the material. For poured concrete, use a sacrificial foam placeholder during the pour to create a perfect slot, then glue the channel in later. For pavers, simply treat the aluminum channel as another "brick" in the pattern, using a channel width that matches standard paver dimensions.
The Art of the Flush Mount
Trip hazards are a huge liability in the US legal system. If your light sticks up 1/4 inch, someone will trip, and you will get sued.
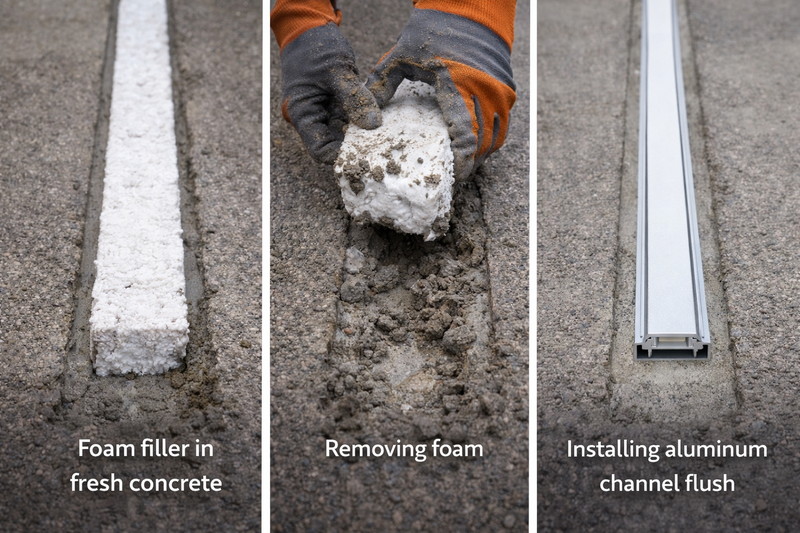
- Method 1: Poured Concrete (The Foam Trick):
- Don’t try to cast the aluminum channel directly into wet concrete. The concrete shrinks as it dries, pulling away from the metal, leaving gaps. Also, the alkaline in wet concrete can eat the anodized coating of the aluminum.
- The Fix: Buy high-density rigid foam7 (insulation board). Cut it to the exact size of your LED channel (maybe slightly wider by 1/8 inch).
- Secure this foam in your formwork where the light will go.
- Pour the concrete. Let it cure.
- Remove the foam. You now have a perfect, clean slot.
- Apply construction adhesive, insert the channel, and grout the edges. Clean, flush, and professional.
- Method 2: Pavers (Hardscaping):
- This is easier. Most specialized hardscape channels are sized to standard paver widths (e.g., 2.5 inches wide).
- Lay your base sand and gravel as normal.
- Place the aluminum channel directly on the sand bed—but here is the trick:
- Spikes: Drive long landscape spikes8 through the bottom of the channel into the sub-base. Pavers shift; you don’t want your light line to shift with them.
- Wings: Use a channel with side wings. The adjacent pavers will sit on top of the metal wings, using the weight of the pavers to hold the light down.
- Cutting Slots (Retrofit):
- If the driveway is already there, you have to use a masonry saw.
- It is messy and loud.
- Key Insight: You must cut the slot deep enough to have clearance for the wire connectors underneath. Don’t just cut for the channel depth; cut deep pockets at the ends for the wires.
| Surface | Best Install Time | Primary Risk | Professional Solution |
|---|---|---|---|
| New Concrete | During Pour | Shrinkage gaps | Foam form placeholder. |
| Existing Concrete | Retrofit | Shallow depth | Diamond blade wet saw. |
| Pavers | During Laying | Shifting/Sinking | Channels with retention wings. |
| Asphalt | Reform | Melting Channel | Avoid. Asphalt is too hot/flexible. |
How Do You Power 100 Feet of Driveway Without Voltage Drop?
A driveway is often 50 to 100 feet long. If you use standard 12V or 24V tape, the end of the driveway will be dim. You don’t want to run a 120V main line down the side because buried high voltage is expensive and dangerous to dig up later.
Driveway runs demand 48V Constant Current (IC) strip lights. A 48V system allows you to power a continuous 100-200 foot run from a single power source in the garage, eliminating the need for expensive underground junction boxes or multiple power supplies along the path.

Managing Light Pollution and Aesthetics
A luxury driveway should feel like a moonlit path, not a Vegas casino.
- The "Dot" Problem: In the ground, the light is very close to the viewer. If you use standard LED tape, you see the dots. It looks jagged and cheap.
- COB Technology: As I mentioned in other articles, COB is mandatory here. The phosphors cover the entire strip. Even with a shallow channel, you get a solid line of light.
- The Diffuser:
- Milky/Opal: This cuts brightness by about 40%, but that is good for driveways. You don’t need high lumens; you need guidance.
- Honeycomb Louvers: For very high-end jobs, we can install a honeycomb grid inside the channel. This straightens the light so you only see it when you are directly over it, effectively deleting glare from the side view.
- Dimming: Always, always put exterior ground lights on a dimmer.
- At 7:00 PM (Party time), you want them at 100%.
- At 2:00 AM, you want them at 20% so they don’t annoy the neighbors or keep you awake.
- Use a Dimmable Driver (Triac, 0-10V, or Lutron compatible) inside the house.
Conclusion
Installing LED strips in a driveway is civil engineering, not just electrical work. By selecting IK10 drive-over channels, using IP68 resin-filled methods or proper drainage, and utilizing 48V systems for long runs, you can build a system that outlasts the concrete it sits in. Don’t fight the environment; engineer around it.
-
Understanding Point Load Danger is crucial for ensuring safety and durability in construction and design. ↩
-
Explore the advantages of Polycarbonate (PC) for impact resistance and durability in various applications. ↩
-
Learn why proper installation with 100% mortar contact is essential for structural integrity and longevity. ↩
-
Discover the unique features of Driveway Channels that make them suitable for heavy loads and durability. ↩
-
Explore the advantages of PU Resin for waterproofing and durability in installations, ensuring long-lasting protection against water damage. ↩
-
Learn about the importance of a Drainage Layer in preventing water accumulation and ensuring the longevity of outdoor lighting fixtures. ↩
-
Explore the benefits of high-density rigid foam for creating precise installations and enhancing durability. ↩
-
Learn how landscape spikes can secure your hardscaping projects, ensuring stability and longevity. ↩
Interested in Our LED Solutions?
Get professional consultation and customized LED lighting solutions for your projects. Contact our expert team today.
Related Articles

How Do You Build Profitable Custom Vehicle and RV Interior LED Rope Lights?
You lose RV installation contracts because your interior lights fail on rough roads. Standard strips show bright dots on glossy…

How to Perfect Bookshelf and Display Cabinet LED Rope Lighting?
You lose retail clients when bookshelves look incredibly dark. Ugly shadows hide expensive products inside display cabinets daily. You need…

How to Master Mirror and Vanity LED Rope Light Installation?
Your clients complain about ugly shadows in their bathroom mirrors. Bad lighting ruins expensive vanity designs. You lose future contracts…
