
How Do You Install Fence and Railing LED Lighting That Actually Lasts?
You built a custom cedar fence or a sleek aluminum deck railing, and the client wants it to glow. You stick some tape on it, and three months later, it’s peeling off and half the diodes are dead.
To successfully light fences and railings, avoid standard exposed LED tape. Instead, use IP67 Silicone Neon Flex for a dot-free look, or rigid aluminum hardscape bars for under-cap mounting. For long perimeter runs, utilize 24V or 48V systems to eliminate voltage drop, and always mount mechanically using clips or channels, never adhesive alone.
In my factory here in Shenzhen, I see orders for "IP65 Waterproof Kit" destined for outdoor fences in Minnesota or Arizona, and I just shake my head. I know those lights will fail. A fence is a harsh environment—it vibrates with the wind, expands with heat, and gets soaked by rain. Treating it like a kitchen cabinet is a recipe for a warranty call. Let’s break down how to design and install this correctly so you don’t have to go back and fix it for free.
What Are the Best Design Strategies for Lighting Fences and Railings?
Clients typically say "I want it to look cool," but they don’t know what that means. Do they want to see the path? Do they want to highlight the wood grain? Or do they want a glowing outline?
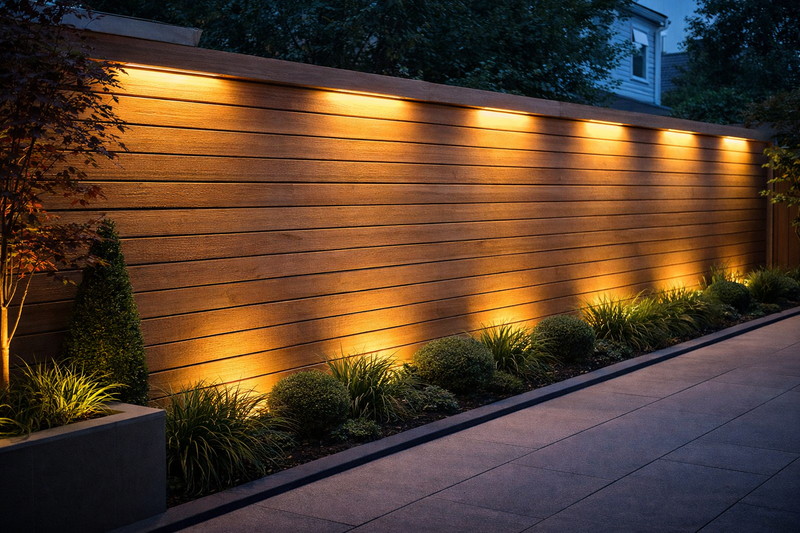
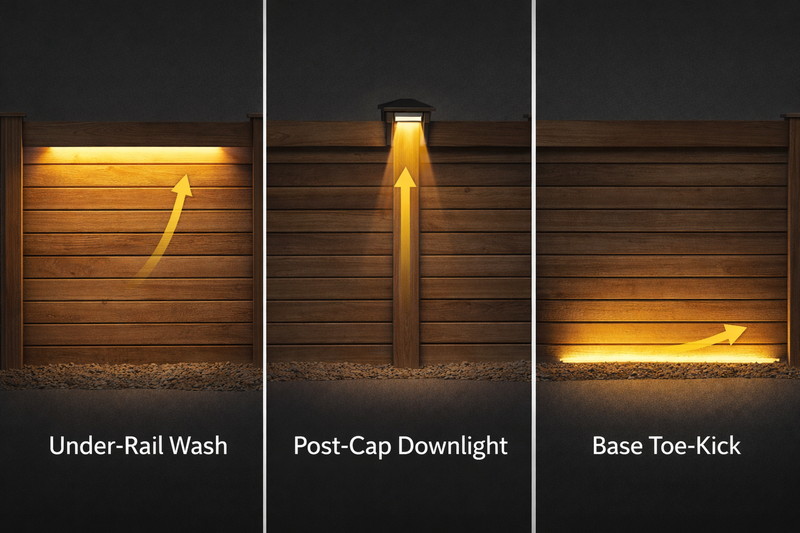
The three most effective design strategies are Under-Cap Grazing (installing lights under the top rail to wash down), Post-Cap Highlighting (installing lights under the post cap), and Toe-Kick Lighting (installing at the base). Under-Cap is the most popular as it reduces glare and highlights the texture of the fencing material.
Designing for Texture and Safety
When we talk about design, we are really talking about where the shadows fall. As a lighting manufacturer, I always tell distributors: "Do not point the light at the viewer’s eye."
- The "Grazing" Effect1: This is the money maker. If you have a fence made of stone, textured vinyl, or beautiful stained wood, you want to mount the strip light immediately under the top cap, facing down.
- Spacing: The light source should be about 1-2 inches away from the vertical surface. If it is too close, you catch every imperfection in the wood. If it is too far, you lose the texture.
- The Benefit: This creates a curtain of light that defines the perimeter of the property without polluting the night sky or shining in the neighbor’s window.
- The "Line of Light" (Direct View): Some modern architecture calls for a visible line of neon. This is common on modern horizontal bar railings.
- Post-Cap vs. Rails: Lighting every single post cap is the "old school" solar light look. It creates a rhythm of pools of light. It is functional for safety but less dramatic than a full linear run under the rail. However, it is much cheaper because you use less material.
- Glare Control3: This is critical for railings. If you put a light under a handrail on a deck, ensure the lip of the handrail extends lower than the LED strip. You never want the homeowner to walk up the stairs and get blinded by the strip underneath. We manufacture special deep aluminum channels specifically to cut off this glare angle.
| Design Goal | Mounting Position | Recommended Strip Type |
|---|---|---|
| Material Texture4 | Under Top Cap (Facing Down) | High Density 60-120 LEDs/m (Warm White) |
| Safety / Path | Under Handrail | COB or Neon Flex (Dot-free) |
| Architectural Line | Face Mounted / Exposed | Silicone Neon Flex (Side Bend) |
| Budget Friendly | Post Caps Only | Modules or Pucks |
Why Should You Avoid Standard "Waterproof" Tape for Railings?
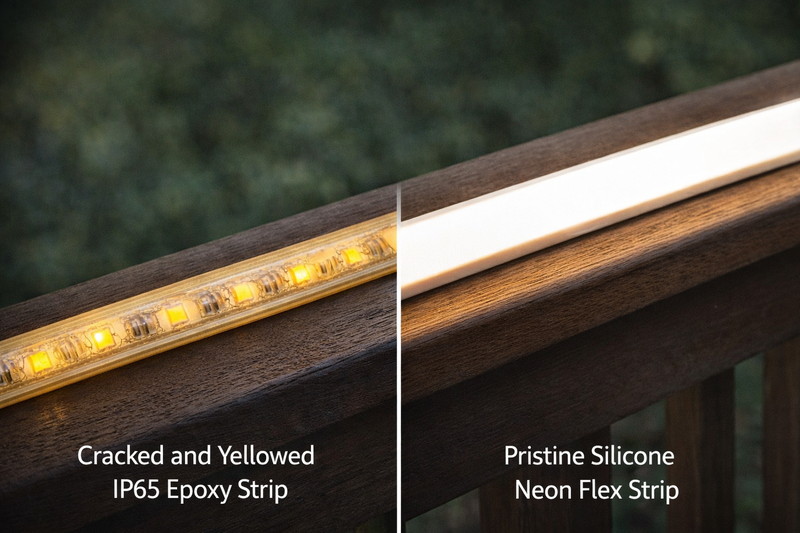
You might be tempted to buy the cheap reel that says "IP65" with the bubble of silicone on top. It is easy to find, and it is cheap. But for a fence that sits in the sun all day, it is the wrong material.
Standard IP65 "Glue-Covered" strips are not durable enough for exposed fences. The epoxy or PU coating yellows under UV rays and cracks with thermal expansion. For railings and fences, you must use "IP67 Silicone Extrusion" (Neon Flex) or fully encased rigid bars, which withstand UV exposure and mechanical abrasion.
The Chemistry of Outdoor Failures
I deal with chemical engineers every day to produce our silicone housing. Here is the reality of outdoor plastics that most datasheets don’t tell you.
- The UV Problem: The sun is a nuclear reactor. It blasts your fence railing with UV radiation. Most standard clear coatings (Epoxy) react to this by cross-linking their polymers, turning them yellow and brittle (like old headlights). Once it cracks, water gets in, touches the copper, and the light dies.
- Silicone is King: We use food-grade silicone for our premium outdoor lines. Silicone is inorganic—it basically ignores UV light. It stays soft and clear for 5 to 10 years. For a permanent fence installation, do not accept anything less than Silicone Extrusion5.
- Neon Flex Explained6: This is essentially a strip light inside a thick silicone tube that acts as a diffuser.
- Top Bend vs. Side Bend: This is where contractors get stuck.
- Top Bend: Bends up and down (like a roller coaster loops). Use this if you are going over an arched gate.
- Side Bend: Bends left and right (like a snake). Use this if you are routing it into a curved deck railing or going around the corner of a fence post.
- Top Bend vs. Side Bend: This is where contractors get stuck.
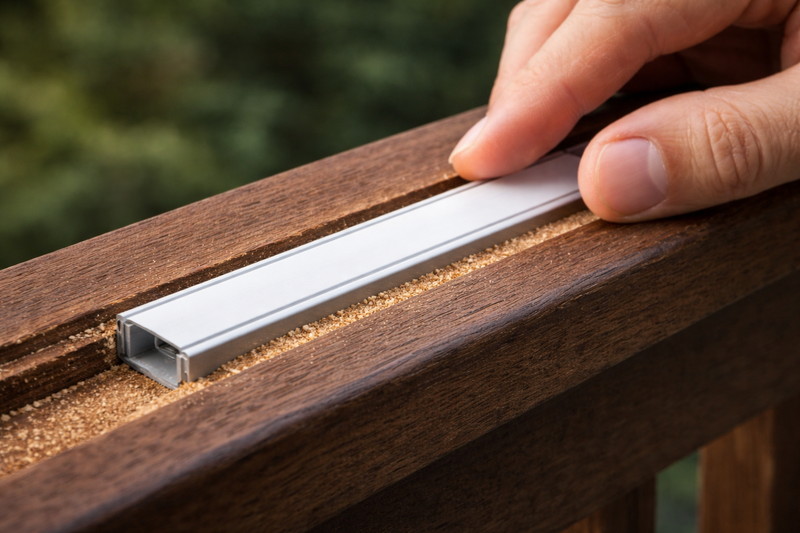
- Rigid Hardscape Bars: Sometimes, flexible is bad. If you are mounting under a straight stone cap or a flat aluminum railing, use a rigid aluminum LED bar.
- Heat Dissipation: The aluminum draws heat away from the chip (LEDs hate heat).
- Straightness: Flexible tape can look "wavy" if not mounted perfectly. A rigid bar is always perfectly straight, giving that high-end architectural look.
| Feature | Standard IP65 Tape | Silicone Neon Flex | Rigid Aluminum Bar7 |
|---|---|---|---|
| UV Resistance8 | Low (Yellows) | High (Stable) | High (Lens dependent) |
| Impact Protection | Low | High (Rubber housing) | Very High (Metal) |
| Aesthetic | Visible Dots | Solid Neon Line | Clean / diffuse |
| Best Application | Temporary / Indoor | Curved Rails / Direct View | Straight Caps / Stone |
How Do You Handle Voltage Drop on Long Fence Perimeters?
Fences are long. A typical backyard might have 200 feet of fencing. If you try to power that from one outlet in the garage using 12V tape, the lights at the back of the yard will be barely visible.
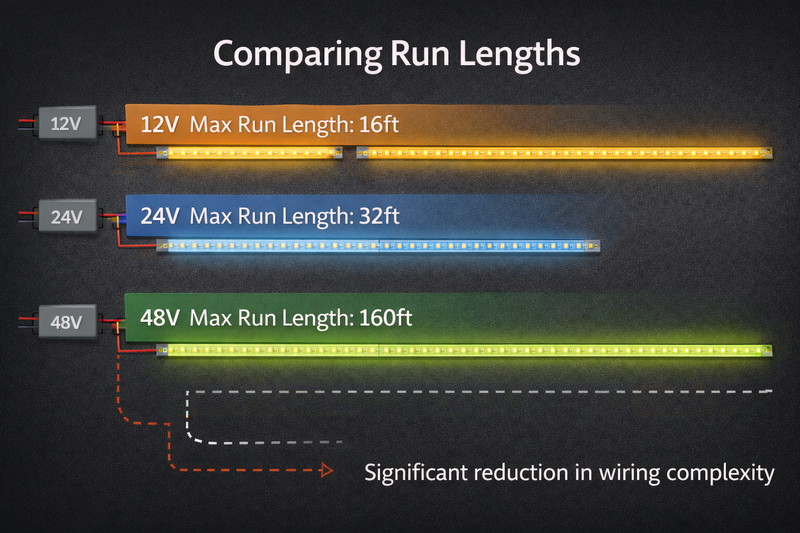
For fence runs exceeding 30 feet, low voltage drop is the primary technical challenge. You should switch to 24V or even 48V LED systems. 48V Constant Current strips can run up to 160 feet (50 meters) on a single power feed without dimming, drastically reducing the wiring labor required.
The Hidden Cost of Copper
When you bid on a fence lighting job, the cost isn’t just the LED strip; it is the labor of burying wires.
- The 12V Trap: If you use 12V tape, you have to inject power every 16 feet. On a 100-foot fence, that means you are digging a trench and running a thick 12-gauge or 10-gauge landscape wire parallel to the fence, splicing into the light every few posts. That is hours of labor and expensive copper wire.
- The 24V Standard: Moving to 24V doubles your run length to about 32 feet (10 meters). This is better, but for a large perimeter estate, it is still a lot of splicing.
- The 48V Solution (Game Changer): We are producing more and more 48V Constant Current (IC)9 strips.
- How it works: Tiny Integrated Circuits (ICs) on the strip regulate the current at every LED.
- The Result: You can power a continuous 150-foot run from one end. The brightness at foot 1 is exactly the same as at foot 150.
- The Savings: You run one wire from the transformer to the start of the fence. No digging trenches. No parallel homeowners. The strip is the wire.
- Burial Considerations: If you do have to run wire between fence sections (like across a gate), use Direct Burial (DB)10 rated low voltage wire. Do not use standard indoor speaker wire; it will rot in the soil.
- Connectors: Never use "clip-on" connectors outdoors. They will fail. Solder the wires and use adhesive-lined heat shrink, or use gel-filled underground wire nuts.
How Do You Mount Lights to Metal vs. Wood Railings?
You have your lights and your power. Now, how do you attach them? If you trust the adhesive backing on a dusty wooden fence, you will be back in two weeks to fix it. The mounting method must match the material.
Wood expands and contracts with moisture; metal expands with heat. Mechanical fastening is mandatory. For wood, use routing or screw-in clips. For hollow metal or vinyl railings, try to run wires internally for a seamless look, using aluminum channels to bridge the thermal expansion gap.
Installation Techniques by Material
I see many installers struggle because they try to use the same technique for every material.
- Wood Fencing (Cedar/Pine):
- The Challenge: Wood is alive. It swells when wet. It has a rough grain that tape hates.
- The Pro Move (Routing): Take a router and carve a channel into the bottom of the top rail before you put it up (or laying on your back if it’s already up). Tap an aluminum channel into this groove. This protects the light and looks integrated, not tacked on.
- The Easy Move (Clips): If you can’t route it, use clear silicone mounting brackets screwed in every 12 inches. Do not rely on staples (you might shoot through the PCB) and do not rely on tape.
- Vinyl / PVC Railing:
- The Challenge: You cannot screw easily into thin vinyl without it stripping, and glue doesn’t stick well to the glossy surface.
- The Solution: Use VHB Tape plus a mechanical anchor at the ends. Clean the vinyl with isopropyl alcohol first. Ideally, tuck the strip inside the hollow cavity of the top rail if the design permits (some vinyl rails have a void for this).
- Aluminum / Steel Railing:
- The Challenge: Extreme heat. Black aluminum railing can hit 150°F.
- The Solution: High-temperature rated VHB tape works well on smooth metal, but the expansion is the enemy. Leave slack in your wires at the ends. If tight, when the rail expands, it will rip the wire out of the solder pad.
- Drilling: The beauty of metal posts is they are hollow. Drill a hole hidden under the rail into the post, run your wire down inside the post, and exit under the deck. It is totally invisible. Use a rubber grommet in the drilled hole so the sharp metal edge does not slice your wire insulation over time.
| Surface Material | Primary Mounting | Wire Hiding Srategy |
|---|---|---|
| Wood | Routed Channel or Screw Clips | Behind posts / Conduit |
| Vinyl | VHB Tape + End Screws | Inside hollow posts |
| Aluminum | VHB Tape (on channel) | Inside hollow posts |
| Masonry/Stone | Construction Adhesive | Differentiate mortar joints |
What Color Temperature Best Suits Different Fencing Materials?
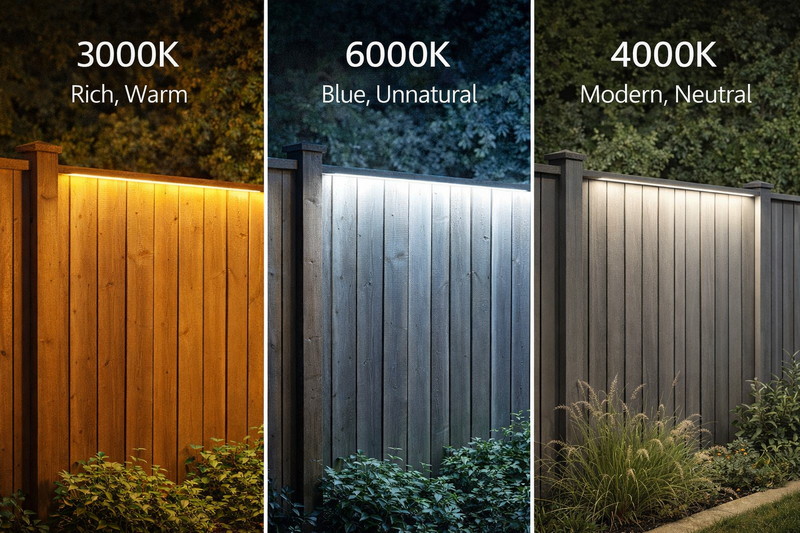
You finished the job, turned it on, and the client says, "It looks like a hospital." You used 6000K Cool White on a warm cedar fence. The light color clashes with the material color.
Matching Kelvin (Color Temperature) to the material is critical. Use 2700K-3000K (Warm White) for natural wood and red brick to enhance the grain and warmth. Use 4000K (Natural White) for white vinyl, grey composite, or modern black aluminum to keep the look crisp and clean.
The Psychology of Color on Materials
In manufacturing, we bin our LEDs very strictly because a slight shift in color can ruin a project.
- The Wood Rule: Wood contains reds, browns, and oranges. If you shine a blue-ish light (5000K+) on it, the wood looks grey and dead. It looks like zombie wood. You must use 2700K or 3000K. This intensifies the red tones and makes the fence look rich and expensive.
- The Modern Aesthetics: For white vinyl fences, 3000K can make the white plastic look yellow and dirty. For white or grey fencing, 4000K is the sweet spot. It makes white look "True White."
- Dark Metals: Black aluminum railings disappear at night. Lighting them is less about the rail and more about what is behind or below them. However, 3000K is generally the safest bet for residential decks as it matches the interior lighting of the house.
- RGBW (Color Changing): A lot of clients ask for this because they want "Party Mode."
- My Advice: Sell them RGBW (Red, Green, Blue, + White). Do not sell them RGB. RGB cannot produce a nice pure white for the 350 days a year they aren’t having a party. The dedicated White chip allows them to have classic luxury lighting daily, and purple lighting for Halloween.
Conclusion
Fence and railing lighting is the ultimate test of your installation skills. By choosing Silicone Neon Flex or Rigid Bars, upgrading to 24V/48V to solve voltage drop, and matching your Color Temperature to the fence material, you turn a backyard into a high-end sanctuary rather than a maintenance nightmare.
-
Understanding the grazing effect can enhance your lighting design, creating beautiful textures and shadows. ↩
-
Learn about Neon Flex lighting to achieve a modern, sleek look without visible hotspots. ↩
-
Explore glare control techniques to ensure safety and comfort in your outdoor lighting designs. ↩
-
Discover methods to highlight material textures effectively, adding depth and character to your designs. ↩
-
Explore the advantages of Silicone Extrusion for outdoor applications, ensuring durability and longevity. ↩
-
Understand the functionality of Neon Flex and its applications in outdoor lighting solutions. ↩
-
Discover why Rigid Aluminum Bars are essential for achieving a sleek and durable LED installation. ↩
-
Learn about UV Resistance and its critical role in prolonging the life of outdoor materials. ↩
-
Explore the advantages of 48V IC strips for efficient lighting solutions and reduced installation costs. ↩
-
Learn about Direct Burial wire to ensure safe and durable outdoor electrical installations. ↩
Interested in Our LED Solutions?
Get professional consultation and customized LED lighting solutions for your projects. Contact our expert team today.
Related Articles

How Do You Build Profitable Custom Vehicle and RV Interior LED Rope Lights?
You lose RV installation contracts because your interior lights fail on rough roads. Standard strips show bright dots on glossy…

How to Perfect Bookshelf and Display Cabinet LED Rope Lighting?
You lose retail clients when bookshelves look incredibly dark. Ugly shadows hide expensive products inside display cabinets daily. You need…

How to Master Mirror and Vanity LED Rope Light Installation?
Your clients complain about ugly shadows in their bathroom mirrors. Bad lighting ruins expensive vanity designs. You lose future contracts…
