
How Do You Install Outdoor LED Strip Lights for a Flawless, Professional Result?
You have a high-quality outdoor LED strip, but the installation is what determines if it lasts one year or ten. Poor surface prep, insecure mounting, and improper wiring can turn a premium product into a frustrating failure and an expensive callback.
A professional installation requires four key stages: careful planning and component selection, meticulous surface preparation, secure mounting using channels, and making safe, fully waterproof low-voltage connections. Skipping any of these steps will compromise the longevity and performance of the entire system.
As a manufacturer, I can control every aspect of my product’s quality up to the moment it leaves my factory. But the final, and most critical, link in the chain is the installation itself. I’ve seen beautifully designed projects ruined by simple installation mistakes. This guide isn’t just about making the lights turn on; it’s about installing them in a way that protects your investment, your client’s satisfaction, and your professional reputation. Think of these as the standard operating procedures for an outdoor lighting installation that is built to last.
How Do You Plan the Project and Choose the Right Components?
You’re ready to start, but you pause. Is the power supply big enough? Will the brightness be even at the end of a long run? Did you order the right kind of connectors? A mistake at the planning stage can mean costly delays and re-ordering materials from the job site.
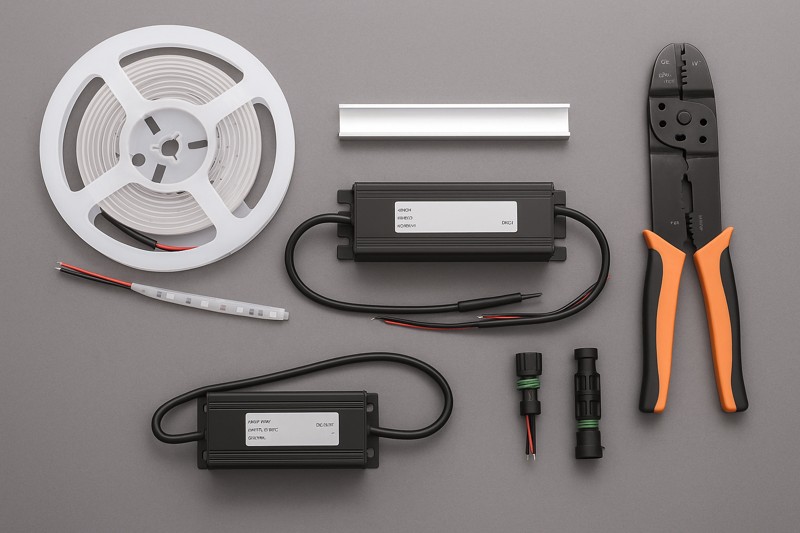
First, accurately measure the total length of your runs. Then, calculate your total power requirement by multiplying the strip’s watts-per-meter by the total length and adding a 20% buffer. Finally, select an IP67-rated strip, a commercial-grade power supply, and appropriate waterproof connectors for a complete, reliable system.
This is the most important phase. The ten minutes you spend with a notepad and calculator before you order will save you ten hours of headaches in the field. Every professional contractor like Tom knows that a good plan is the foundation of a profitable job. It’s not just about measuring length. It’s about thinking through the entire system, from the power outlet to the very last LED, and anticipating challenges like voltage drop and component compatibility. A well-planned project is a smooth project.
A Deeper Dive into Planning and System Specification
Let’s break down the critical decisions you need to make before you install a single foot of lighting.
-
Choosing the Right LED Strip
Not all "outdoor" strips are created equal. The choice you make here determines the project’s real-world longevity.
- IP65 (Epoxy Coated): These strips have a clear coating on top but are open on the bottom. I strongly advise against using these for any serious outdoor project. The coating will yellow and crack in the sun, and moisture can easily get in from the back. They are not a professional solution.
- IP67/IP68 (Silicone Extrusion/Sleeve)1: This is the professional standard. The strip is fully encased in a UV-stable silicone jacket. This provides a complete, durable seal against water, dust, and UV radiation. This is the only type of strip we recommend and manufacture for long-term outdoor use.
-
Calculating Your Power Supply (Driver)2
Under-sizing your power supply is the most common and dangerous installation mistake. An overworked power supply will overheat, leading to premature failure and a potential fire hazard.
- Find the Watts per Meter3: This will be on the product spec sheet (e.g., 14.4W/m).
- Calculate Total Wattage: Multiply the watts per meter by the total length of your strip. (e.g., 14.4W/m x 8 meters = 115.2W).
- Add the Safety Buffer: Never run a power supply at 100% capacity. It shortens its life. Add a 20% safety headroom. (115.2W x 1.2 = 138.24W).
- Select the Right Supply: Choose a power supply with a wattage rating greater than your calculated need. In this case, a 150W power supply would be the correct choice. Always use a 24V system for outdoor runs4 to minimize voltage drop.
| Component | Budget / Amateur Choice | Professional Specification |
|---|---|---|
| LED Strip Type | IP65 Epoxy Coated | IP67/IP68 Full Silicone Extrusion |
| System Voltage | 12V (Prone to significant voltage drop) | 24V (Minimizes voltage drop for long runs) |
| Power Supply | Unrated, indoor-style "power brick" | UL/CE Listed, IP67-rated Commercial Driver |
| Planning Rule | "Guessing" the power needs | Calculate Total Watts + 20% Safety Headroom |
How Do You Properly Mount the Strip So It Never Falls Off?
You installed a strip using only its adhesive backing. A few weeks later, after a series of hot days and cool nights, the client calls to say the strip is sagging and peeling off. Now you have to go back and fix it for free.
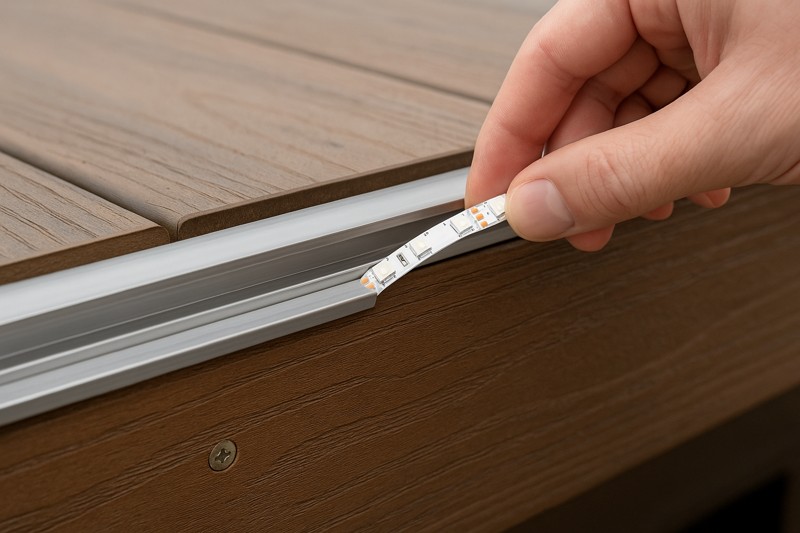
For a permanent installation, you must use mechanical fasteners. The best method is to install the LED strip inside a dedicated aluminum mounting channel. The channel is screwed to the surface, and the strip sits securely inside, ensuring it will never sag or detach.
The double-sided tape on the back of any LED strip is only meant for initial positioning. It is not a permanent mounting solution, especially outdoors where it’s exposed to moisture, dust, and constant temperature changes. Every professional I work with knows that relying on adhesive alone is a guaranteed callback. The thermal expansion and contraction of the mounting surface will break the adhesive bond. Mounting channels are not optional; they are a required component for a professional installation.
A Deeper Dive into Surface Prep and Mounting Methods
Let’s go through the correct, professional procedure for mounting a strip so it stays in place for the life of the product.
-
Step 1: Meticulous Surface Preparation5
Even when using channels, you want the surface to be perfectly clean. If you are using the strip’s adhesive for initial placement within the channel, this step is critical.
- Clean: Vigorously wipe down the entire mounting surface with a cloth and a solvent like isopropyl alcohol (rubbing alcohol). This removes all oils, dust, and grime that prevent adhesion. Do not use household cleaners, as they can leave behind a residue.
- Dry: The surface must be 100% dry. Allow the alcohol to fully evaporate. If the surface is porous, like wood or concrete, ensure it has been dry for at least 24 hours.
-
Step 2: Choosing and Installing Mounting Channels6
Mounting channels provide multiple benefits: they are a secure mechanical fastening, they help protect the strip from impacts, and they can act as a heatsink to improve longevity.
- Installation: The aluminum channels are installed first. You drill pilot holes and secure them to the surface with screws appropriate for the material (e.g., wood screws for a deck, masonry screws for brick). Place a screw every 12-18 inches for a secure hold.
- Mounting the Strip: Once the channels are in place, you peel the backing from the LED strip’s adhesive and press it firmly into the clean channel.
- Adding the Diffuser: Most channels come with a frosted or clear plastic diffuser cover. This cover snaps into place over the strip, protecting it further and creating a more even, finished light output by reducing hot spots from individual LEDs.
| Mounting Method | Pros | Cons | Professional Verdict |
|---|---|---|---|
| Adhesive Tape Alone7 | Fast and easy for initial placement. | Guaranteed to fail outdoors. Will sag, peel, and detach. | Never acceptable. |
| Silicone Clips | Better than tape, provides some mechanical hold. | Can create pressure points, looks unfinished, offers no protection. | Acceptable, but not ideal. |
| Aluminum Channels8 | Permanent, secure, protects the strip, looks professional. | Requires more time for installation (drilling and screwing). | The Only Correct Method. |
How Do You Wire Everything Safely and Make It Waterproof?
You’ve made your wiring connections using standard wire nuts and electrical tape. A year later, after a rainy season, the lights are flickering and a section has failed completely. You open the connection and find a corroded, green mess.
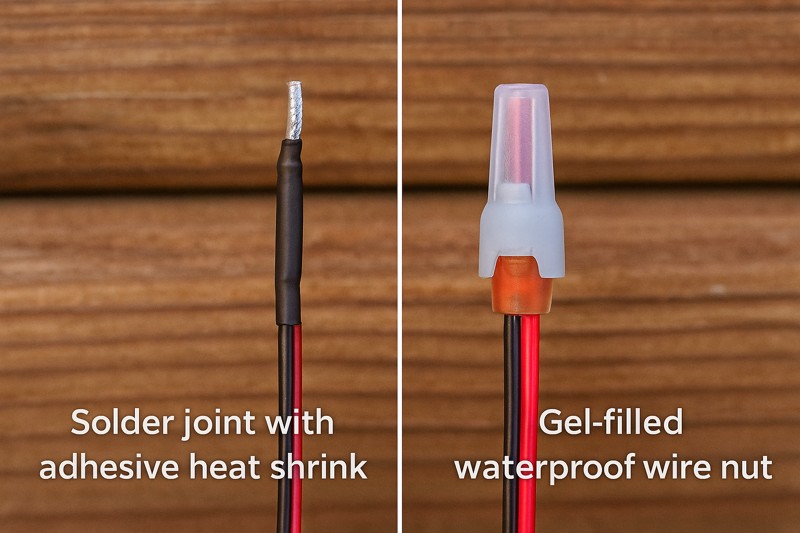
All low-voltage connections must be 100% waterproof. The best method is to solder the wires for a secure connection and then seal the joint with adhesive-lined heat shrink tubing. For solder-free connections, use professional-grade, gel-filled waterproof connectors.
This is where an installation lives or dies. The LED strip and power supply can be perfectly IP67-rated, but if the point where you connect them is not equally waterproof, the entire system is compromised. Water will inevitably find its way into a bad connection through capillary action, causing corrosion, short circuits, and failure. Electrical tape is not waterproof. Standard wire nuts are not waterproof. Taking the time to make every single connection mechanically strong and environmentally sealed is the mark of a true professional.
A Deeper Dive into Wiring, Connections, and Voltage Drop9
Let’s walk through the final and most technical step to ensure a safe and reliable electrical system.
-
Connecting to the Power Supply
Your IP67 power supply will have input (AC high voltage) and output (DC low voltage) wires. The input side should be handled by a licensed electrician and hardwired in a weatherproof junction box. Our focus is on the low-voltage output side. You will connect your main feed wire to the V+ and V- output wires from the power supply.
-
Making Waterproof Connections10
This is where you will connect your main feed wire to the pigtail of the LED strip, or where you will join two lengths of wire.
- Best Method (Soldering11): Solder provides the most reliable electrical and mechanical connection. Twist the wires together, apply solder, then slide a piece of adhesive-lined heat shrink tubing over the joint. Use a heat gun to shrink the tubing. The internal adhesive will melt, creating a solid, waterproof seal.
- Good Method (Waterproof Connectors): If you can’t solder on-site, use gel-filled connectors. These are wire nuts or push-in connectors that come pre-filled with a silicone gel. When you insert the wires and tighten the cap, the gel completely surrounds the connection, preventing any moisture from entering.
-
Managing Voltage Drop
Voltage drop is the gradual loss of voltage as electricity travels along a wire. On a long run of LED strip, this can cause the LEDs at the far end to be noticeably dimmer than those at the beginning.
- Use 24V Systems12: 24V is the professional standard because it can travel twice as far as 12V down the same size wire with the same amount of voltage drop.
- Use Thicker Wire: For your main feed wire from the power supply to the strip, use a thick gauge wire (e.g., 16AWG or 14AWG) to minimize voltage loss.
- Power from Both Ends: For very long runs (over 10 meters/32 feet), it is best to run a separate wire from the power supply to the start and the end of the strip. This ensures even voltage across the entire length.
Conclusion
A professional installation is a system of proven methods. By planning carefully, mounting securely in channels, and making every connection waterproof, you transform a great product into a reliable, long-term lighting solution that will impress your clients. This is how you build with confidence.
-
Explore the advantages of IP67/IP68 silicone extrusion for outdoor LED strips to ensure durability and longevity. ↩
-
Learn the essential steps to accurately calculate power supply needs for LED lighting to avoid installation mistakes. ↩
-
Understanding Watts per Meter is crucial for selecting the right LED strips and ensuring optimal performance. ↩
-
Discover why a 24V system minimizes voltage drop and enhances the efficiency of outdoor LED lighting installations. ↩
-
Understanding meticulous surface preparation is crucial for ensuring strong adhesion and longevity of your installations. ↩
-
Exploring the benefits of mounting channels can help you choose the best method for securing your LED strips effectively. ↩
-
Learn why adhesive tape alone fails outdoors and discover better alternatives for lasting installations. ↩
-
Discover the advantages of aluminum channels, the best choice for secure and professional LED strip installations. ↩
-
Understanding voltage drop is crucial for maintaining brightness in LED strips; this resource will clarify its impact. ↩
-
Explore this link to learn effective techniques for ensuring your electrical connections are waterproof and reliable. ↩
-
Discover expert soldering techniques that ensure strong and reliable electrical connections in your projects. ↩
-
Learn why 24V systems are the professional choice for LED lighting, offering advantages in distance and efficiency. ↩
Interested in Our LED Solutions?
Get professional consultation and customized LED lighting solutions for your projects. Contact our expert team today.
Related Articles

How Do You Build Profitable Custom Vehicle and RV Interior LED Rope Lights?
You lose RV installation contracts because your interior lights fail on rough roads. Standard strips show bright dots on glossy…

How to Perfect Bookshelf and Display Cabinet LED Rope Lighting?
You lose retail clients when bookshelves look incredibly dark. Ugly shadows hide expensive products inside display cabinets daily. You need…

How to Master Mirror and Vanity LED Rope Light Installation?
Your clients complain about ugly shadows in their bathroom mirrors. Bad lighting ruins expensive vanity designs. You lose future contracts…
