
How Do You Perfectly Light an Outdoor Kitchen and Dining Area?
Your client has invested in a beautiful outdoor kitchen, but as evening falls, it becomes unusable. The overhead patio light casts weird shadows on the grill, and the dining area feels either too bright or too dark.
The solution is to create dedicated lighting layers for each zone. Use bright, high-quality task lighting for countertops and grills, warm, dimmable ambient light for the dining space, and subtle accent lighting to add depth and a touch of drama to the entire area.
As someone who manufactures these lighting systems, I know that an outdoor kitchen is more than just a place to cook—it’s the heart of the backyard. The lighting must support both its function as a kitchen and its role as a social hub. A single, harsh light source can’t do this. A professional, layered approach ensures the space is safe and efficient for the chef, while also being warm and inviting for guests. This guide will show you how to design and install a system that accomplishes both, elevating a simple patio into a true outdoor room.
What is the Most Critical Lighting for an Outdoor Kitchen?
If the chef can’t see what they’re doing, the entire space fails. Food can be undercooked, and using sharp knives on a poorly lit surface is a serious safety hazard. You have to solve this functional problem first.
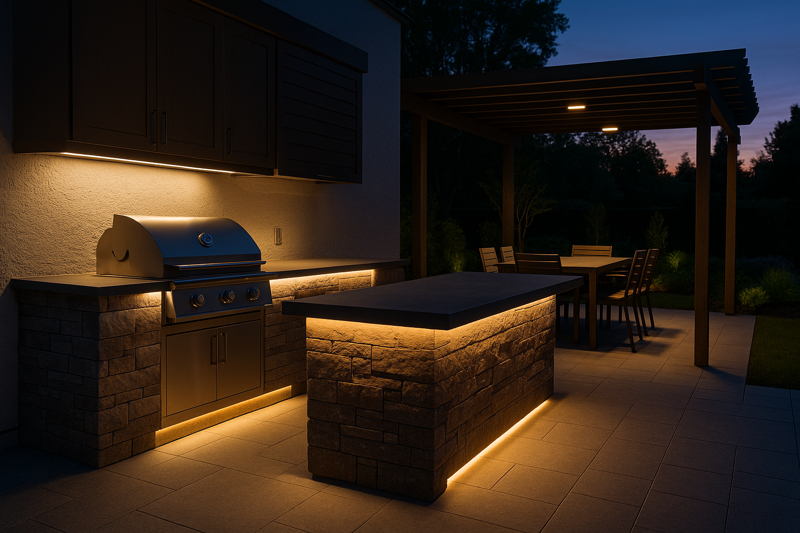
Bright, direct, high-CRI task lighting over all work surfaces is non-negotiable. This means installing powerful, downward-facing LED strips under upper cabinets, shelves, or structural lips directly above the countertops and grill area.
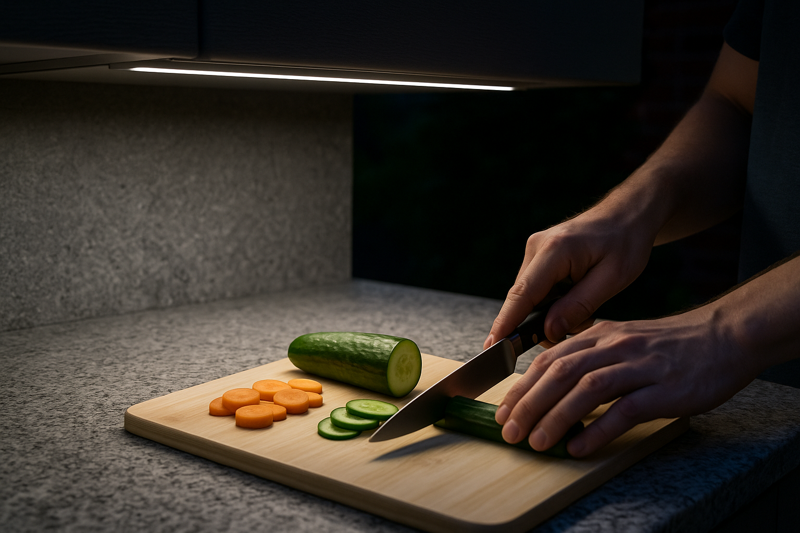
This is the foundation of a successful outdoor kitchen lighting plan. Think of it like a professional kitchen: every workstation needs its own dedicated light. This isn’t just about brightness; it’s about the quality of the light. For a contractor like Tom, explaining the importance of CRI (Color Rendering Index) to a client is a key differentiator. It shows you understand the details that matter. When you use high-CRI light, a medium-rare steak looks perfectly pink, and fresh herbs look vibrant and green. Low-CRI light makes everything look dull and unappetizing. Solving the task lighting problem with high-quality light is the first and most important service you provide.
A Deeper Dive into Task Lighting Excellence
Let’s break down the technical aspects of creating perfect, functional task lighting.
-
Principle 1: Placement is Everything
The goal is to eliminate shadows cast by your own body.
- Under-Cabinet/Under-Shelf: This is the ideal placement. Mount the LED strip in a channel on the underside of any overhead structure, positioning it towards the front of the cabinet, not the back. This directs the light down and slightly back, fully illuminating the countertop right where you are working. If you mount it at the back, your head and shoulders will block the light.
- Grill-Specific Lighting: Grills are often the trickiest part. If there is a range hood or shelf above it, use the same under-cabinet technique. If the grill is open, you may need to use two small, adjustable, waterproof spotlights mounted on a nearby wall or pergola post, aimed to cross-illuminate the cooking surface.
-
Principle 2: High CRI is Not a Luxury; It’s a Requirement1
Color accuracy is critical when cooking.
- The CRI Scale: Color Rendering Index2 is measured on a scale of 0-100, with 100 being natural sunlight. For any food prep area, you must use a strip with a CRI of 90 or higher. A CRI in the 80s, which is common for cheaper strips, will make food look grayish and unappealing.
- Color Temperature3: For task areas, a neutral white (around 4000K) is often preferred. It feels clean and energetic, which is good for a workspace. However, many clients prefer a consistent feel, so a warmer white (3000K) is also a great choice as long as the CRI is high.
-
Principle 3: Durability Against Heat, Grease, and Smoke4
The area above a grill is a harsh environment.
- Aluminum Channels are Mandatory5: Anodized aluminum channels are essential. They not only protect the strip from impacts but, critically, they shield it from grease splatter and make it easy to clean. They also dissipate heat, which is vital in a hot outdoor kitchen environment.
- IP65 Rating Minimum6: The strip itself should have an IP65 rating or higher. This means it’s protected against dust and jets of water, so it can be wiped down or hosed off for cleaning. A solid silicone coating is preferable to an epoxy one, as it won’t yellow or crack from heat and UV exposure.
| Task Lighting Location | Main Goal | Key Hardware | Professional Tip |
|---|---|---|---|
| Countertops | Shadow-free food preparation. | High CRI (90+) strip in a diffused channel. | Mount the channel at the front edge of the upper cabinet, not pushed back against the wall. |
| Grill Area | Accurate view of food cooking. | High CRI (90+), IP65 rated strip in a channel. | Consider a 4000K CCT for a cleaner, brighter feel specific to the cooking zone. |
| Sink Area | Safely washing and handling items. | IP67 rated strip to handle more splashes. | Ensure the power supply is in a dry, protected location away from any plumbing. |
How Do You Create a Relaxing Ambiance for the Dining Area?
Once the cooking is done, the bright, functional task lights can feel harsh and clinical for dining and socializing. You need to create a transition to a more relaxed and comfortable mood.
Use warm, indirect, and dimmable lighting to define the dining and seating areas. Techniques like under-bar lighting, "floating" bench effects, and soft overhead glows create an intimate, inviting atmosphere that encourages guests to linger.

This is the "hospitality" layer of your design. The key word here is indirect. Guests should feel the warmth and see the effect of the light, but they should never see the bare light source itself, which can be jarring and uncomfortable. Providing dimmable control is absolutely essential. It allows the homeowner to adjust the mood, turning the brightness up for a lively family dinner and dimming it way down for a quiet, late-night glass of wine. For a professional like Tom, installing a quality dimmer is a simple upsell that dramatically increases the client’s satisfaction with the final project.
A Deeper Dive into Creating Ambiance
Let’s explore the specific techniques for building this warm, inviting atmosphere.
-
Technique 1: Under-Counter / Under-Bar Glow7
This is one of the most effective and popular techniques.
- The Placement: A continuous LED strip is mounted in a channel on the underside of the overhanging "bar" portion of the kitchen island.
- The Effect: This casts a soft downlight that illuminates the facing of the island, highlighting the stone or wood texture. It also provides functional foot-level lighting for guests sitting at the bar. It visually separates the "front of house" from the "back of house" and creates a sophisticated, restaurant-like feel.
-
Technique 2: Floating Benches and Steps8
This technique uses light to create architectural magic.
- The Placement: For any built-in seating benches or steps, mount a strip under the overhanging lip.
- The Effect: This makes the heavy architectural elements appear to float weightlessly. It’s a high-impact design trick that looks incredibly custom and high-end. It also serves a practical purpose, providing low-level safety lighting to prevent trips and falls.
-
Technique 3: Soft Overhead Glow9
This defines the entire dining space as its own "room".
- The Placement: If the dining area is under a pergola or other roof structure, use indirect uplighting. Place LED strips on top of the cross-beams, aimed up at the ceiling.
- The Effect: This creates a soft, diffuse, and completely glare-free ambient light that fills the entire space. It feels like light from a full moon, not an artificial fixture. It’s the perfect top layer of light for a comfortable dining experience. For all these applications, a warm white 2700K or 3000K CCT10 is essential for that cozy, inviting feel.
| Ambiance Technique | Design Goal | Best Placement | Key Light Specification |
|---|---|---|---|
| Under-Bar Lighting | Create a sophisticated "lounge" feel. | Under the overhang of the guest-facing counter. | Dimmable, 2700K CCT |
| Floating Bench/Steps | Add architectural drama; provide safety. | Under the lip of seats and stair treads. | Low brightness, continuous line. |
| Pergola Uplighting | Provide a soft, glare-free overhead fill. | On top of cross-beams, aimed at the structure’s ceiling. | Dimmable, 2700K CCT |
How Can You Add "Wow" Factor with Accent Lighting?
You’ve handled the functional and ambient needs. Now, how do you add those final details that make the project look truly exceptional and professionally designed?
Use small, focused applications of light to create focal points. Highlight the texture of a stone backsplash, backlight a translucent countertop, or add "toekick" lighting at the base of the cabinets to make the whole kitchen island float.
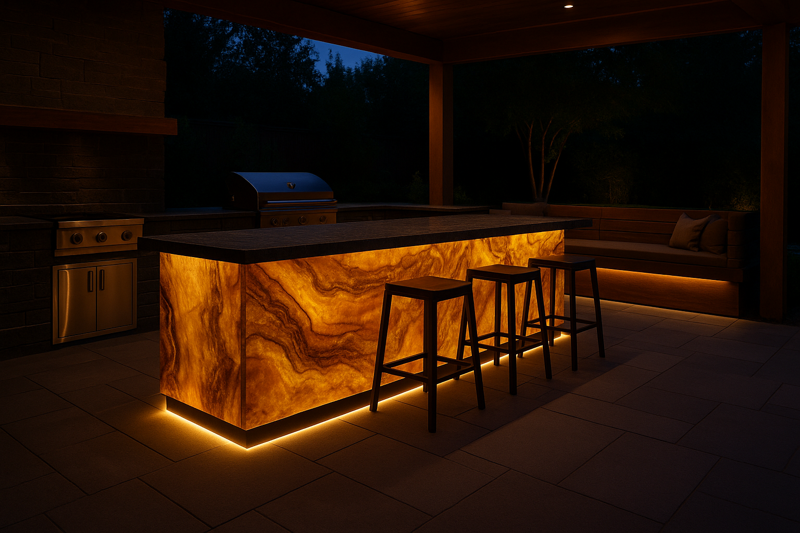
These are the details that separate a good project from a spectacular one. They are the "jewelry" of the lighting design. While not strictly necessary for function, these accent layers create depth, highlight expensive materials, and generate a huge "wow" factor that clients love. For Tom, suggesting one or two of these high-impact accents is an excellent way to upsell a project and demonstrate a sophisticated design sense that goes beyond basic utility, justifying a higher price tag.
A Deeper Dive into High-Impact Accents
These techniques require careful planning but deliver unforgettable results. They are what transform a space from a kitchen into a true showpiece.
-
Technique 1: Backsplash Grazing for Texture
If the kitchen has a backsplash made of a textured material like stacked stone, rough-hewn tile, or brick, you can turn it into a major feature wall. By placing a linear LED strip in a very narrow-beam channel right at the top (or bottom) of the backsplash, you can "graze" the surface with light. This extreme angle creates long, dramatic shadows that make the texture pop. It’s an architectural technique that adds incredible depth and visual interest.
-
Technique 2: Backlighting Translucent Surfaces
This is the ultimate high-end accent. If your client is using a premium material like onyx, certain types of quartzite, or a man-made translucent solid surface for their bar top or a vertical feature, you can make the material itself glow from within. This involves building a sealed, waterproof light box behind or beneath the slab, typically using a dense array of IP67 strips or our LED light panels. This must be planned from the very beginning of the kitchen’s construction, but the effect is jaw-dropping and creates a one-of-a-kind centerpiece.
-
Technique 3: Toekick Lighting for a Floating Effect
This is a simple but incredibly effective accent. Install a low-brightness, diffused LED strip in the recessed "toekick" area at the very bottom of the base cabinets. This wash of light at the floor level serves two purposes: it acts as a subtle, effective safety nightlight for the area, and it creates the magical illusion that the entire heavy kitchen island is floating an inch off the ground.
| Accent Technique | Design Goal | Best Placement | Professional Tip |
|---|---|---|---|
| Material Grazing | Make textured surfaces like stone pop with drama. | Very close to the surface, top or bottom, in a narrow channel. | More effective on rough, uneven surfaces. |
| Backlighting | Make a translucent countertop the star of the show. | In a sealed light box directly behind or under the material. | Must be planned before construction. Ensure even light distribution to avoid spotting. |
| Toekick Lighting | Create a "floating island" illusion; add safety. | In the recessed space at the base of the cabinets. | Use a lower-brightness strip so it’s a subtle glow, not a bright line. |
Conclusion
A truly great outdoor kitchen is lit in layers. It requires bright task lights for cooking, warm ambient light for dining, and clever accents for that final touch of luxury.
-
Understanding CRI helps ensure your task lighting accurately represents colors, crucial for food preparation. ↩
-
Learn about CRI to choose the right lighting for your kitchen, enhancing food appearance and safety. ↩
-
Understanding color temperature helps create the right ambiance and functionality in your cooking space. ↩
-
Explore materials that withstand kitchen conditions, ensuring longevity and performance of your lighting. ↩
-
Find out how aluminum channels protect your lighting and enhance its durability in challenging conditions. ↩
-
Discover the significance of IP ratings to select lighting that can endure harsh kitchen environments. ↩
-
Discover how Under-Counter / Under-Bar Glow can enhance your kitchen’s ambiance and functionality. ↩
-
Learn how Floating Benches and Steps can create a stunning visual effect while ensuring safety in your space. ↩
-
Explore the transformative effect of Soft Overhead Glow lighting for a cozy and inviting dining experience. ↩
-
Understand the nuances between 2700K and 3000K CCT to choose the perfect warm light for your home. ↩
Interested in Our LED Solutions?
Get professional consultation and customized LED lighting solutions for your projects. Contact our expert team today.
Related Articles

How Do You Build Profitable Custom Vehicle and RV Interior LED Rope Lights?
You lose RV installation contracts because your interior lights fail on rough roads. Standard strips show bright dots on glossy…

How to Perfect Bookshelf and Display Cabinet LED Rope Lighting?
You lose retail clients when bookshelves look incredibly dark. Ugly shadows hide expensive products inside display cabinets daily. You need…

How to Master Mirror and Vanity LED Rope Light Installation?
Your clients complain about ugly shadows in their bathroom mirrors. Bad lighting ruins expensive vanity designs. You lose future contracts…
