
How Do You Safely and Beautifully Light a Pool with LED Strips?
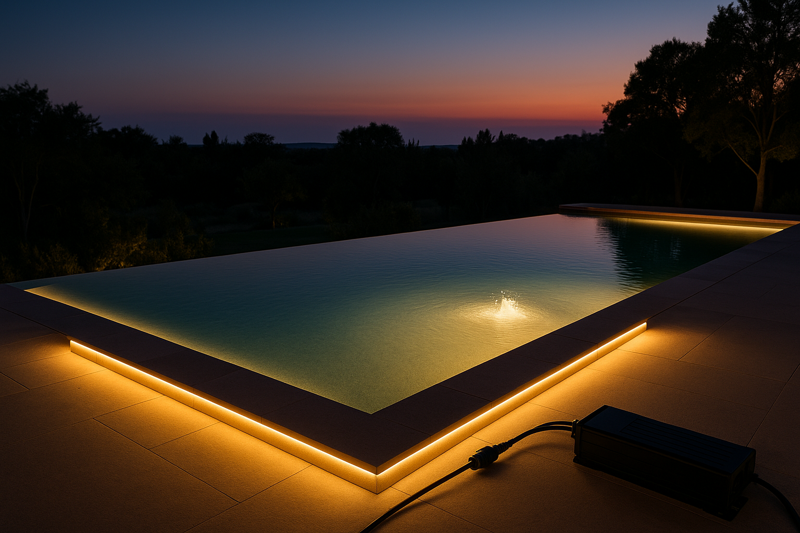
Your client’s stunning new pool is the highlight of their backyard during the day, but at night it becomes a dark, foreboding "black hole." They want a magical, resort-style glow, not just a couple of harsh, outdated underwater spotlights.
You achieve this with a complete, low-voltage system. By installing IP68-rated, submersible LED strips inside protective channels, you can make the entire pool glow beautifully and safely, creating a truly luxurious and modern nighttime oasis.
As a manufacturer who specializes in these systems, I can tell you that lighting a pool is 90% about safety and 10% about artistry. Get the safety and engineering wrong, and the artistry doesn’t matter. The difference between a professional, long-lasting installation and a dangerous failure is the system itself. This guide breaks down the essential safety standards, the most impactful design techniques, and the critical installation steps to ensure a result that is both breathtakingly beautiful and completely secure.
What Makes LED Strip Lighting Safe for Pools and Water Features?
Water and electricity are a dangerous combination, creating massive liability concerns for any contractor. A single failure could be catastrophic, so how can you confidently specify and install an LED strip system in or near water?
Absolute safety is achieved through a "Safety Triangle": a 100% low-voltage (12V or 24V) system, certified IP68 submersible LED strips, and a remote, air-cooled Class 2 power supply kept far away from the water. All three elements are non-negotiable.
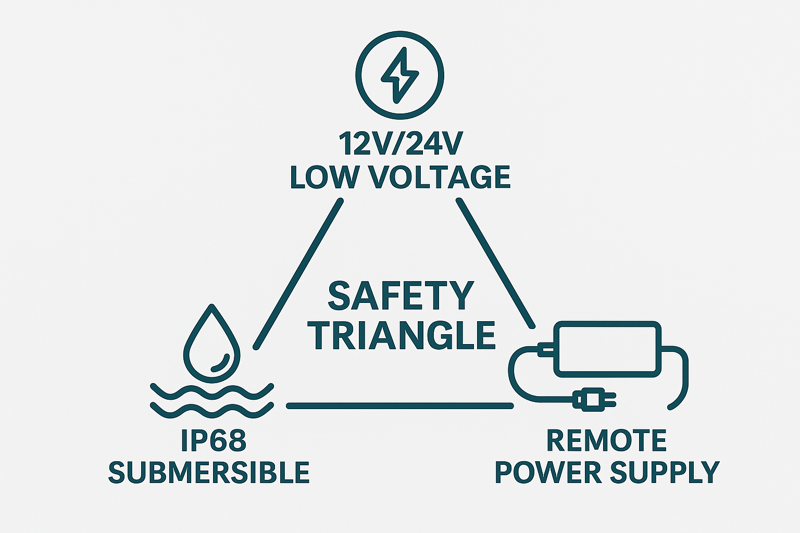
From a manufacturing and engineering perspective, there is no room for compromise here. High-voltage (120V) systems have no place near a pool. A professional system is engineered from the ground up to be intrinsically safe. It uses low voltage so that even in the unlikely event of a failure, there is no danger of serious electric shock. It uses IP68-rated components that are designed for continuous submersion. And it physically separates the high-voltage components from the water. For a professional like Tom, understanding and being able to explain this Safety Triangle to clients is what protects his business and his reputation.
A Deeper Dive into the Safety Triangle
Let’s examine each side of this critical safety framework.
-
Principle 1: Low Voltage (12V/24V DC)1 is Mandatory
This is the foundational principle of all underwater lighting safety.
- What it is: The system operates on a very low direct current (DC) voltage, typically 12V or 24V, transformed from your standard mains power (120V/240V AC) by the power supply.
- Why it’s safe: These low voltages do not carry enough electrical potential to cause a dangerous shock to the human body, especially in a conductive environment like a pool. This is the same reason why most landscape lighting is low-voltage. It’s designed to be safe even when wet.
-
Principle 2: The IP68 Rating2: The Submersible Standard
Not all "waterproof" ratings are created equal. This is a critical distinction.
- IP67 vs. IP68: An IP67 rating means the product is protected against temporary immersion (up to 1 meter for 30 minutes). It’s fine for a deck or patio. An IP68 rating means the product is certified for continuous immersion3 under pressure. This is the only rating acceptable for use inside a pool or fountain.
- Material Matters: For IP68 strips, look for solid silicone extrusion4. Cheaper PVC or epoxy coatings will fail under constant water pressure, chemical exposure (chlorine, salt), and UV light, leading to a breach in the waterproof seal.
-
Principle 3: The Remote Class 2 Power Supply5
This keeps the danger far from the water.
- Function: The power supply, or "driver," is the device that converts high voltage to low voltage. This is the only part of the system connected to the dangerous mains power.
- Location, Location, Location: This unit must be installed in a dry, accessible location that meets all local electrical codes6, typically at least 10-20 feet away from the pool’s edge. It should never be in an underground vault where it could flood. All wiring that runs from the power supply to the pool must be low-voltage.
| Safety Feature | What It Means | Why It’s Essential for Pools | Tom’s Selling Point |
|---|---|---|---|
| Low Voltage (12V/24V) | The system runs on safe, low electrical pressure. | Prevents dangerous electric shocks, even if a wire is damaged. | "This is an intrinsically safe system, engineered like modern landscape lighting." |
| IP68 Rating | Certified for continuous submersion in water. | Guarantees the light will not fail or leak when installed underwater. | "We are using a true submersible-grade component, not just a ‘water-resistant’ one." |
| Remote Power Supply | The high-voltage component is far from the pool. | Isolates the only real electrical hazard from the wet area. | "The entire system in and around the pool is low-voltage for complete peace of mind." |
Where Are the Best Places to Install LED Strips for High-Impact Pool Lighting?
You’ve confirmed the system is safe. Now, where do you place the lights to get that stunning, high-end "resort" look? Just throwing a light in the middle of the pool won’t achieve it.
Focus on three key zones for a layered, professional design: fully submerged for a "glowing water" effect, hidden under the pool coping for a sharp "perimeter definition," and integrated within water features like waterfalls to animate the moving water with light.
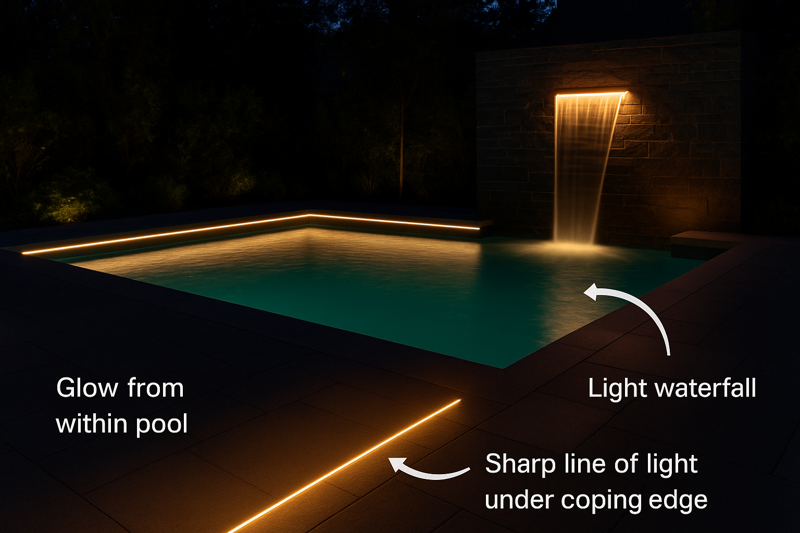
This is where design intent comes into play. Each of these placements creates a different layer of light that adds to the overall composition. The submerged light provides the main ambient glow. The perimeter light creates a crisp, architectural boundary. And the waterfall light adds a dynamic, magical element. As a factory, we engineer different types of strips and channels specifically for these applications. For a designer like Tom, offering a package that includes all three layers is a way to deliver a truly comprehensive and impressive project.
A Deeper Dive into Creative Water Lighting Placements
Let’s explore the techniques for each of these high-impact zones.
-
Technique 1: The Submerged Glow7 (In-Pool)
This creates the foundational "glowing water" effect.
- The Placement: The IP68 strip8 is installed in a special U-shaped channel, typically a few inches below the water line, running along the perimeter of the pool. For new pools, this channel can be built directly into the wall. For existing pools, special surface-mount submersible channels can be used.
- The Effect: This placement illuminates the volume of water from within, creating a soft, uniform glow that is visually stunning and also enhances safety by making the entire pool visible. Color-changing (RGBW) strips are very popular here, allowing the client to change the mood from a tranquil blue to a lively magenta for a party.
-
Technique 2: The Perimeter Definition9 (Under-Coping10)
This creates a sharp, architectural frame around the pool.
- The Placement: A standard outdoor-rated IP67 strip is tucked into a channel directly under the overhanging edge (the coping) of the pool deck. The light is aimed either straight down onto the deck or angled slightly toward the pool water.
- The Effect: This creates a ‘floating deck’ illusion, as if the entire pool surround is hovering just above the ground. It provides excellent safety lighting for the deck area and creates a beautiful mirrored line on the water’s surface, perfectly reflecting the shape of the pool.
-
Technique 3: The Animated Feature11 (Waterfalls & Fountains)
This turns moving water into a dynamic light sculpture.
- The Placement: An IP68 strip is hidden at the base of a waterfall, uplighting the cascading water. Alternatively, for a "weir" or "scupper," the strip can be hidden in the trough where the water emerges, making the sheet of water itself appear to glow.
- The Effect: This is pure magic. As the light shines through the turbulent, moving water, it refracts and shimmers, creating a living, sparkling feature that becomes the absolute focal point of the garden.
| Placement Zone | Design Goal | Required IP Rating | Professional Tip |
|---|---|---|---|
| Submerged (In-Pool) | Create a magical "glowing water" ambient effect. | IP68 (Mandatory) | Use RGBW strips12 for ultimate client control and "party mode" options. |
| Under-Coping (Deck) | Define the pool edge, light the deck. | IP67 | This creates a stunning reflection on the water’s surface. Hide the strip! |
| Waterfalls/Scuppers | Animate moving water with light. | IP68 (Mandatory) | Aim the light in the same direction the water is moving for a natural look. |
| In-Pool Steps & Benches | Enhance safety and create architectural interest. | IP68 (Mandatory) | Integrate seamlessly during pool construction for the cleanest look. |
What Are the Critical Steps for a Fail-Proof Waterproof Installation?
Even with the right IP68 hardware, a poor installation can create a weak point that allows water to get in. How do you ensure every connection is 100% waterproof and the system lasts for years?
A professional installation relies on a system of factory-sealed connections, waterproof feed cables exiting above the waterline, and meticulous sealing of all channel end caps and joints with high-grade, chlorine-resistant silicone sealant.
This is where our factory experience is invaluable. We’ve seen a thousand installations, and failures almost always happen at the connection points. You cannot use standard solder connections or wire nuts and expect them to survive underwater. The entire chain, from the strip to the wire to the power supply, must be a sealed system. This requires using specific components and following a precise process. For Tom, guaranteeing a fail-proof job means paying extreme attention to these connection details. It’s the craft that ensures his high-end design doesn’t turn into a high-cost callback.
A Deeper Dive into Waterproofing Techniques
Let’s break down the critical steps for a truly waterproof system.
-
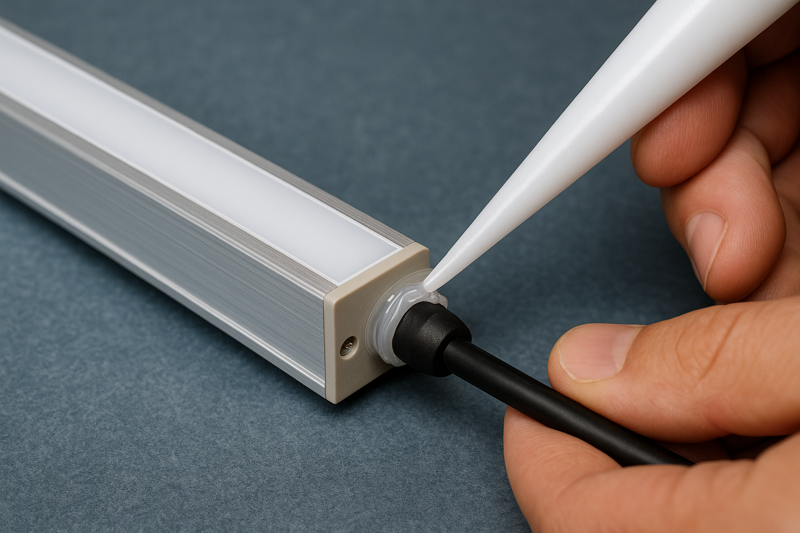
Step 1: Use Factory-Sealed Injection Molded Connectors
This is the most reliable way to connect the strip to the feed cable.
- The Problem: The point where the flexible LED strip joins the power cable is the most common point of failure. Hand-soldering and heat-shrinking is not reliable enough for continuous submersion.
- The Solution: We supply our IP68 strips with a special factory-sealed, injection-molded connector. This process creates a single, seamless, and perfectly waterproof bond between the strip and the cable that cannot be replicated in the field. Always order your strips in the exact lengths you need, with the factory connector already attached.
-
Step 2: Route the Feed Cable Above the Waterline
Never create an underwater exit point for your wiring.
- The Technique: Even with a perfect seal, it’s best practice to minimize risk. Plan your installation so that the feed cable exits the channel and the pool structure above the maximum water level. For example, the cable can run up behind a skimmer box or through a conduit built into the top of the pool wall. This adds a crucial layer of redundancy.
-
Step 3: Meticulously Seal All Channels and End Caps
The channel is your second layer of defense. Make it watertight.
- The Process: After placing the strip inside the channel and snapping on the diffuser, every single joint and end cap must be perfectly sealed. Use a high-quality marine-grade or pool-rated silicone sealant. Do not use standard construction silicone, as it will be degraded by chlorine or salt. Apply a generous, continuous bead to the end caps, especially where the feed cable exits. Seal any joints where two pieces of channel meet. Let it cure completely before submerging.
Conclusion
A spectacular and safe pool lighting solution is a complete engineered system. It starts with a non-negotiable foundation of low-voltage, IP68-rated hardware and relies on professional installation that ensures every connection is 100% sealed, creating a stunning feature that will last.
-
Explore the advantages of low voltage systems for safety and efficiency in pool lighting. ↩
-
Learn why an IP68 rating is crucial for ensuring the longevity and safety of underwater lighting. ↩
-
Understand the importance of continuous immersion ratings for reliable underwater lighting. ↩
-
Find out why solid silicone is preferred for durability and performance in wet conditions. ↩
-
Discover how remote power supplies minimize electrical hazards in pool environments. ↩
-
Get informed about essential electrical codes to ensure safe and compliant pool lighting. ↩
-
Discover how the Submerged Glow technique can transform your pool into a stunning visual centerpiece. ↩
-
Understand the significance of IP68 strips in ensuring safety and durability in pool lighting installations. ↩
-
Learn about the Perimeter Definition technique and how it creates a beautiful floating effect around your pool. ↩
-
Discover the Under-Coping technique and how it can beautifully define your pool’s edge while enhancing safety. ↩
-
Explore the magic of Animated Features and how they can turn your water features into dynamic light sculptures. ↩
-
Find out how RGBW strips can add versatility and mood to your pool lighting, perfect for any occasion. ↩
Interested in Our LED Solutions?
Get professional consultation and customized LED lighting solutions for your projects. Contact our expert team today.
Related Articles

How Do You Build Profitable Custom Vehicle and RV Interior LED Rope Lights?
You lose RV installation contracts because your interior lights fail on rough roads. Standard strips show bright dots on glossy…

How to Perfect Bookshelf and Display Cabinet LED Rope Lighting?
You lose retail clients when bookshelves look incredibly dark. Ugly shadows hide expensive products inside display cabinets daily. You need…

How to Master Mirror and Vanity LED Rope Light Installation?
Your clients complain about ugly shadows in their bathroom mirrors. Bad lighting ruins expensive vanity designs. You lose future contracts…
