
How Do You Truly Weatherproof an Outdoor LED Strip Light Installation?
You complete a beautiful outdoor lighting job. A few months later, the client calls: the lights are full of water and flickering. Your professional work now looks amateurish, and a costly repair is needed.
True weatherproofing is a system. It requires starting with a high-quality IP67 silicone strip, mounting it in a protective aluminum channel, wiring it to an outdoor-rated power supply inside a NEMA box, and sealing all cuts and connections with solder and 100% silicone sealant.
From my position as a manufacturer, I know that weatherproofing isn’t just one feature; it’s a complete installation philosophy. A cheap strip will fail, but even the best strip in the world will fail if it’s not installed correctly. Let’s walk through the four essential layers of protection that separate a temporary setup from a permanent, professional installation.
Does the IP Rating Alone Guarantee Weatherproofing?
You bought an IP67-rated strip, confident it was waterproof. But after one year in the sun, the coating became brittle and cracked, letting moisture in and destroying the LEDs completely.
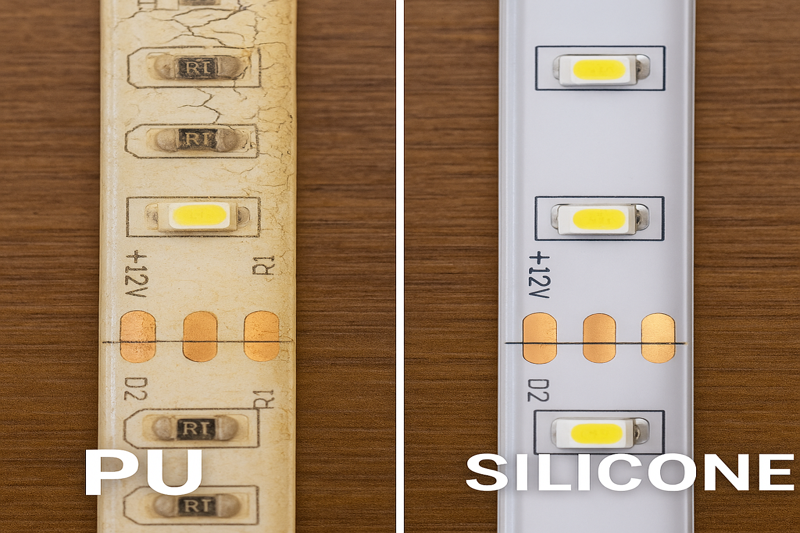
No. The IP rating is a lab test, not a guarantee of long-term durability. True weatherproofing depends on the strip’s material. Premium strips use UV-resistant silicone that stays flexible, while budget strips use cheap PU or epoxy that UV light turns yellow and brittle.
This is the biggest misconception I see in the field. The IP (Ingress Protection) rating only tells you how well a product resists water and dust when it’s brand new. It tells you nothing about how it will hold up after a year of sun, heat, and cold. A product’s material is the true predictor of its outdoor lifespan.
Beyond the Rating – The Material Science of Durability
An IP rating is a starting point, not the finish line. The real enemy of outdoor electronics isn’t just water; it’s the sun.
- The Limits of a Lab Test: The IP67 test involves submerging a product in 1 meter of water for 30 minutes in a controlled lab. It doesn’t test for the relentless daily assault of UV radiation, temperature cycles from freezing to scorching, or abrasive wind and rain.
- The Failure of Cheap Coatings: Budget strips are often coated in Polyurethane (PU) or epoxy. These are organic plastics that are fundamentally broken down by UV light. This process, photodegradation1, makes them hard, brittle, and yellow. As the material expands and contracts with daily temperature swings, micro-cracks form, grow, and allow water to seep in, rendering the initial IP rating useless.
- The Resilience of Silicone: Our premium strips use a high-grade silicone2 body. Silicone is an inorganic material, making it inherently resistant to UV damage. It remains optically clear and, more importantly, flexible for years. This enduring flexibility allows it to maintain a perfect waterproof seal through every season.
| Feature | Budget Strip (PU/Epoxy) | Premium Strip (Silicone) |
|---|---|---|
| IP Rating | Passes when new | Maintains rating for years |
| UV Resistance | Poor (Cracks/Yellows) | Excellent (Stays Clear/Flexible) |
| Longevity | 1-2 Year Lifespan | 5+ Year Lifespan |
How Should You Protect the Power Supply from the Elements?
You carefully installed a waterproof LED strip, but the power supply you tucked under a deck failed after a humid summer. The entire system is dead because its heart was left exposed.
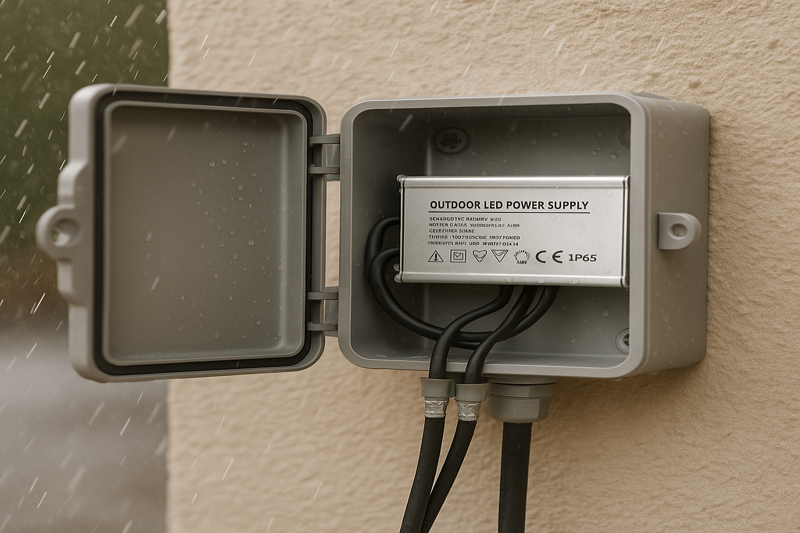
Always use a power supply that is itself outdoor-rated (IP67 or higher). For the ultimate protection and a professional finish, install this power supply inside a NEMA-rated weatherproof electrical junction box to shield it from direct rain, condensation, and physical damage.
The power supply is the most common point of failure in an improperly weatherproofed system. Many installers focus only on the strip, forgetting that the power supply is just as vulnerable. Using a standard, indoor-rated power supply outdoors is a guarantee of failure and a serious safety risk. A two-layer approach provides the redundancy needed for a decade of reliable operation.
Shielding the System’s Heart
Protecting the power supply is just as important as choosing the right strip. You must defend against more than just rain.
- Tier 1: The Outdoor-Rated Power Supply3: Start with a power supply that is designed for the job. Look for a UL Wet Location rating and an IP67 or IP68 rating. These units are factory-sealed to prevent water from getting inside the housing.
- Tier 2: The NEMA Junction Box4: This is the professional standard. Placing the power supply inside a NEMA 3R (or higher) rated box provides a critical second layer of defense. It protects the unit from direct rainfall, lawn sprinklers, and physical impacts. Crucially, it also helps manage condensation and provides a secure, organized place for all your wiring connections, preventing loose wires from being exposed to the elements. This is the mark of a truly professional and safe installation.
| Placement Method | Weather Resistance | Professional Grade |
|---|---|---|
| Indoor PSU Outdoors | None (Dangerous) | No |
| Outdoor PSU, Exposed | Good | Acceptable |
| Outdoor PSU in NEMA Box | Excellent | Yes |
What’s the Best Way to Mount Strips to Withstand Weather?
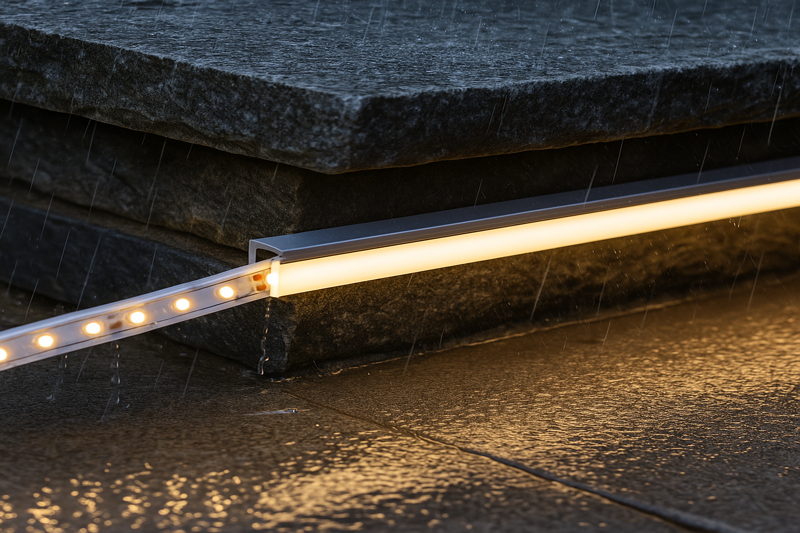
You used the strip’s adhesive backing to mount it along a stone wall. After the first season of freeze-thaw cycles, the strip is sagging and peeling, completely ruining the clean line of light.
Never rely on adhesive tape alone. For a permanent, weatherproof installation, secure the LED strip inside a deep-set aluminum channel. The channel should be fastened to the surface with screws, providing a mechanical bond that is immune to weather and temperature changes.
I see this failure all the time. The adhesive on the back of an LED strip is only for temporary positioning. It is not a structural mounting solution for outdoor use. The constant expansion and contraction of materials like wood, stone, and metal will break the adhesive bond. A channel provides physical protection and ensures the strip stays perfectly straight and secure for its entire lifespan.
More Than Mounting – A Protective Housing
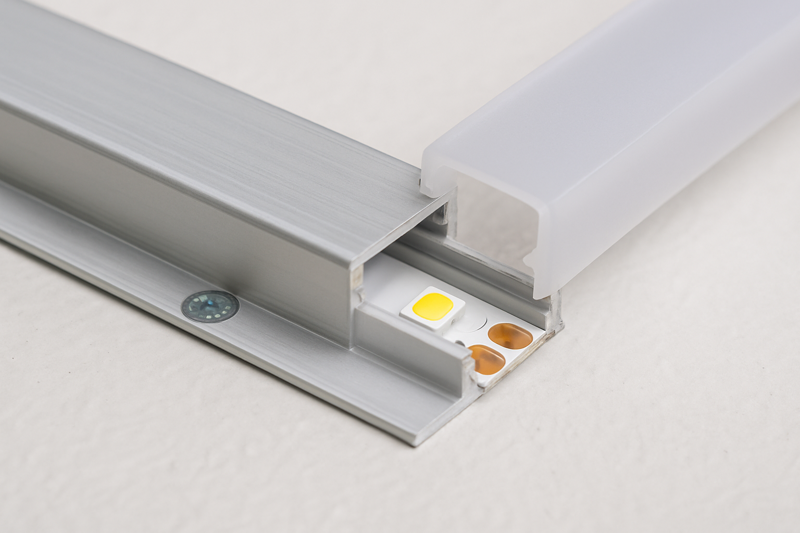
An aluminum channel is a simple component that provides three essential weatherproofing benefits.
- A Mechanical Bond5: The channel is physically screwed into the mounting surface. This mechanical connection will not fail due to heat, cold, or moisture. It holds the strip exactly where you want it, forever.
- A Physical Shield: The channel and its diffuser cover act as a hard shell. It protects the LED strip from direct impact from hail, falling branches, or accidental bumps from lawn equipment. It also creates a barrier against standing water, ice, and snow.
- A Heat Sink6: Weatherproofing is also about managing heat. On a hot summer day, direct sun can bake a strip. The aluminum channel acts as a large heat sink, drawing damaging heat away from the LEDs and electronics. This keeps the strip running cooler, which is critical for ensuring a long and stable lifespan.
| Mounting Solution | Durability | Protection Level |
|---|---|---|
| Adhesive Tape Only | Poor (Will Fail) | None |
| Plastic Clips | Fair | Low |
| Aluminum Channel | Excellent (Permanent) | High |
How Do You Make 100% Waterproof Cuts and Connections?
You used solderless clip-on connectors to join two pieces of strip. After the first rain, water wicked into the connection point, causing corrosion and a flickering, failing light.
Never use solderless clips outdoors. To create a fully waterproof seal, solder the connection wires directly to the strip’s copper pads. Then, fill a silicone end cap with 100% silicone sealant and press it over the joint, forcing the silicone to fully encapsulate everything.

The waterproofing of your installation is only as strong as its weakest point. Every cut you make creates a new potential entry point for moisture. Solderless connectors are convenient for indoor use, but they are the enemy of outdoor longevity. They create tiny gaps that invite moisture, which leads to corrosion and failure. A soldered and silicone-sealed connection is the only method that creates a new, factory-grade waterproof seal.
Recreating the Factory Seal
Every time you cut the strip, your goal is to perfectly recreate the waterproof seal it had when it left the factory.
- Why Solderless Clips Fail7: These clips work by using tiny metal teeth to bite into the copper pads. Outdoors, temperature changes cause the plastic clip to expand and contract, loosening this connection. Moisture gets in, and electrolysis begins, rapidly corroding the copper contacts and causing the light to fail.
- The Permanent Solder Joint: Soldering creates a single, solid piece of metal between the wire and the copper pad. It is a robust electrical and mechanical connection that will not loosen or corrode. It is the professional standard for all low-voltage wiring.
- The Silicone Encapsulation Method8: This is the critical final step. Use only 100% silicone sealant (not acrylic caulk). Inject a generous amount into a fresh silicone end cap. When you push the cap onto the end of the strip, the hydraulic pressure forces the silicone into every tiny crevice, completely surrounding the solder an and wires. This creates a solid, flexible, impenetrable plug that water cannot defeat.
| Connection Method | Waterproof Integrity | Long-Term Reliability |
|---|---|---|
| Solderless Clip | None (Will Leak) | Poor (Will Corrode) |
| Soldered + Tape | Low | Fair |
| Soldered + Silicone Cap | Excellent (IP67) | Excellent |
Conclusion
True weatherproofing is a systematic process. It starts with a quality silicone strip and ends with every connection being perfectly sealed, creating a robust system that will endure the elements for years.
-
Understanding photodegradation is crucial for selecting durable materials, especially for outdoor electronics. ↩
-
Exploring the advantages of high-grade silicone can help you make informed choices for long-lasting outdoor electronics. ↩
-
Exploring Outdoor-Rated Power Supplies will help you choose the right equipment for outdoor installations, ensuring durability and reliability. ↩
-
Understanding NEMA Junction Boxes can enhance your installation’s safety and efficiency, ensuring long-lasting performance. ↩
-
Understanding the mechanical bond can help you appreciate its importance in ensuring durability and stability in weatherproofing. ↩
-
Exploring how heat sinks function can enhance your knowledge of LED longevity and performance, crucial for effective lighting solutions. ↩
-
Understanding the failure of solderless clips can help you choose better alternatives for your projects. ↩
-
Exploring the silicone encapsulation method will provide insights into effective waterproofing techniques for electrical connections. ↩
Interested in Our LED Solutions?
Get professional consultation and customized LED lighting solutions for your projects. Contact our expert team today.
Related Articles

How Do You Build Profitable Custom Vehicle and RV Interior LED Rope Lights?
You lose RV installation contracts because your interior lights fail on rough roads. Standard strips show bright dots on glossy…

How to Perfect Bookshelf and Display Cabinet LED Rope Lighting?
You lose retail clients when bookshelves look incredibly dark. Ugly shadows hide expensive products inside display cabinets daily. You need…

How to Master Mirror and Vanity LED Rope Light Installation?
Your clients complain about ugly shadows in their bathroom mirrors. Bad lighting ruins expensive vanity designs. You lose future contracts…
