
How Do You Truly Weatherproof an Outdoor LED Strip Light Installation?
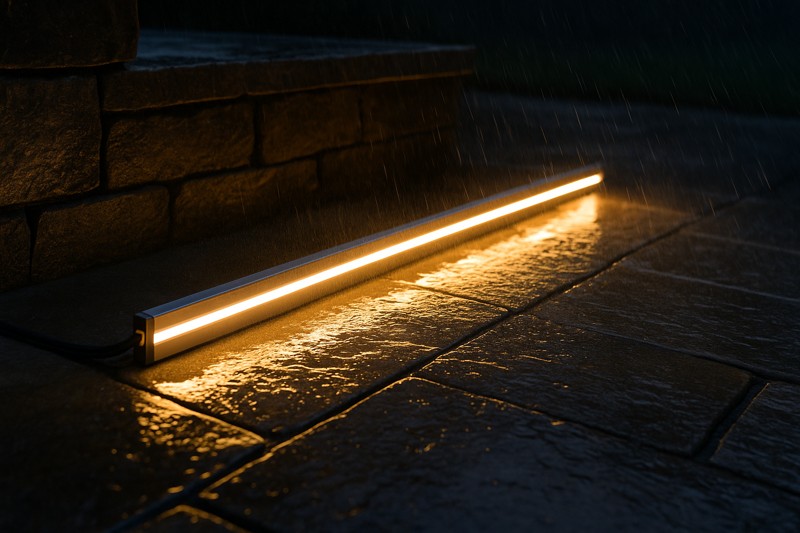
You’ve completed a beautiful outdoor lighting project. It looks stunning. But after the first major rainstorm, the client calls you in a panic. The lights are flickering, a section is dead, and your flawless installation is now a major problem.
To truly weatherproof an installation, you must create a fully sealed system. This means starting with an IP67 or IP68-rated silicone LED strip, using an IP67 power supply, making every low-voltage connection 100% waterproof, and providing physical protection with mounting channels.
As a manufacturer, I can design an LED strip to be completely waterproof when it leaves my factory. But a chain is only as strong as its weakest link. In an outdoor lighting system, there are multiple potential "links"—the strip itself, the power supply, and every single wiring connection. A failure in any one of these components compromises the entire system. True weatherproofing isn’t a feature you buy; it’s a meticulous installation process you follow. This guide will walk you through the professional, step-by-step method to ensure your outdoor lighting is built to withstand any weather for years to come.
How Do You Choose a Truly Weatherproof LED Strip?
You see "waterproof" on the product box, but you’ve been burned before. After just one season of sun and rain, a previous strip you used became yellow, brittle, and started to fail. You need to know what to specify to guarantee durability.
The only choice for professional outdoor use is an IP67 or IP68-rated LED strip made with a full silicone extrusion. Unlike cheaper epoxy-coated (IP65) strips, silicone is inherently UV-stable, remains flexible in the cold, and will not yellow or crack over time.
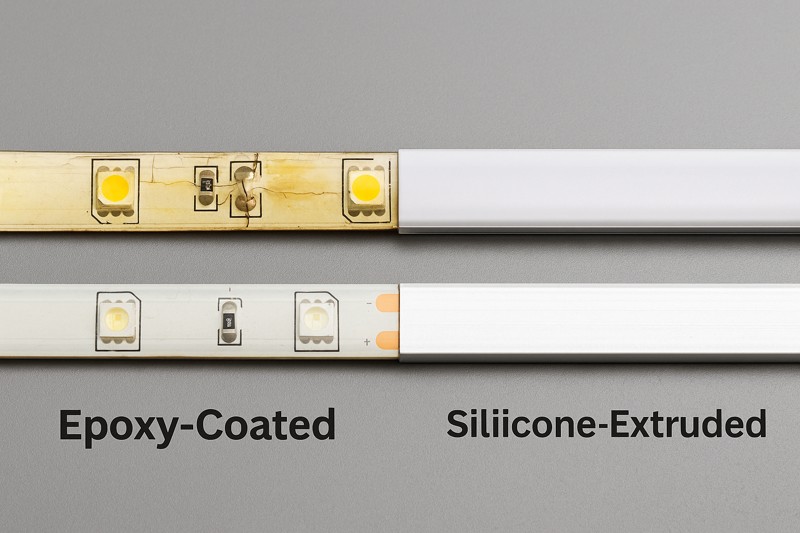
This is the single most important decision you will make. The material science of the LED strip’s protective housing determines its long-term viability. Many products are marketed as "outdoor" or "water-resistant," but they are not designed to survive years of direct exposure to the elements. Cheaper strips use an epoxy resin or polyurethane (PU) glue poured over the top of an indoor strip. While this provides some initial water protection, these materials are not UV-stable. The sun’s radiation will break them down, causing them to become hard, yellow, and develop micro-cracks that allow water to seep in. For my clients like Tom, who need to install a system and not worry about it again, I only manufacture and recommend full silicone extrusion strips.
A Deeper Dive into Materials and IP Ratings1
Let’s get technical and break down exactly what you’re looking for in a durable outdoor product.
-
IP Ratings: What They Really Mean for an Installation
The Ingress Protection (IP) rating is a two-digit code that tells you the level of protection against solids (first digit) and liquids (second digit).
- IP65: The "6" means total protection from dust. The "5" means it is protected against low-pressure water jets from any direction. This is not sufficient for outdoor installation. Rain is often wind-driven (high pressure), and puddles can form. An IP65 strip is, at best, "splash-proof."
- IP672: The "6" means dust-tight. The "7" means it is protected against temporary immersion in water up to 1 meter deep. This is the professional minimum for any outdoor application.
- IP683: The "8" means it is protected against continuous, long-term immersion in water under pressure. This is specified for underwater applications like pools and fountains.
-
Material Science: Why Silicone4 is the Only Choice
The material of the waterproof housing is more important than the IP rating alone. An IP67 strip made from the wrong material will eventually fail and lose its rating.
- Epoxy/PU: As mentioned, these materials are cheap but will degrade under UV light. They are a common point of failure in low-cost "waterproof" strips.
- Silicone: Silicone is a superior material in every way for this application. It is naturally UV-resistant, meaning it won’t yellow or degrade in direct sunlight. It remains highly flexible across a wide temperature range, so it won’t become brittle and crack in freezing weather. It offers excellent thermal conductivity, helping to dissipate heat from the LEDs and prolong their life.
| Material / Rating | UV Resistance | Long-Term Durability | Professional Use Case |
|---|---|---|---|
| IP65 Epoxy | Poor | Poor (1-2 years) | Not Recommended for Outdoor Use. |
| IP67 Silicone | Excellent | Excellent (5-10+ years) | The professional standard for all outdoor landscape and architectural lighting. |
| IP68 Silicone | Excellent | Excellent (5-10+ years) | Required for underwater and submersible applications (pools, fountains). |
Where is the Most Common Point of Failure in an Outdoor System?
You’ve installed a top-of-the-line IP67 strip and a waterproof power supply. Everything should be perfect. But six months later, the lights are dead. You investigate and find that your wire connection, wrapped in electrical tape, has become a corroded, water-filled mess.
The single most common point of failure is an improperly sealed low-voltage wire connection. Water will wick into any non-waterproof connection, causing corrosion, short circuits, and complete system failure. Every single connection must be made 100% watertight and airtight.
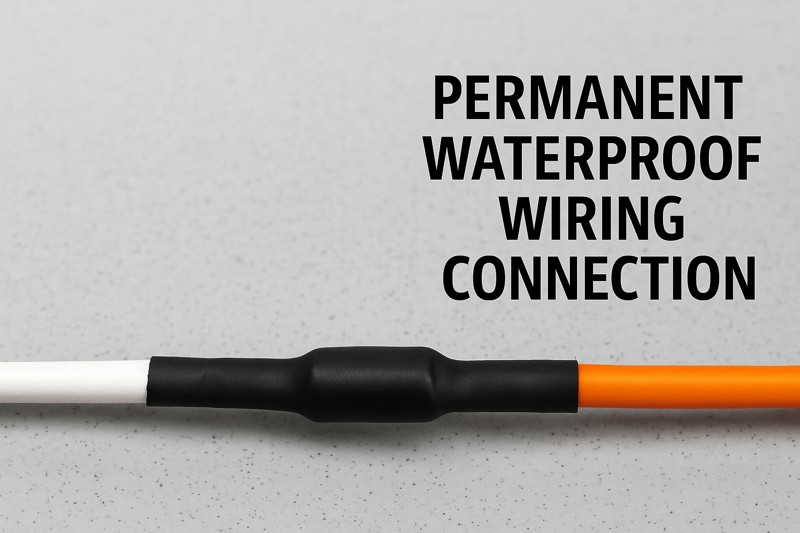
This is the mistake I see most often. An installer will spend top dollar on the best hardware but then treat the wiring as an afterthought. You can have a submarine-grade LED strip, but if you connect it to your power wire with a simple twist-on wire nut and a wrap of electrical tape, you have created a guaranteed entry point for moisture. Electrical tape is not waterproof. Its adhesive fails over time, and it unravels. Standard wire nuts have large gaps that invite water in. Making these connections robust and permanent is not an optional "upgrade"; it is a mandatory step for a weatherproof installation.
A Deeper Dive into Professional Connection Methods
There are two primary professional methods for creating a permanent, waterproof low-voltage connection. Choosing one of these methods is non-negotiable.
-
Method 1: Soldering with Adhesive Heat Shrink (The Gold Standard)
This is the most reliable method and the one I recommend for all my professional clients. It creates a connection that is both mechanically strong and completely sealed.
- Strip Wires: Expose about half an inch (1.5cm) of bare copper on each wire.
- Add Heat Shrink: Before you connect the wires, slide a 2-inch (5cm) piece of adhesive-lined (dual-wall) heat shrink tubing5 over one of the wires. This is critical. Standard heat shrink will not work.
- Twist & Solder: Twist the bare wires together firmly. Apply heat with a soldering iron6 and introduce solder until it flows and fully penetrates the joint. This creates a solid electrical and physical bond.
- Seal the Joint: Slide the heat shrink tubing over the cooled solder joint. Use a heat gun to shrink it down. The tubing will shrink tightly, and the adhesive lining on the inside will melt, flowing into every tiny gap and creating a solid, waterproof, and strain-resistant seal.
-
Method 2: Waterproof Gel-Filled Connectors7 (Excellent Solder-Free Alternative)
When soldering isn’t practical on a job site, these connectors are the next best thing.
- How They Work: These are typically push-in or twist-on connectors that come pre-filled with a thick, non-conductive silicone gel8.
- Installation: You simply strip your wires to the specified length and insert them into the connector. As you push them in (or twist the cap on), the wires become fully encapsulated by the gel. The gel displaces all air and prevents any moisture from ever reaching the metal conductors. These are far superior to any non-filled connector.
| Connection Method | Reliability | Skill Level Required | Key Component |
|---|---|---|---|
| Electrical Tape | Failure | None | N/A – Do not use. |
| Standard Wire Nuts | Failure | None | N/A – Do not use outdoors. |
| Gel Connectors | Good | Low | Silicone Gel-Filled Waterproof Connectors. |
| Solder & Heat Shrink | Excellent | Medium (Soldering) | Adhesive-Lined (Dual-Wall) Heat Shrink. |
How Do You Protect the Power Supply and Electronics?
The LED strip and its connections are sealed, but what about the power supply? You’ve placed a standard, indoor-style power brick inside a plastic box, thinking it’s protected. Condensation forms inside the box, and the power supply shorts out and fails.
The power supply unit (PSU or driver), and any smart controllers, must be explicitly rated for outdoor use, with a minimum IP67 rating. These units are fully potted and sealed in a robust metal casing with waterproof cable glands to prevent any moisture ingress.
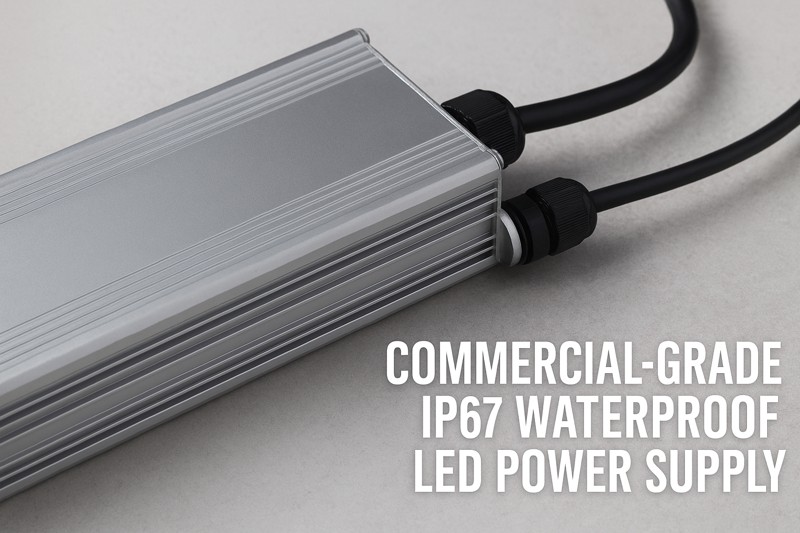
The power supply is the heart of your entire lighting system. Attempting to "weatherproof" an indoor-rated power supply is a common but dangerous mistake. An indoor PSU is designed with ventilation holes to cool itself. Placing it in a sealed box will cause it to overheat and fail prematurely. Even in a "weatherproof" NEMA box, daily temperature cycles will cause condensation (sweating) on the inside, which will drip onto the electronics and cause a short. The only professional solution is to use a power supply that was designed from the ground up for outdoor exposure. These units are solid-state, fully sealed in a thermally conductive epoxy, and housed in a waterproof aluminum casing that acts as a heatsink.
A Deeper Dive into System Electronics Protection
Let’s ensure the entire "brain" of your system is as tough as the lights themselves.
-
Specifying the Power Supply
- Rating: Look for a minimum of IP67. The unit should be UL or CE listed for safety compliance.
- Housing: A finned aluminum housing is ideal, as it provides both physical protection and excellent heat dissipation.
- Connections: The unit should have integrated waterproof pigtail cables for both the AC input and DC output, not screw terminals that would be exposed to the air.
- Location: Even with an IP67 rating, it’s best practice to mount the power supply in a sheltered location (under a deck, on a wall protected by an eave) to protect it from direct, prolonged sunlight and standing water. This will maximize its operational lifespan.
-
Weatherproofing Smart Controllers
If your system includes a WiFi, Zigbee, or RF controller, the same rules apply. You cannot place an indoor "smart" module in a box outside.
- Integrated Units: Some manufacturers offer integrated IP67 controller-and-driver units.
- Dedicated Outdoor Controllers: We manufacture dedicated IP67-rated controllers that are designed just like our power supplies—fully sealed with waterproof pigtails. These are wired in-line between the power supply and the LED strip. This is the only reliable way to add smart control to an outdoor installation.
Conclusion
True weatherproofing is a professional discipline. It requires selecting IP67 silicone strips and electronics, making every connection permanently waterproof, and protecting the system from physical damage. By following these steps, you build a lighting system that delivers on its promise of durability, reliability, and lasting client satisfaction.
-
Understanding IP Ratings is crucial for selecting the right outdoor products that can withstand environmental challenges. ↩
-
Learn about the significance of the IP67 rating and its importance for reliable outdoor installations. ↩
-
Discover the advantages of IP68 rating for products used in underwater settings like pools and fountains. ↩
-
Explore why silicone outperforms other materials in durability and UV resistance for outdoor lighting. ↩
-
Explore this link to understand the benefits and applications of adhesive-lined heat shrink tubing in creating waterproof connections. ↩
-
Find out which soldering iron is recommended for creating strong, waterproof electrical connections. ↩
-
Discover how waterproof gel-filled connectors can provide a reliable, solder-free alternative for electrical connections. ↩
-
Learn about the role of non-conductive silicone gel in enhancing the reliability of electrical connections. ↩
Interested in Our LED Solutions?
Get professional consultation and customized LED lighting solutions for your projects. Contact our expert team today.
Related Articles

How Do You Build Profitable Custom Vehicle and RV Interior LED Rope Lights?
You lose RV installation contracts because your interior lights fail on rough roads. Standard strips show bright dots on glossy…

How to Perfect Bookshelf and Display Cabinet LED Rope Lighting?
You lose retail clients when bookshelves look incredibly dark. Ugly shadows hide expensive products inside display cabinets daily. You need…

How to Master Mirror and Vanity LED Rope Light Installation?
Your clients complain about ugly shadows in their bathroom mirrors. Bad lighting ruins expensive vanity designs. You lose future contracts…
