
LED Rope Light Brightness: Lumens and Visibility Guide (Are You Buying Too Dim or Too Bright?)
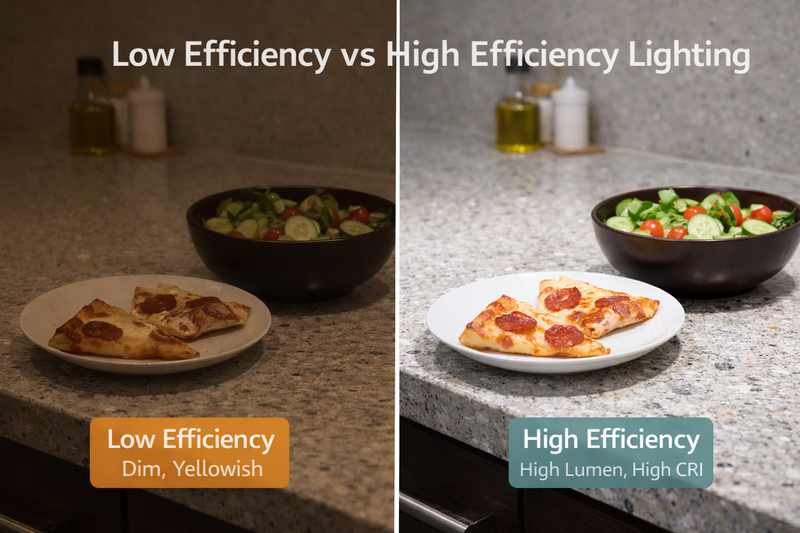
Picture this: You are standing in the middle of a freshly finished high-end retail store. The design is sleek, the shelves are custom oak, the flooring is imported marble, but something feels wrong. The product displays look dull, the jewelry doesn’t sparkle, and the "vibrant" atmosphere you promised the client feels more like a hospital waiting room during a power outage. You check the specs—you bought the "standard" lights. Choosing the wrong brightness isn’t just a technical error; in our business, it is a sales killer.
To confirm true specific visibility, you must look beyond just wattage. You need to analyze the "Light Efficiency" (lm/W) to determine energy cost versus output, check the LED Density (Quantity of Lampwicks) for uniform brightness without dark spots, and select the correct Color Temperature (CCT) to ensure your lumens are actually enhancing the textures and materials of your project.
As a factory owner who has spent years constantly dealing with "urgent" panic calls from contractors who realized their lights were too dim after they had already glued them into the aluminum channels, I see the same pattern over and over again. Buyers look at the price tag first, the wattage second, and the actual lumen output last. Or worse, they go to the other extreme and buy the brightest industrial light possible for a bedroom application, effectively blinding the guests. Today, I am going to break down the technical specs—Lumens, Light Efficiency, and Flux—so you stop guessing and start engineering your lighting success.
Does "More Watts" Really Mean "More Brightness"?
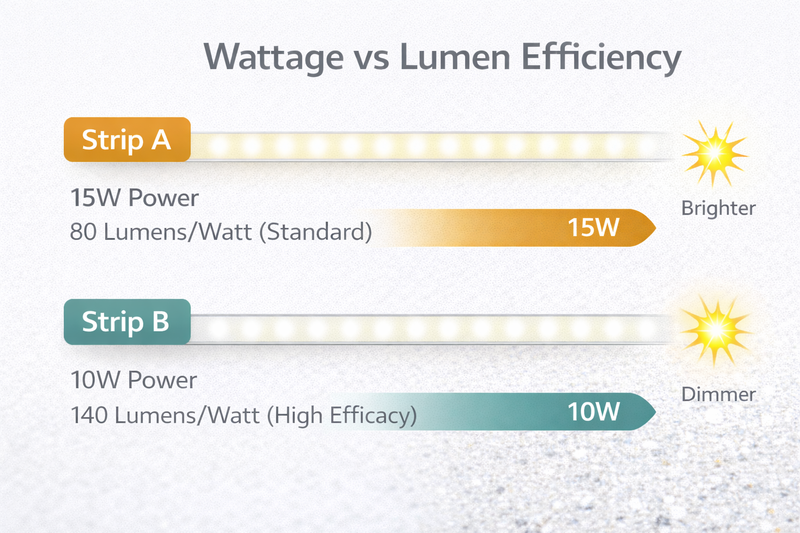
Most people—even experienced electricians—operate under the assumption that a 15-watt strip is automatically brighter than a 10-watt strip. Ten years ago, that might have been true. Today, believing this is the biggest misconception in the industry and it is costing your clients money.
Wattage measures energy consumption, not brightness. You must calculate the "Light Efficiency" (lumens per watt). A cheap strip might burn 15W to produce a meager 800 lumens, while a high-efficiency premium strip can produce 1000 lumens using only 10W. High efficiency means brighter light with less heat and lower electricity bills.
The Mathematics of Efficiency and Heat
In commercial projects, you need to understand that heat is the enemy of longevity1. If you buy a high-wattage strip just to get brightness, you are also buying a significant thermal management problem.
Let me share a story from a project in Las Vegas. A contractor bought cheap, high-wattage (20W/meter) strips for a ceiling cove. They were bright, yes. But because the efficiency was low (around 80 lumens/watt), almost 80% of that energy was turning into heat, not light. Six months later, the silicone began to yellow, and the brightness decayed by 30% because the chips were cooking themselves.
The Efficiency Metric You Must Check:
When you look at a spec sheet, ignore the wattage for a second. Look at the "Light Efficiency2" column.
- Standard Efficiency: Traditional SMD strips often hover around 70 to 80 lumens per watt. These are fine for budget projects, but they are energy hogs.
- High Efficiency: In our factory, we produce advanced COB strips that reach 120, 130, or even up to 182 lumens per watt3.
- The Real World Impact: Imagine you are lighting a 500-meter hotel corridor. If you use a 130 lm/W strip instead of an 80 lm/W strip, you are getting the same amount of light, but you are stressing your power supplies 30% less. This means you can buy smaller power supplies (saving money) and your air conditioning bill goes down because you aren’t fighting the heat generated by the lights.
Lumen Output Ranges to Target:
Don’t just guess. Here are the benchmarks we use for manufacturing:
- Decorative/Accent: Aim for 300-400 lumens/meter. This is strictly for mood lighting or toe-kicks where you don’t want to light up the floor.
- Task Lighting: You need about 900-1000 lumens/meter. This is the minimum requirement for under-cabinet lighting. Any less, and cutting vegetables becomes dangerous.
- Primary Illumination: For main room lighting, look for specs pushing 1400+ lumens/meter. Our specific HC series high-output strips can push up to 1443 lumens at 15 Watts. This is powerful enough to be the main light source in a room, eliminating the need for bulky hanging fixtures.
The "Dark Area" Factor:
It is not just about total brightness; it is about delivery. Standard SMD strips leave gaps between the chips. Even if they are bright, the light is spotty. Our COB (Chip on Board) technology provides a continuous line of light with no dark areas. This means the perceived brightness is higher because the light is uniform, filling the space evenly rather than aggressively shooting beams from individual points.
Why Is Color Temperature (CCT) Critical to Perceived Brightness?
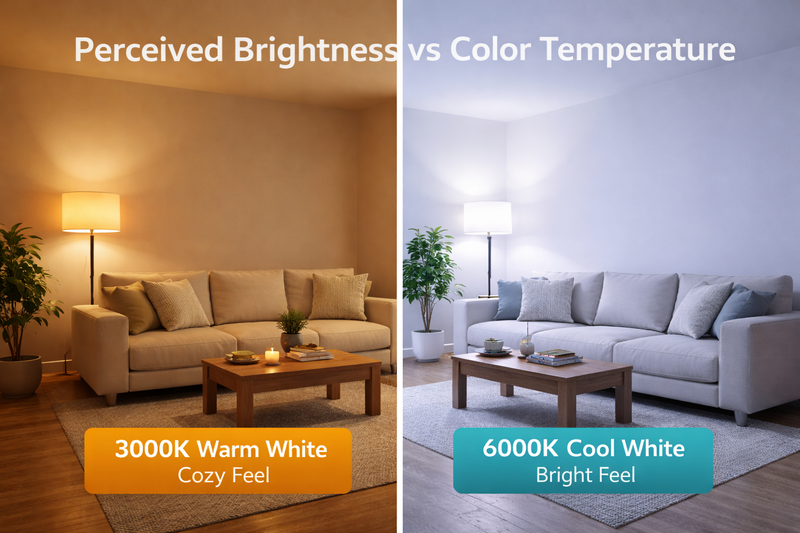
Have you ever installed "bright" lights that made a room look gloomy? Or conversely, installed a dimmer switch that made the room feel "dirty"? That is likely a Color Temperature mismatch. A 3000K warm light and a 6000K cool light with the exact same lumen count appear completely different to the human eye.
The human eye perceives Cool White (6000K) as "brighter" than Warm White (3000K) even at the same wattage due to the blue light spectrum stimulating our eyes more. For workspaces and retail displays where visibility is paramount, choose 4000K-5000K. For hospitality environments requiring relaxation, stick to 2700K-3000K, understanding you may need slightly higher lumen output to achieve the same perceived visibility.
Selecting the Right CCT for Visibility
In my factory, we sort LEDs into strict "bins" to ensure CCT consistency4. This is crucial because a shift of 200K is visible to the trained eye. Here is how CCT affects your project’s "brightness" and how to upsell your clients on the right choice.
- 2000K – 2700K (Warm/Gold): This range is used for creating intimacy. It mimics candlelight or old incandescent bulbs. However, be warned: this light absorbs definition. It is very hard to read paperwork or do detailed assembly work under 2200K light. It feels "dim" even at high wattage because the blue spectrum is missing.
- 3000K – 3500K (Soft White): This is the standard for hotels and high-end residential homes. It is comfortable but can make white walls look slightly yellow.
- 4000K (Natural White): This is the sweet spot for retail and offices. It renders colors accurately (high CRI6) and feels "clean." If you are lighting a clothing store, 4000K represents the true color of the fabric best.
- 6000K+ (Cool Daylight): This offers the highest perceived visibility. It is often used in jewelry stores to make diamonds sparkle or in industrial settings. However, in a home, it can feel like an operating room.
CCT and Lumen Output Physics:
Here is a manufacturing secret: Generally, the higher the Kelvin, the higher the lumen output7 for the exact same chip. Why? Because LED chips are naturally blue. We add phosphor to make them yellow/warm. The more phosphor we add (to get 2700K), the more light gets blocked.
- Looking at our test data for a standard 480 LED/m strip:
- 3000K version output: Approximately 595 lumens.
- 4000K version output: Approximately 646 lumens.
- 5000K version output: Approximately 698 lumens.
- Insight: If you are switching a massive warehouse project from 5000K to 3000K because the client wants a "warmer look," you need to realize you are losing about 15% of your light output. You need to increase the power or the quantity of fixtures to maintain the same visibility levels. Do not let the client make this change without warning them about the brightness drop.
How Do "Cutting Units" and Density Impact Constant Brightness?
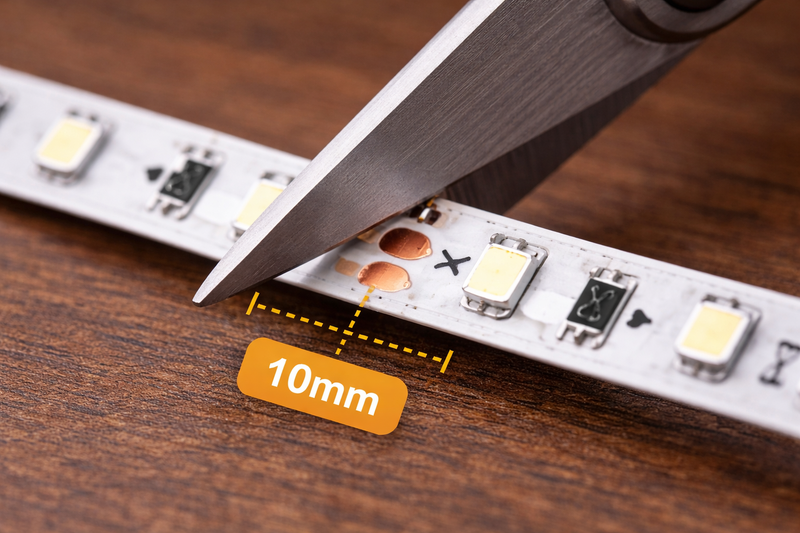
You are installing lights in custom cabinetry. You measure perfectly, but you have to cut the strip to fit. Suddenly, after cutting, the last 2 inches of the shelf are completely dark. Why? Because you bought a strip with a massive cutting interval, leaving "dead zones" at the ends of your fixture.
High visible brightness requires consistent coverage. To avoid "shadow corners" in custom joinery, select High-Density COB strips (320-480 LEDs/m) which offer cutting units as small as 10mm or 12.5mm. This allows you to trim the light exactly to size, ensuring the brightness extends to the very edge of the fixture.
Density Equals Uniformity
Brightness is useless if it is spotty or if it doesn’t fit the furniture.
The "Shadow Corner" Problem:
In the old days of 24V SMD lighting, the cutting lengths were often 100mm (4 inches).
Imagine you have a cabinet shelf that is exactly 480mm wide.
- If your cut point is every 100mm, you can cut at 400mm (leaving an 80mm dark gap).
- Or you try to squeeze in 500mm, which physically won’t fit.
This results in dark corners that make the install look cheap/amateur.
The COB Solution:
Our modern 12V High-Density COB8 strips have a cutting length of just 10mm.
For that same 480mm shelf, you can cut the light at exactly 480mm (or 470mm to allow for end caps). The light fills the entire void. There are no dark spots at the edges.
Quantity of Lampwicks (Chips):
"Lampwicks" simply refers to the number of diodes on the board.
- Standard strips have 60 or 120 LEDs per meter.
- We offer 320, 480, and even 840 LEDs per meter9.
- Why density matters for brightness perception: A strip with 840 LEDs/m does not just look smoother; it runs cooler per chip because the electrical current is spread across more semiconductors. Cooler chips maintain their lumen output longer. Over a 5-year lifespan, a low-density strip driven hard will dim significantly (lumen depreciation), whereas a high-density strip will maintain its initial brightness much better.
Voltage Stability vs. Brightness:
Be careful with long runs. Voltage drop10 is a physical reality where electrical pressure decreases as it travels down the copper tape. This causes the far end of the strip to look dimmer than the start.
- For consistent brightness over runs longer than 5 meters, you must use 24V strips (or even 36V/48V specialized strips).
- For 24V strips, we use 3oz copper PCBs11 to reduce resistance. This ensures that the brightness at meter 10 is identical to the brightness at meter 1. If you use a cheap 12V strip for a 10-meter run, the end will be visibly 50% dimmer than the start.
Can Waterproofing Reduce Your Brightness?
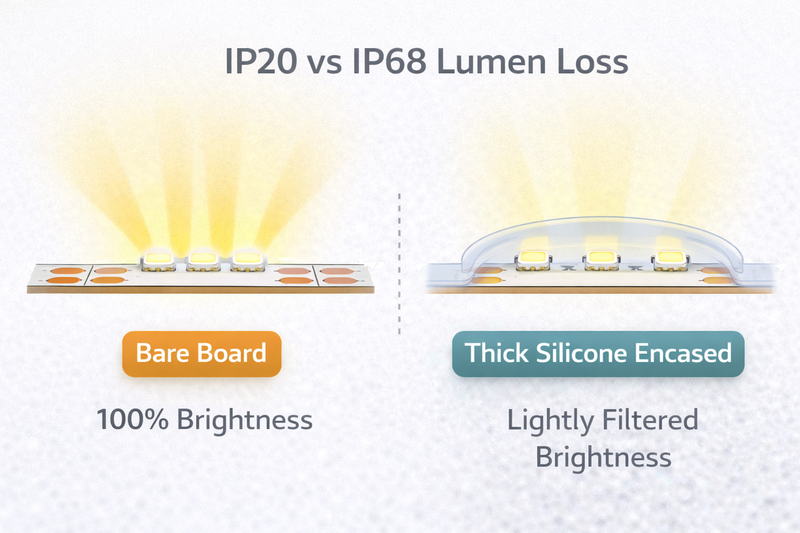
You need lights for an outdoor patio or a pool area. You buy IP68 strips. You install them next to the indoor lights, and they look 20% dimmer. Did you get a bad batch? Did the factory cheat you? No, you likely forgot to account for the physics of silicone absorption.
Thick waterproofing materials naturally absorb light. A heavy IP68 "Solid Extrusion" silicone coating can reduce lumen output by 10-15% compared to a bare IP20 strip. When planning outdoor or wet-area lighting, you must specify a higher initial lumen output to compensate for this loss and maintain the desired visibility.
The Physics of Potting and Extrusion
Protection comes at a cost, specifically the cost of transparency.
The Material Matters:
- IP20 (Non-waterproof): This is just the bare chip and phosphor. You get 100% light transmission. It is the brightest option but has zero protection against moisture or dust.
- IP65 (Spray/Coating): This uses a thin layer of silicone or nano-coating. There is very little light loss, perhaps 3-5%, but it is less durable against physical impact.
- IP68 (Solid Extrusion): This is where we fully encase the strip in a thick rectangular tube of silicone.
- While we use high-transmittance optical silicone, the physics of passing light through a medium means you lose some intensity.
- Real World Spec Adjustment: If your indoor lobby design uses 1000 lumen/m strips, and you want the outdoor facade to match visually, you should aim for a spec of practically 1200 lumen/m for the outdoor units. This offsets the silicone absorption and the fact that outdoor light "escapes" more easily into the darkness rather than bouncing off walls.
Double-Color Silicone & Neon Flex:
Some of our specialized IP65/IP67 strips use what we call "black edge and double-color silicone" for aesthetic reasons.
- While these look incredibly sleek and hide the messy PCB from view when the light is off, the diffuser top layer is designed to soften the light.
- This creates a beautiful, dot-free "neon" glow, but it significantly reduces the raw "throw" of the light. These are best for direct-view applications (like signage or building outlines) where you look at the light. They are terrible for task lighting (like lighting up a table) because the diffuser eats up too many lumens.
The Advice:
Always check if the lumen data on the datasheet is for the bare chip or the finished tube. In our factory, we clearly distinguish between our non-waterproof and waterproof extrusion models in testing, but many trading companies will just copy-paste the "bare chip" lumens onto the "waterproof" datasheet, misleading you into thinking it is brighter than it actually is.
How Does "Board Width" Limit Your Brightness Potential?
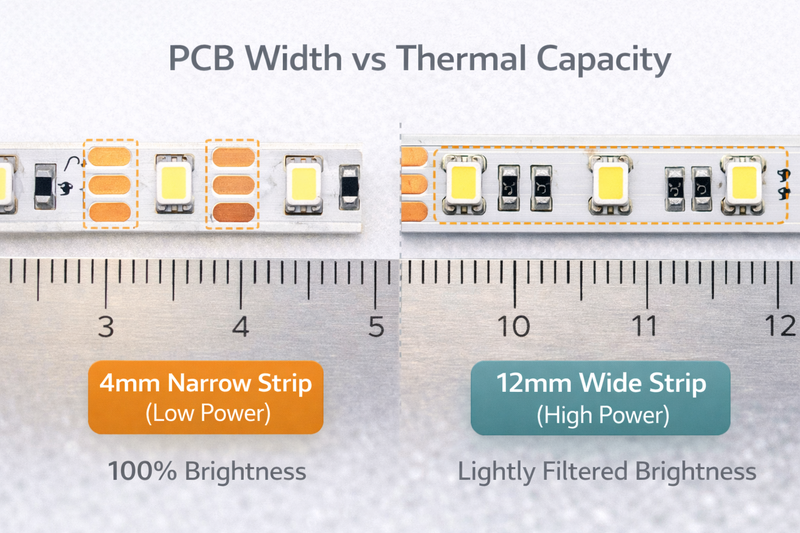
You want maximum brightness, so you ask for the highest wattage possible. But you also want the strip to fit in a tiny 5mm groove. I have to be the bearer of bad news: Physics won’t allow high power on a tiny board.
The width of the PCB (Printed Circuit Board) acts as the primary heat sink for the LED chips. A narrow 4mm or 5mm board physically cannot dissipate the heat generated by high-lumen, high-wattage chips. To achieve ultra-high brightness (1500+ lumens), you typically need a standard 10mm or 12mm wide board to prevent overheating and premature failure.
Thermal Management is Key
We spoke about efficiency earlier, but let’s talk about the physical vessel carrying the light.
The Nano Strip Constraint:
We manufacture incredible 4mm and 2.7mm width strips. They are engineering marvels designed to fit into saw kerfs in plywood or delicate glass shelves.
- However, because there is so little copper surface area, we have to limit the power. Usually, these are capped at around 5 Watts or 6 Watts per meter.
- If we tried to push 15 Watts through a 4mm board, it would get so hot you couldn’t touch it, and the LEDs would fail in weeks.
- Result: "Nano" and "Ultra-Slim" strips are generally for accent lighting (500-600 lumens), not main room illumination.
The High-Power Standard:
If you need that blasting 1500+ lumen output for a commercial showroom:
- You need a board width of at least 10mm, preferably 12mm.
- This extra width provides more copper mass to pull heat away from the chips.
- Some of our highest power "Dual Row" or "Quad Row" strips are 20mm wide.
- Application Tip: If you are buying high-brightness strips, always mount them in an aluminum profile. Do not stick a 15W/m strip directly onto wood or drywall. The aluminum acts as a necessary extension of the heat sink. Without it, even a high-quality strip will degrade quickly.
The Copper Weight Factor:
Standard strips use 2oz copper. For our high-brightness, high-power industrial series, we often upgrade to 3oz or 4oz copper. It costs more, but it handles the current load and heat dissipation required for stable high-lumen output. If you hold a cheap strip and our pro strip in your hand, you can physically feel the difference in weight and stiffness. That weight is the copper that saves your lights from burning out.
Conclusion
Brightness is not a guessing game or a simple matter of looking for the highest number on a box. It is a precise calculation of Efficiency (lm/W), Density (LEDs/m), Color Temperature (CCT), and Thermal Management.
- For maximum punch and energy savings, aim for specs >120 lm/W.
- For uniform, shadow-free lines in joinery, demand Chip-on-Board (COB) with 480+ LEDs/m and precision 10mm cutting units.
- For outdoor areas, over-spec your lumens by 15% to fight silicone absorption.
- And never try to force high-wattage brightness onto a tiny, narrow PCB without proper heat sinking.
Don’t let your project look dull because you trusted a generic label. Specify with precision, and demand the data that matters.
-
Understanding the impact of heat on longevity can help you make better lighting choices for your projects. ↩
-
Exploring Light Efficiency will help you choose lighting that maximizes brightness while minimizing heat. ↩
-
Learn how high lumens per watt can save energy and reduce heat, enhancing your lighting solutions. ↩
-
Understanding CCT consistency is vital for ensuring uniform lighting quality in your projects. ↩
-
Explore the Kelvin scale to learn how different temperatures impact ambiance and functionality in lighting. ↩
-
Discover why high CRI is essential for accurate color rendering in retail and office environments. ↩
-
Learn about lumen output variations to make informed decisions on lighting brightness and efficiency. ↩
-
Explore the advantages of 12V High-Density COB lighting for uniform brightness and energy efficiency. ↩
-
Learn how higher LED density improves brightness and longevity in lighting solutions. ↩
-
Understanding voltage drop is crucial for maintaining consistent brightness in long LED runs. ↩
-
Discover how 3oz copper PCBs enhance performance and reduce resistance in LED strips. ↩
Interested in Our LED Solutions?
Get professional consultation and customized LED lighting solutions for your projects. Contact our expert team today.
Related Articles

How Do You Build Profitable Custom Vehicle and RV Interior LED Rope Lights?
You lose RV installation contracts because your interior lights fail on rough roads. Standard strips show bright dots on glossy…

How to Perfect Bookshelf and Display Cabinet LED Rope Lighting?
You lose retail clients when bookshelves look incredibly dark. Ugly shadows hide expensive products inside display cabinets daily. You need…

How to Master Mirror and Vanity LED Rope Light Installation?
Your clients complain about ugly shadows in their bathroom mirrors. Bad lighting ruins expensive vanity designs. You lose future contracts…
