
What Do Lumens, Watts, and CCT Really Mean for Your Project?
You found an LED strip online with a great price, but the specifications are a confusing jumble of numbers. You place an order hoping for the best, but what arrives is either disappointingly dim or the wrong color of white.
To decode LED strip specifications, understand these three core metrics: Lumens (lm) measure the strip’s total brightness. Watts (W) measure its power consumption and heat output. Color Temperature (CCT), measured in Kelvin (K), defines the specific shade of white light, from warm yellow to cool blue.
As a manufacturer, I deal with these numbers every single day. They are the language of light. My most successful and long-term clients—the lighting designers, architects, and high-volume installers—speak this language fluently. They know that these three specifications are the foundation for any successful lighting project. Understanding them is not just technical jargon; it’s the key to avoiding costly mistakes, ensuring projects meet client expectations, and consistently delivering a professional-grade result. Let’s break down what each of these numbers actually means for your work.
What Do Lumens Really Tell You About an LED Strip?
You ordered five reels of an LED strip advertised as "super bright," but after installing them in a large ceiling cove, the light is weak and underwhelming, leaving the client disappointed.
Lumens (lm) are the only true measure of a light source’s brightness. A higher lumen number means more light output. For accurate comparison, you must always look at the lumens per foot or per meter, not the total lumens for the whole reel.
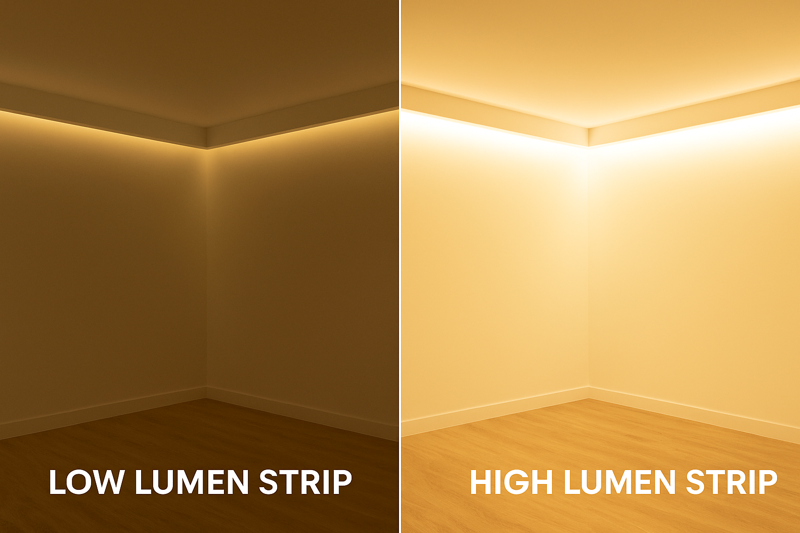
The term "super bright" is a meaningless marketing phrase. It’s subjective. The first thing I teach new clients is to ignore fuzzy words and look for hard data. Lumens are the data. It is the raw measurement of the total amount of visible light produced by a source. When you understand how to use this metric, you move from guessing to planning. You can confidently select a strip that is perfectly suited for the application, whether it’s subtle accent lighting that requires a gentle glow or high-powered task lighting that needs to illuminate a workspace effectively.
Beyond Just "Lumens": Why Lumens per Foot/Meter is the Key Metric
When you look at a spec sheet, you might see "5000 lumens." This is often the total output for the entire 5-meter (16.4-foot) reel. This number is almost useless for planning. Why? Because a less dense strip over a longer length could have the same total lumens as a very dense strip over a shorter length. What you really need to know is the intensity of the light at any given point. This is where lumens per foot (lm/ft)1 or lumens per meter (lm/m)2 becomes the critical number for professionals. It tells you exactly how much light you’re putting into a space for every foot of strip you install.
A Practical Guide to Lumens for Different Applications
To help you choose the right product, I’ve put together a simple table based on the most common applications I see from our clients in North America and Japan. These are general guidelines, but they provide a solid starting point for your projects.
| Application Type | Description | Typical Lumens per Foot | Typical Lumens per Meter |
|---|---|---|---|
| Accent / Mood | Gentle, subtle glow. Cove lighting, shelf backlighting, under-furniture. | 100 – 250 lm/ft | 300 – 800 lm/m |
| General / Task | Functional light for visibility. Under-cabinet, toe-kicks, some ceiling coves. | 250 – 500 lm/ft | 800 – 1600 lm/m |
| Primary / High-Output | Bright enough to be the main source of light in a room or for high-ceiling applications. | 500+ lm/ft | 1600+ lm/m |
The Hidden Trap: Efficacy (Lumens per Watt)
Here’s a detail that separates true professional-grade strips from cheap consumer products: efficacy3. Efficacy is the measure of how efficiently a strip converts electricity (watts) into light (lumens). It’s calculated by dividing the lumens by the wattage. For example, a strip that produces 1000 lumens and consumes 10 watts has an efficacy of 100 lumens per watt (lm/W). A lower-quality strip might also produce 1000 lumens but consume 15 watts (67 lm/W). The first strip is far more efficient. It produces the same amount of light for less electricity and, critically, produces less waste heat. High efficacy is a hallmark of quality LED chips and good thermal design, and it’s a key indicator of a superior product that will last longer.
Why Are Watts More Than Just an Electricity Bill Concern?
You installed a long run of high-output LED strips for a client. Six months later, you get a call that sections of the strip are flickering and turning yellow. The installation is failing.
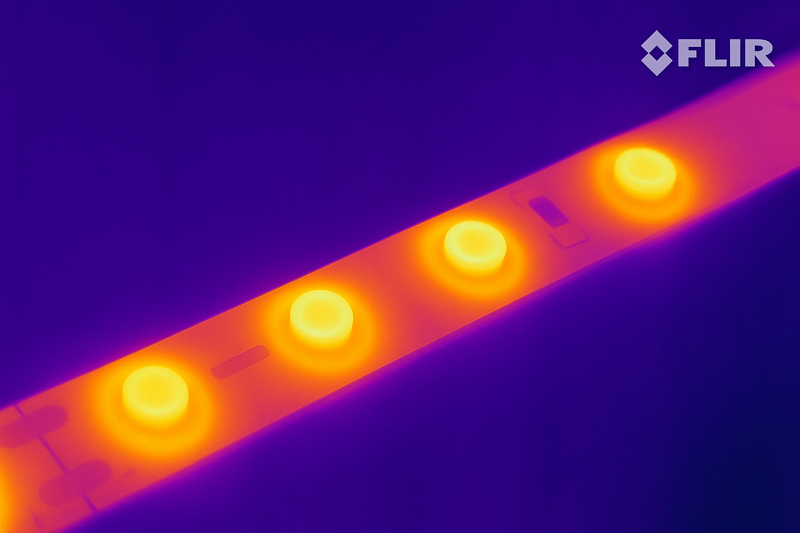
The wattage (W) of an LED strip tells you how much electrical power it consumes. Its two primary practical uses are for correctly sizing your power supply and for understanding the strip’s heat output. High wattage means more heat, which is the number one enemy of an LED’s lifespan.
For an experienced installer like Tom, wattage is about much more than the client’s energy bill. It’s a critical specification for ensuring the safety, reliability, and longevity of the entire system. When I see a specification sheet, the wattage per foot or per meter immediately tells me a story. It tells me how much power I need to provide and, more importantly, how seriously I need to take thermal management. Ignoring the implications of wattage is the fastest way to an installation failure and an unhappy client.
Sizing Your Power Supply Correctly: The 80% Rule4
This is the most critical safety calculation in any low-voltage lighting installation. A power supply (or driver) should never be loaded to 100% of its capacity. This puts stress on its components, generates excess heat, and dramatically shortens its life, leading to premature failure. The professional standard is the 80% Rule.
How it works: You should only load a power supply to 80% of its maximum rated wattage. The easier way to calculate this is to take your total calculated load and multiply it by 1.25.
- Step 1: Calculate Total Wattage. Multiply the strip’s watts per foot/meter by the total length of your run. (e.g., 4.5 W/ft x 20 feet = 90 Watts).
- Step 2: Apply the Safety Headroom. Multiply your total wattage by 1.25. (e.g., 90W x 1.25 = 112.5 Watts).
- Step 3: Choose the Next Size Up. You must now choose a power supply with a rating equal to or, more commonly, the next standard size greater than your result. In this case, you would choose a 150W power supply, not a 100W one. Following this rule is non-negotiable for a safe and reliable installation.
Watts as an Indicator of Heat and Longevity
Every watt of electricity consumed by an LED strip that isn’t converted to light is converted directly into heat. Therefore, Watts = Heat5. This is a fundamental concept. A 5 W/ft strip produces significantly more heat than a 2 W/ft strip. This heat, if not properly managed, will rapidly degrade the LED chips and the phosphor coating, causing the light output to dim and the color to shift over time.
- Low-Wattage Strips (< 3 W/ft): Can often be mounted directly onto clean, dry surfaces like wood or drywall without significant issues.
- High-Wattage Strips (> 3 W/ft): It is absolutely essential to mount these strips on a thermally conductive material6. An aluminum mounting channel7 is the best and most common solution. The channel acts as a heat sink, drawing heat away from the strip and dissipating it into the air, dramatically extending the life and maintaining the performance of the LEDs. As a manufacturer, we consider mounting channels to be a mandatory component for our high-output products.
How Does Color Temperature (CCT) Completely Change a Room?
You installed beautiful, bright under-cabinet lighting in a client’s kitchen. But the light is a harsh, blue-white that makes their warm wood cabinets and granite countertops look sterile and unappealing.
Color Temperature, measured in Kelvin (K), describes the color appearance of white light. A low Kelvin value (e.g., 2700K) produces a warm, cozy, yellow-toned light, while a high Kelvin value (e.g., 5000K) produces a cool, energizing, blue-toned light.
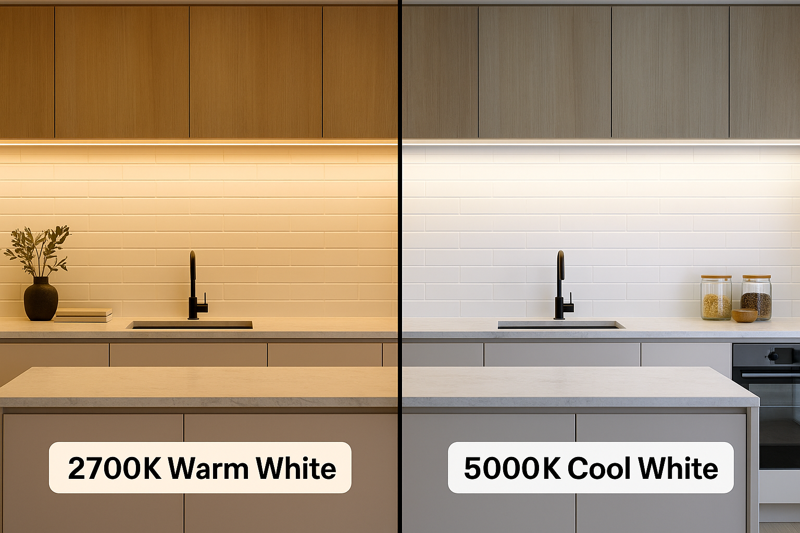
This is where the art of lighting design meets the science of manufacturing. CCT is arguably the most important specification for determining the feel and mood of a space. Getting it wrong is jarring and can ruin the entire design intent of a room. As an installer, guiding your client to the correct CCT is one of the most valuable services you can provide. It shows you understand not just the technical aspects, but also the aesthetic impact of your work. This single choice can make a living room feel cozy and inviting or cold and sterile.
A Visual Guide to the Kelvin Scale
The Kelvin scale8 can seem abstract, so I encourage my clients to think about it in terms of familiar light sources. Here is a table that breaks down the most common CCTs and their typical applications.
| CCT (Kelvin)9 | Light Appearance | Mood & Feeling | Common Professional Applications |
|---|---|---|---|
| 2700K | Warm White | Cozy, intimate, relaxing. Similar to a standard incandescent bulb. | Living rooms, bedrooms, restaurants, hotel lobbies. |
| 3000K | Soft White | Warm and inviting, but slightly crisper and more modern than 2700K. | Kitchens, bathrooms, general residential spaces. A very popular "all-around" choice. |
| 4000K | Neutral / Natural White | Clean, crisp, vibrant, and alert. Similar to natural daylight. | Offices, retail stores, garages, modern kitchens, commercial spaces. |
| 5000K | Cool White / Daylight | Bright, crisp, blue-toned. Can be harsh for residential use. | Warehouses, hospitals, workshops, task lighting requiring high visual acuity. |
The Mark of Quality: Color Consistency and Binning
Here’s a critical issue that Tom and other professionals face: you order five reels of "3000K" strips, and when you install them side-by-side, you can see visible differences in the shade of white. This is a sign of a low-quality manufacturer. During production, LEDs are sorted into "bins" based on their exact color output. The highest-quality strips use LEDs from a very tight bin, ensuring near-perfect consistency. This process is often measured by something called a MacAdam ellipse10. A 3-step MacAdam ellipse standard means the color variation is so small that it is virtually imperceptible to the human eye. Cheaper manufacturers will use LEDs from a wider range of bins, resulting in noticeable color shifts from reel to reel or even along the same reel. When you source from a quality factory, you are paying for this consistency. This guarantees that a project you install today will perfectly match an extension you add a year from now. This is a non-negotiable requirement for any true professional.
Conclusion
Mastering lumens, watts, and CCT moves you from being a simple installer to a knowledgeable lighting professional. This understanding empowers you to select the right product, design reliable systems, and create the perfect mood for any space.
-
Understanding lumens per foot helps you choose the right lighting for your space, ensuring optimal brightness and efficiency. ↩
-
Exploring lumens per meter will enhance your knowledge of lighting design, ensuring you achieve the desired ambiance. ↩
-
Learning about efficacy can help you select energy-efficient lighting options that save money and reduce heat output. ↩
-
Understanding the 80% Rule is crucial for ensuring the longevity and safety of your power supply installations. ↩
-
Explore how heat generation impacts LED performance and lifespan, ensuring your installations are efficient and durable. ↩
-
Learn why thermally conductive materials are essential for high-wattage LED strips to prevent overheating and extend their life. ↩
-
Discover how aluminum mounting channels enhance heat dissipation, improving LED performance and longevity. ↩
-
Understanding the Kelvin scale is essential for selecting the right lighting for different environments. ↩
-
Discover how CCT affects the mood and functionality of different spaces. ↩
-
Learn about the MacAdam ellipse to ensure color consistency in your lighting projects. ↩
Interested in Our LED Solutions?
Get professional consultation and customized LED lighting solutions for your projects. Contact our expert team today.
Related Articles

How Do You Build Profitable Custom Vehicle and RV Interior LED Rope Lights?
You lose RV installation contracts because your interior lights fail on rough roads. Standard strips show bright dots on glossy…

How to Perfect Bookshelf and Display Cabinet LED Rope Lighting?
You lose retail clients when bookshelves look incredibly dark. Ugly shadows hide expensive products inside display cabinets daily. You need…

How to Master Mirror and Vanity LED Rope Light Installation?
Your clients complain about ugly shadows in their bathroom mirrors. Bad lighting ruins expensive vanity designs. You lose future contracts…
