
What is the Maximum Length You Can Run an Outdoor LED Strip?
Your beautiful 50-foot outdoor lighting installation looks perfect for the first 15 feet, but then it starts to fade. By the end of the run, the light is a dim, sad, yellowish glow. Your client is unhappy, and your work looks unprofessional.
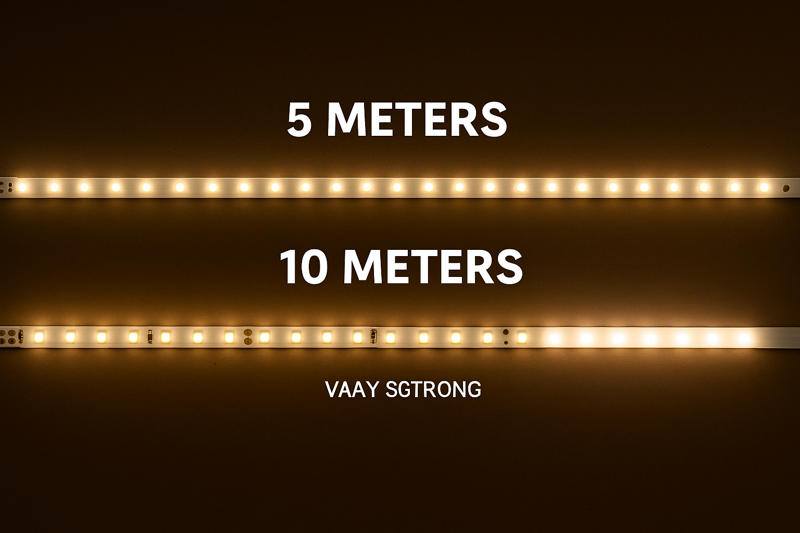
The standard maximum length for a single-powered run is 5 meters (16.4 feet). Exceeding this causes "voltage drop," which makes the strip dim and can change its color. For longer installations, you must use specific wiring techniques like powering from both ends or running parallel wires.
As a factory owner, this is one of the most common and costly technical problems I help my clients solve. It’s not a product defect; it’s a principle of electricity. For a buyer like Tom, understanding how to manage this is the difference between a successful, impressive project and a failed one that requires a complete rewire. Let’s explore why this happens and review the professional solutions to guarantee perfect brightness on any length installation.
What Causes the 5-Meter (16.4-foot) Length Limit?
You’ve planned a long, continuous line of light, but the reels only come in 5 meters. You’re tempted to just solder them together end-to-end, but you’re worried about the result.
The length limit is caused by voltage drop. This is the natural loss of electrical pressure as it travels along the copper circuit board (PCB) of the strip. After about 5 meters, the voltage has dropped so much that it can no longer power the LEDs at their full brightness.
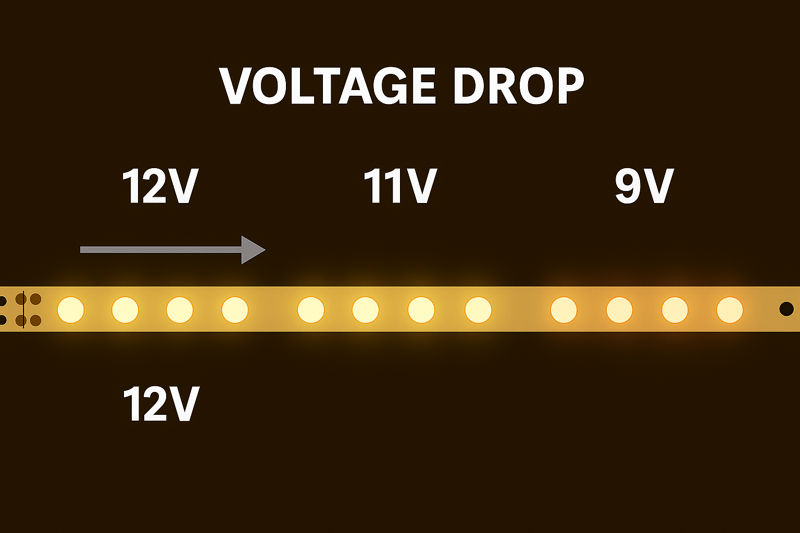
Think of it like water pressure in a very long, thin hose. The pressure is strong at the tap, but by the time the water gets to the end of the hose, it’s just a trickle. Electricity works the same way. The LED strip’s thin copper traces have a small amount of electrical resistance. Over a long distance, this resistance adds up, consuming voltage along the way. I’ve seen installers blame the power supply or the LED strip itself, but the issue is simply physics. The LEDs at the beginning of the strip get the full 12 volts, while the LEDs at the end might only receive 9 or 10 volts. This not only makes them dim but can also cause color shifting in white strips, making warm white look even warmer or yellowish.
Factors Affecting Maximum Length
| Factor | How It Affects Length | My Factory Perspective |
|---|---|---|
| Voltage (12V vs. 24V)1 | Higher voltage allows for longer runs. | 24V is the professional standard for anything beyond a single reel. |
| Power Draw (W/m) | Strips with more LEDs per meter (higher wattage) have shorter max lengths. | High-output strips often have more copper in the PCB to help fight this. |
| PCB Copper Thickness2 | Thicker copper traces have less resistance, allowing for slightly longer runs. | This is a key quality difference. Cheaper strips use thin copper and suffer more. |
How Do You Correctly Power Runs Longer Than 5 Meters?
Your project requires a 30-foot (approx. 9 meters) continuous run of light. You know you can’t just connect two strips end-to-end. So, what is the professional solution?
For runs up to 10 meters (32.8 feet), the easiest solution is to power the strip from both ends. For runs longer than that, you must create parallel runs, where each 5-meter section gets its own separate wire running back to the power supply.
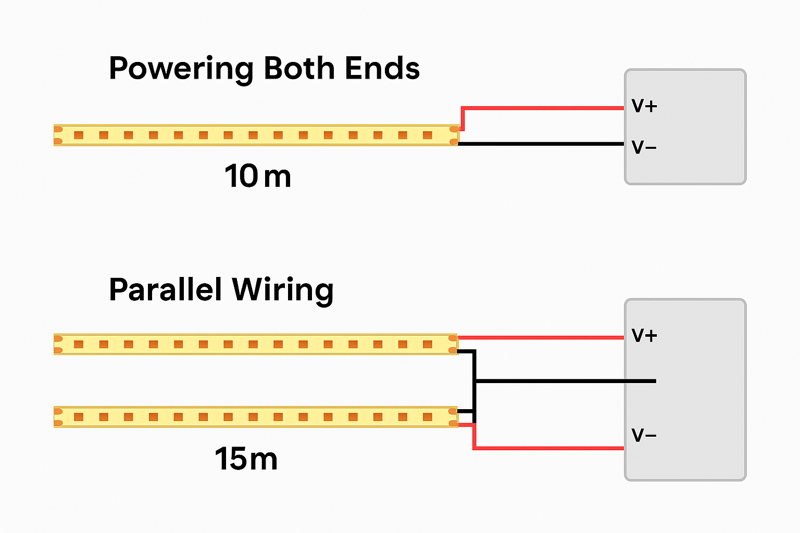
This is where planning the installation becomes critical. Let’s break down the two main techniques we recommend to our professional clients. Powering from both ends is simple: you connect the start of the strip to the power supply as usual, and then run an additional "injection" wire from the same power supply all the way to the end of the strip and connect it there. This feeds power from both directions, ensuring the middle of the strip gets enough voltage. For very long runs, like outlining a whole building, you must use a parallel connection. This involves treating each 5-meter (or 10-meter for 24V) section as its own independent strip. You run a thicker main power line (a "busbar" wire) from your power supply and then tap into it for each new section. This guarantees every single section receives the full, correct voltage directly.
Solution Comparison for Long Runs
| Method | Best For | Pros | Cons |
|---|---|---|---|
| Powering Both Ends3 | Runs of 6-10 meters (20-33 ft). | Simple to wire, minimal extra wire needed. | Not effective for runs over 10 meters. |
| Parallel "Home" Runs4 | Runs over 10 meters (33+ ft). | Guarantees perfect brightness on every section, infinitely scalable. | Requires more planning and more wire. |
Does Using a 24V Strip Instead of 12V Make a Difference?
You see both 12V and 24V versions of the same LED strip. The 24V is sometimes slightly more expensive. Is it worth it for your outdoor projects?
Yes, absolutely. Using a 24V LED strip is one of the most significant advantages for longer installations. A 24V system allows you to run double the length of a 12V strip with the same amount of voltage drop, often up to 10 meters (32.8 feet) on a single power feed.
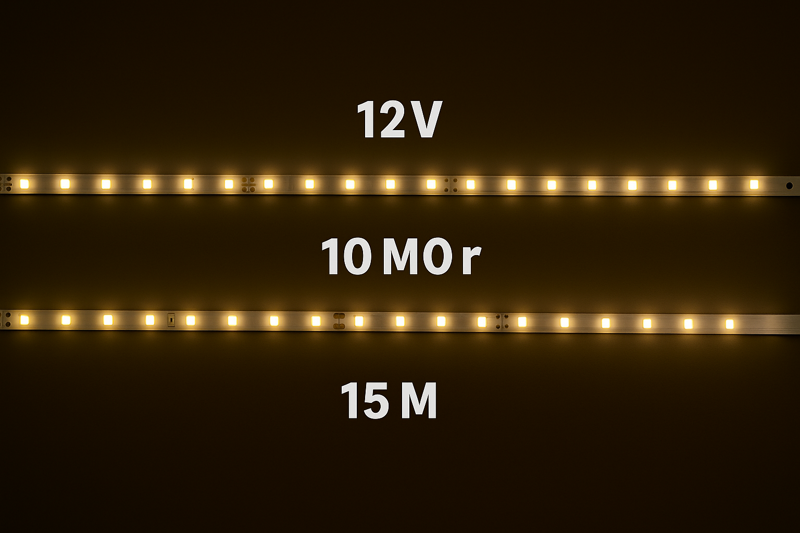
This is based on a fundamental electrical law (Ohm’s Law). For the same amount of power, a 24V system draws half the current (amps) of a 12V system. Since voltage drop is directly related to current, cutting the current in half also cuts the voltage drop in half. For a buyer like Tom, choosing 24V products is a smart business decision. It simplifies installations by reducing the need for extra power injection wires on medium-length runs (up to 10 meters). This saves his team time and money on wire and labor. For my clients doing large-scale architectural or landscape projects, we almost exclusively recommend 24V systems. They are more efficient, more reliable for long runs, and offer much more installation flexibility. The slight upfront cost increase for 24V products is easily paid back in wiring and labor savings.
12V vs. 24V: The Professional’s Choice
| Feature | 12V System | 24V System | Why It Matters to a Pro |
|---|---|---|---|
| Max Run Length5 | ~5 meters | ~10 meters | Fewer power injection points are needed, saving labor and material costs. |
| Current Draw6 | Higher | Lower (50% less) | Allows for the use of thinner, less expensive wiring over the same distance. |
| Efficiency | Good | Better | Less power is wasted as heat in the wiring, leading to a more efficient system. |
| Best Use Case | Short runs, vehicles, very small projects. | Architectural, landscape, commercial—any project over 5 meters. | Choosing 24V is a sign of a professional-grade installation. |
How Do You Choose the Right Power Supply and Wire Gauge?
You’ve planned your long run using a 24V strip and parallel connections. Now you need to power it all. How do you select a power supply that won’t fail?
Calculate the total wattage of your entire installation, then add a 20% "safety buffer." The wire gauge depends on the current (amps) and the distance from the power supply to the strip. Longer distances require thicker wire (a lower gauge number).
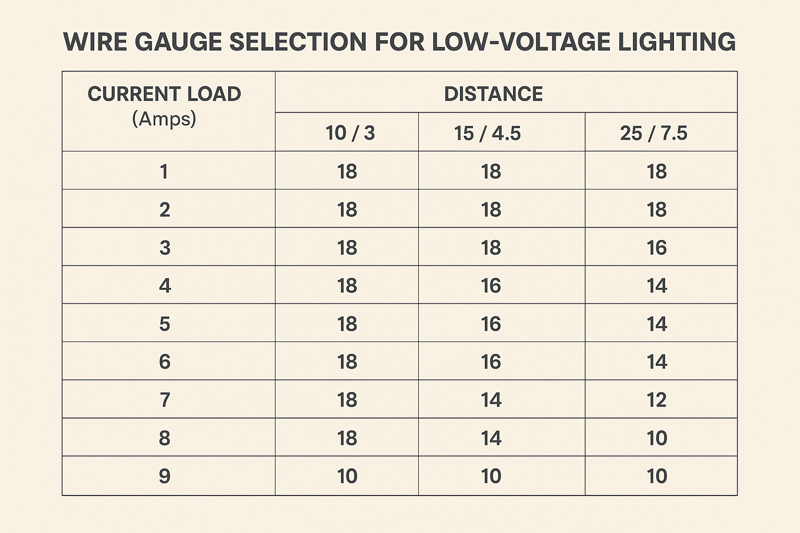
This is the final piece of the puzzle and it’s absolutely critical. First, find the wattage per meter on your LED strip’s spec sheet. Multiply that by the total number of meters you are installing. For example, a 10 watt/meter strip used for a 15-meter installation is 150 watts total. Then, add 20% for safety (150 * 1.2 = 180W). You should choose the next size up, so a 200W power supply would be perfect. Under-sizing your power supply will cause it to overheat and fail prematurely. Second, for the wire, don’t guess. Using wire that is too thin will create its own voltage drop before the power even reaches the strip. There are many "Voltage Drop Calculators" online that can help you select the exact American Wire Gauge (AWG) you need based on your system’s voltage, amperage, and the length of the wire run. Using the right wire is just as important as using the right wiring technique.
Conclusion
Never connect LED strips end-to-end beyond the recommended 5 or 10 meters. Plan for voltage drop by using 24V systems, powering from both ends, or creating parallel runs to ensure perfect, even brightness.
-
Understanding voltage effects can help you choose the right LED setup for your needs. ↩
-
Exploring this topic reveals why quality materials matter for LED longevity and efficiency. ↩
-
Explore this link to understand how Powering Both Ends can simplify wiring for short runs. ↩
-
Discover why Parallel ‘Home’ Runs are ideal for longer distances and how they maintain consistent brightness. ↩
-
Exploring max run length can enhance your project planning and reduce unnecessary costs. ↩
-
Understanding current draw can help you optimize your electrical systems for efficiency and cost savings. ↩
Interested in Our LED Solutions?
Get professional consultation and customized LED lighting solutions for your projects. Contact our expert team today.
Related Articles

How Do You Build Profitable Custom Vehicle and RV Interior LED Rope Lights?
You lose RV installation contracts because your interior lights fail on rough roads. Standard strips show bright dots on glossy…

How to Perfect Bookshelf and Display Cabinet LED Rope Lighting?
You lose retail clients when bookshelves look incredibly dark. Ugly shadows hide expensive products inside display cabinets daily. You need…

How to Master Mirror and Vanity LED Rope Light Installation?
Your clients complain about ugly shadows in their bathroom mirrors. Bad lighting ruins expensive vanity designs. You lose future contracts…
