
When Should You Use Flexible vs. Rigid LED Strips?
You’re specifying lighting for two projects. One is a series of elegant, curved ceiling coves in a hotel lobby. The other is a set of high-end retail jewelry showcases that need perfect, unwavering lines of light. Using the wrong type of LED product will ruin the effect and the installation.
Use flexible LED strips for curved surfaces, backlighting, and intricate designs where you need to bend the light source. Choose rigid LED strips, often called LED bars, for applications requiring durability, better heat dissipation, and a perfectly straight, sag-free line of light like in showcases or under cabinets.
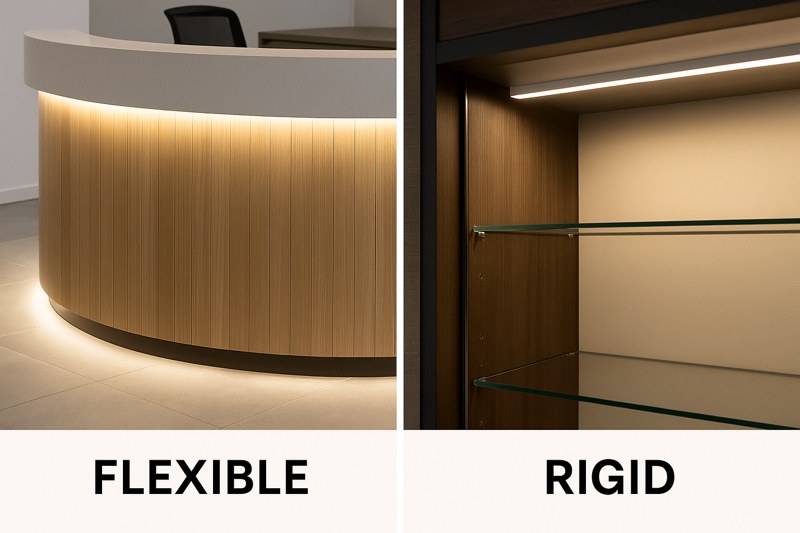
As a factory that produces both of these formats, I see clients grapple with this decision all the time. The choice isn’t just about shape; it’s about durability, heat management, and the final aesthetic quality of the installation. A buyer like Tom knows that a sagging, uneven line of light looks unprofessional and cheap, while trying to force a rigid product onto a curved surface is simply impossible. Understanding the fundamental differences in their construction and best-use cases is key to delivering a flawless, long-lasting lighting project every single time.
What Are the Core Strengths of Flexible LED Strips?
Your design calls for a seamless glow around a circular mirror, or maybe you need to backlight a complex, custom-shaped sign. You know you need a light source that can adapt. How can you achieve these organic shapes without any breaks or shadows in the illumination?
Flexible LED strips get their strength from their ability to bend and conform to nearly any shape. Their thin, pliable PCB base and adhesive backing make them incredibly versatile for custom installations, cove lighting, and backlighting complex, non-linear surfaces quickly and cost-effectively.
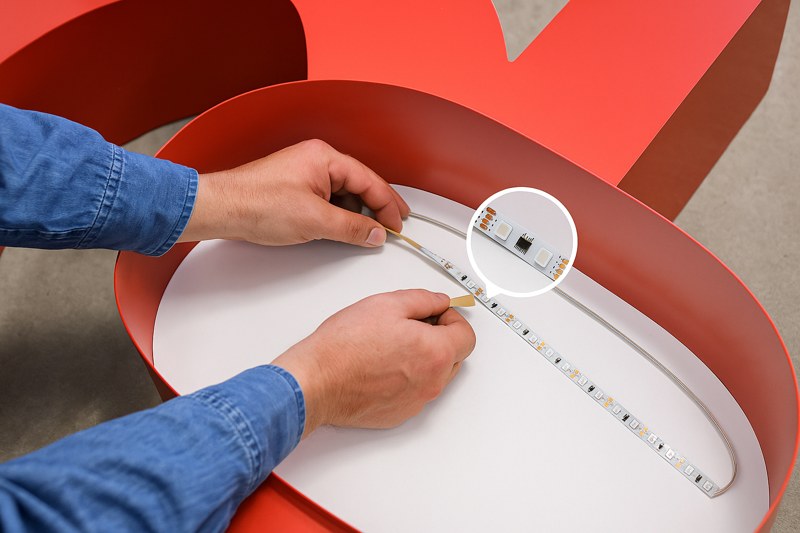
Think of flexible LED strips as the ultimate problem-solver for modern, organic architectural designs. Their primary advantage is baked right into their name: flexibility. For years, designers were limited to straight lines. This product changed everything. It comes on a reel, can be cut to length, and has a peel-and-stick adhesive backing. This makes installation incredibly fast, especially in long runs for cove or accent lighting. I’ve worked with countless contractors who rely on this product for its speed and adaptability. It allows them to bring complex lighting designs to life without needing custom-fabricated fixtures, saving immense amounts of time and labor on site.
A Deeper Dive into Flexible Strip Technology
While simple in concept, the quality of a flexible strip can vary dramatically. For a professional buyer, understanding the components is key to specifying a product that lasts.
-
The Construction: A Multi-Layer Sandwich
At its core, a flexible LED strip is a marvel of simple engineering. It’s built on a Flexible Printed Circuit Board (FPCB)1. This material is like a thin sheet of plastic infused with copper pathways. High-quality LEDs are surface-mounted onto these copper pads, along with resistors to regulate the current. The back is then coated with a strong adhesive tape, typically from a brand like 3M, for easy installation. The choice of materials here is critical. As a manufacturer, we insist on using thicker copper in the FPCB. This doesn’t just improve electrical conductivity to reduce voltage drop over long runs; it also helps pull a small amount of heat away from the LEDs, which is vital for their lifespan. Cheap flexible strips use thin copper, leading to inconsistent brightness and premature failure. -
Installation and Versatility:
The peel-and-stick backing is its most famous feature, but for professional results, it’s just the starting point. For permanent installations, especially on porous or uneven surfaces, the strip must be mounted inside an aluminum channel2 or profile. This is non-negotiable for longevity. The channel acts as a crucial heat sink3, drawing damaging heat away from the LEDs and dramatically extending the life of the product. The channel also provides a clean, finished look and protects the strip from physical damage. The versatility is immense, but it requires professional installation techniques to be reliable.
| Feature | Description | Benefit for Professionals |
|---|---|---|
| Form Factor | Thin, pliable FPCB, typically 5-10 meters per reel. | Easy to transport, store, and handle. Allows for long, continuous runs with minimal connection points. |
| Installation | Cuttable at designated points, with self-adhesive backing. | Extremely fast installation for curves and long straight runs. Reduces labor time and complexity on the job site. |
| Beam Control | Natively has a wide 120-degree beam angle. | Excellent for creating a diffuse, even wash of light in coves or for general backlighting applications. |
| Common Applications | Architectural cove lighting, backlighting signs and displays, accent lighting for curved features, task lighting under shelves. | The go-to solution for about 70% of decorative and ambient linear lighting needs due to its adaptability and lower initial cost. |
Why Choose Rigid LED Strips for Professional Lighting?
You’re designing the lighting for a museum display case. The light must be perfectly uniform, completely straight, and housed in a sleek, robust fixture. Any warping or sagging is unacceptable. How do you guarantee a flawless, permanent, and high-performance result?
Rigid LED strips are chosen for their structural integrity, superior heat management, and refined appearance. Built on a solid aluminum PCB, they will never sag, they dissipate heat much more effectively, and they are ideal for high-end surface-mounted and task lighting applications.

Rigid LED strips, or LED bars, are the solution for when "good enough" isn’t. Their construction is fundamentally more robust. Instead of a flexible plastic base, the LEDs are mounted directly onto a rigid Metal Core Printed Circuit Board (MCPCB), which is usually aluminum. This metal base acts as a built-in, highly effective heat sink. This is the single most important advantage of a rigid bar. Better heat dissipation means the LEDs can be driven at higher power for more light output, and they will have a significantly longer lifespan with better color stability over time. When Tom, my client, is working on a high-stakes commercial project where maintenance is costly and performance is paramount, I always steer him toward rigid bars for the most critical task and display lighting.
A Deeper Dive into Rigid Strip Technology
The difference between a flexible strip and a rigid bar is like the difference between a blueprint and a steel beam. One is for planning and versatility, the other is for permanent structure and performance.
-
The Construction: Built for Performance
The MCPCB4 is the hero here. Aluminum is an excellent thermal conductor. By mounting the LEDs directly to this metal core, the heat they generate has a direct, wide-open path to escape. This allows us to use higher-density and higher-power LEDs without risking overheating. The rigid bars5 are manufactured in fixed lengths, typically 0.5 or 1 meter, and are designed with connectors on the ends to be linked together for longer runs. This creates a mechanically and electrically sound connection that is far more durable than soldering wires to a flexible strip. The entire package is engineered for durability and thermal management6 from the ground up. -
Optics and Aesthetics:
Because rigid bars are designed for more focused applications, they are often paired with specialized optics. They are almost always installed within a purpose-built aluminum channel7. This channel not only provides mounting and further heat sinking but is also designed to hold a lens or diffuser. You can choose a frosted diffuser for a smooth, dot-free line of light, or a clear or lensed cover to direct and focus the light onto a specific target. This level of optical control8 is much harder to achieve with flexible strips and is essential for high-end retail, gallery, and task lighting where beam control matters. The final look is clean, professional, and integrated into the architecture.
| Feature | Description | Benefit for Professionals |
|---|---|---|
| Heat Sink | Built on a rigid aluminum MCPCB. | Superior heat dissipation. Allows for higher power output, longer lifespan, and better lumen maintenance. |
| Structural Integrity | Perfectly straight and will not bend or sag over time. | Guarantees a clean, sharp line of light. Essential for showcases, under-cabinet lighting, and architectural reveals. |
| Optical Control | Easily integrated with lenses and diffusers within dedicated aluminum profiles. | Allows for precise beam shaping, glare reduction, and creating a finished, professional-grade fixture. |
| Common Applications | Jewelry and retail display cases, under-cabinet and task lighting, integrated wardrobe lighting, art gallery and museum lighting. | The premium choice for any application where performance, longevity, and a perfect aesthetic are top priorities. |
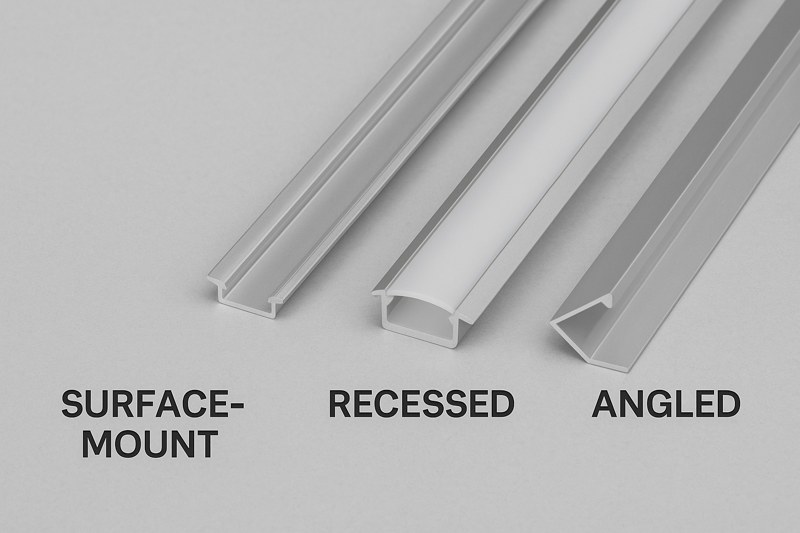
How Do You Choose the Right Mounting and Housing?
You’ve chosen the right type of strip for your project, but you know just sticking it to a surface isn’t the professional way. You see dozens of aluminum channels and diffusers. How do you select the one that will protect the strip and give you the exact lighting effect you need?
Always use an aluminum channel for permanent installations. For flexible strips, it’s essential for heat sinking. For rigid strips, it provides a finished housing. Choose a deeper channel with a frosted diffuser to eliminate dots and create a smooth, continuous line of light.
Choosing the housing is the final step to creating a true lighting fixture from a simple LED strip. As a supplier, this is a part of the "one-stop solution" I provide. The channel, or profile, is not just a cosmetic accessory; it is a critical component of the system. For a flexible strip, the channel is its lifeline. That strip generates heat, and without a path for that heat to escape, the LEDs will degrade quickly. The aluminum channel acts as that path—a heat sink that pulls heat away and dissipates it into the air. For rigid strips, which already have a metal core, the channel adds another layer of thermal management while also providing a clean mounting structure and housing for optics.
A Deeper Dive into Channels and Diffusers
The right profile can completely transform the look and performance of your linear lighting. Let’s break down the key choices.
-
Profile Type and Mounting9:
The first decision is how the channel will be mounted.- Surface-Mounted: These are the most common. They are low-profile channels that screw or clip directly onto the surface. They are perfect for under-cabinet and display case lighting.
- Recessed: These channels have a "lip" on the edges. You route a groove into the surface (like a shelf or a wall), and the channel fits down into it, sitting flush for a completely seamless, integrated look. This provides the most professional, architectural finish.
- Corner-Mounted: These are triangular or curved, designed to fit perfectly into 90-degree corners, casting light out at a 45-degree angle. This is ideal for display cases and room accent lighting.
-
Depth, Diffusers, and the "Dot" Effect:
The biggest aesthetic goal is often to create a smooth line of light10 without seeing the individual bright spots of the LEDs. This is achieved through the combination of channel depth and the diffuser (the plastic cover).- Diffuser Type11: You can typically choose between clear, semi-frosted, or fully-frosted (opal). A clear cover protects the strip but does not diffuse the light, so you will see every dot. An opal diffuser provides the smoothest light but also reduces the light output the most.
- Channel Depth12: The distance between the LED strip and the diffuser is critical. A shallow channel, even with a frosted diffuser, may still show some spotting if you look closely. A deeper channel moves the diffuser further from the LEDs, giving the light more room to mix and spread out, resulting in a perfectly uniform, dot-free line. For a truly high-end look, always opt for a deep channel and an opal diffuser.
| Channel Characteristic | Why It Matters | Best For… |
|---|---|---|
| Material (Aluminum)13 | Provides essential heat sinking, preventing premature LED failure. | All permanent installations of both flexible and rigid strips. |
| Mounting Style14 | Determines how the light is integrated into the surface (on top, inside, or corner). | Surface-mount for ease; Recessed for a clean architectural look; Corner for display cases. |
| Depth | A deeper channel creates a smoother, more uniform line of light, eliminating dots. | High-visibility areas where a premium, dot-less appearance is required. |
| Diffuser Type | Controls the balance between light output and diffusion (smoothness). | Opal/Frosted for the smoothest look; Clear for maximum brightness and protection. |
Conclusion
Your choice is determined by the application. Flexible strips offer unmatched versatility for curves and rapid installations. Rigid strips provide the durability, performance, and perfect straight lines demanded by high-end, professional projects. Always use aluminum channels to ensure longevity.
-
Understanding FPCBs is crucial for grasping the technology behind flexible strips and their advantages. ↩
-
Learn how aluminum channels improve heat dissipation and longevity of LED strips, ensuring better performance. ↩
-
Discover how heat sinks protect LEDs from overheating, extending their lifespan and maintaining brightness. ↩
-
Understanding MCPCB is crucial for grasping how heat management enhances LED performance. ↩
-
Explore the benefits of rigid bars to see how they outperform flexible strips in durability and performance. ↩
-
Learn about thermal management’s role in extending LED lifespan and improving efficiency. ↩
-
Find out how aluminum channels improve heat dissipation and aesthetics in lighting installations. ↩
-
Discover how optical control can enhance lighting design for professional applications. ↩
-
Understanding profile types and mounting options can help you choose the best lighting solution for your space. ↩
-
Finding techniques to create a smooth line of light can elevate the overall look of your lighting installation. ↩
-
Exploring diffuser types will help you achieve the desired light quality and aesthetic in your lighting design. ↩
-
Learning about channel depth can guide you in selecting the right setup for a uniform and professional lighting effect. ↩
-
Discovering the benefits of aluminum can enhance your understanding of LED longevity and performance. ↩
-
Exploring various mounting styles will help you integrate lighting seamlessly into your design. ↩
Interested in Our LED Solutions?
Get professional consultation and customized LED lighting solutions for your projects. Contact our expert team today.
Related Articles

How Do You Build Profitable Custom Vehicle and RV Interior LED Rope Lights?
You lose RV installation contracts because your interior lights fail on rough roads. Standard strips show bright dots on glossy…

How to Perfect Bookshelf and Display Cabinet LED Rope Lighting?
You lose retail clients when bookshelves look incredibly dark. Ugly shadows hide expensive products inside display cabinets daily. You need…

How to Master Mirror and Vanity LED Rope Light Installation?
Your clients complain about ugly shadows in their bathroom mirrors. Bad lighting ruins expensive vanity designs. You lose future contracts…
