
Why Are Your LED Strips Flickering, Fading, or Failing?
Your client calls, angry. The expensive new under-cabinet lights you just installed are flickering. Your reputation is on the line, and you’re facing an unpaid service call to fix a problem you don’t understand.
Most LED strip failures, such as flickering, color fading, or dead sections, stem from three core issues: an improperly sized power supply, excessive voltage drop on long runs, or poor-quality electrical connections at the terminals or splice points.
I’ve been manufacturing LED strips for over a decade, and I’ve seen every possible failure mode. I’ve received countless emails and phone calls from frustrated installers all over the world. The good news is that nearly every one of these problems is not only fixable but also entirely preventable with the right knowledge. It’s not magic; it’s about understanding the fundamentals of low-voltage DC electronics. As a professional like Tom, mastering these troubleshooting steps moves you from being a simple installer to a true lighting expert, capable of diagnosing and solving problems on the spot. Let’s break down the most common issues you’ll face on the job site and how to solve them like a pro.
Why Is Your New LED Strip Installation Flickering?
The job is done, the client has paid, and everything looks perfect. Then, you see it out of the corner of your eye—a subtle, annoying flicker. The client will definitely notice. Now what?
Flickering is almost always a power issue. It’s most commonly caused by an overloaded power supply, an incompatible or low-quality dimmer, or a loose wire that intermittently interrupts the stable flow of current.

A flickering light is the number one callback generator. It makes an expensive installation look cheap and defective. When an installer calls me about flickering, I always ask them to start their diagnosis at the power source and work their way forward. The LEDs themselves are solid-state components; they rarely "flicker" on their own. The flicker is a symptom of an unstable power delivery system. You need to think like a detective and investigate the entire electrical path, from the 120V AC input to the last LED on the strip. Is the power supply straining to deliver enough current? Is the dimmer "chopping" the electrical wave in a way the driver can’t understand? Is a wire nut just barely making contact? One of these is almost always the culprit.
A Deeper Dive into Diagnosing Flickering
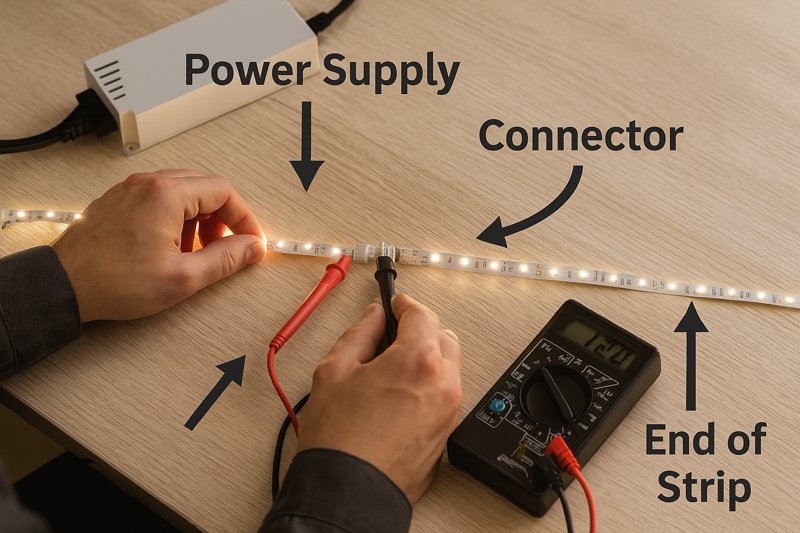
To solve this problem reliably, you need a systematic approach. Grabbing a multimeter is always a good idea. Here’s a professional checklist to walk through.
-
The Power Supply: The Usual Suspect
- The Problem: The most common cause of flickering is an overloaded power supply unit (PSU), or driver. Many installers calculate the exact wattage of their LED strip run and buy a power supply with the exact same rating. This is a critical mistake. A power supply running at 100% of its capacity will overheat, its internal components will be stressed, and it will fail to provide a stable DC voltage, resulting in flickers.
- The Pro Solution: Always follow the 80% Rule (or 20% Headroom Rule)1. You should only load a power supply to a maximum of 80% of its rated capacity.
- Example: You have a 16.4ft (5m) run of an LED strip that consumes 5 watts per foot.
- Calculation: 16.4 ft * 5 W/ft = 82 Watts total load.
- Correct PSU Size: 82 Watts / 0.80 = 102.5 Watts.
- You must use a power supply rated for at least 103 Watts. A 120W or 150W unit would be a perfect, reliable choice.
- Quality Matters: Also, be aware that cheap, non-certified power supplies often lie about their ratings and produce "dirty" power with high voltage ripple, which can cause flickering even when they are not overloaded. Always use a high-quality, UL or ETL-listed power supply2.
-
Dimmer Incompatibility
- The Problem: Not all dimmers and drivers are created equal. If you are using a high-voltage AC dimmer (like a standard residential wall dimmer), you must pair it with a "dimmable" driver. Connecting a standard wall dimmer to a non-dimmable switching power supply will cause pronounced flickering, humming, and will eventually destroy the power supply.
- The Pro Solution: Understand the dimming methods.
- AC Dimmers (TRIAC/MLV/ELV): If the client wants to use a wall dimmer, you must use a corresponding dimmable magnetic or electronic driver that is specifically designed to interpret that dimmed AC input.
- Low-Voltage PWM Dimming: A more reliable method is to use a standard, non-dimmable power supply and place a low-voltage PWM (Pulse Width Modulation) dimmer3 between the power supply and the LED strip. This is how most smart controllers (Zigbee, Z-Wave, RF) work and it provides the smoothest, flicker-free dimming.
-
Loose Connections
- The Problem: Every connection point is a potential point of failure. A wire that is not securely fastened in a terminal block, a poorly twisted wire nut, or a faulty solderless connector can cause micro-arcing and an unstable current flow, resulting in flickering.
- The Pro Solution: Check every single connection. Wiggle the wires at the power supply terminals. Check your splices. If you used solderless "clamp-style" connectors, remove them and inspect the contact points. For permanent, professional installations, a properly soldered connection is always the most reliable option.
Why Does My LED Strip Change Color or Get Dimmer at the End?
You’ve installed a long, beautiful run of cove lighting. But when you turn it on, the beginning of the strip near the power source is bright white, and the last few feet have faded to a dim, yellowish color.
This classic issue is called voltage drop. It occurs when the voltage gradually decreases along the length of the copper conductor in the LED strip, causing the LEDs farthest from the power source to be underpowered.

Voltage drop is a fundamental law of physics, and it’s one of the biggest challenges in any low-voltage lighting project. I get calls about this constantly. An installer will buy a 12V strip and try to create a single 40-foot run, and then wonder why the last half of the strip barely lights up. They blame our product, but the issue is a misunderstanding of how DC power works. The longer the wire, the more resistance it has. This resistance consumes voltage along the way, leaving less and less power available for the LEDs at the far end. The lower voltage means the LEDs can’t produce their full brightness or correct color. The blue diodes, which require a higher forward voltage, are affected first, which is why the light often appears warmer or yellowish at the end of the run.
A Deeper Dive into Preventing Voltage Drop
As a professional, you can’t afford to have your installations look unprofessional due to color shifts. You must engineer your runs to mitigate voltage drop from the start.
-
Choose 24V Over 12V4 for All Professional Projects
- The Physics: This is the most important decision you can make. According to Ohm’s Law (P = V * I), for a given amount of power (P), doubling the voltage (V) from 12V to 24V will halve the required current (I). For example, a 96W load requires 8 Amps at 12V, but only 4 Amps at 24V.
- The Benefit: Lower current means significantly less voltage drop for the same length and gauge of wire. This allows you to create much longer, more stable single runs of LED strip before voltage drop becomes noticeable. As a factory, we strongly recommend 24V as the standard for any architectural or large-scale project. A 12V strip is really only suitable for short, accent applications like in-cabinet or vehicle lighting.
-
Inject Power at Multiple Points5
- The Problem: Even with a 24V strip, you will still experience voltage drop on very long runs (typically over 32ft or 10m).
- The Pro Solution: Don’t power a long run from only one end. You need to inject power at multiple points. There are two main ways to do this:
- Center Power Feed: For a straight run, place your power connection in the middle of the strip and let the power flow outwards in two directions. This immediately cuts the effective run length in half.
- Parallel Wiring (Power Bus): For very long, continuous runs (like perimeter cove lighting), run a separate, thicker gauge two-conductor wire (a "power bus") from the power supply alongside the LED strip. Then, every 16ft (5m) or so, tap into that bus to inject power into the strip. This ensures that no section of the strip is too far from a direct power feed.
-
Use Thicker Gauge Wire6 for Your Feeds
- The Problem: Voltage drop doesn’t just happen in the strip itself; it also happens in the feed wires between your power supply and the strip. Using thin 22AWG wire for a 20-foot lead to your strip will cause significant power loss before the electricity even reaches the first LED.
- The Pro Solution: Use an online voltage drop calculator7 to determine the correct American Wire Gauge (AWG) for your runs. For longer distances or higher-amperage runs, you will often need to use 18AWG, 16AWG, or even thicker wire to ensure the strip receives the full voltage from the power supply.
Why Won’t My LED Strips Stick?
You return to a job site a month after installation and find your beautiful under-cabinet lighting is sagging and peeling off. It looks terrible, and the client is rightfully upset about the poor workmanship.
Adhesive failure is almost always due to improper surface preparation or using the strip in an environment it wasn’t designed for. Dust, oil, moisture, or textured surfaces will prevent the adhesive from forming a strong bond.
This is one of the most frustrating and embarrassing failures for an installer. It has nothing to do with the electronics, but it completely undermines the perceived quality of the entire job. We, as a manufacturer, source high-quality 3M adhesive backing for our professional-grade strips, but even the best adhesive in the world is no match for a dirty or unsuitable surface. Many installers are in a rush and just peel and stick, but taking an extra five minutes to prepare the surface is the difference between an installation that lasts for years and one that fails in a few weeks. It’s a crucial step that protects your reputation and prevents costly callbacks.
A Deeper Dive into Ensuring a Permanent Bond
Here is the process that professional installers use to guarantee their strips never fall down.
-
Meticulous Surface Preparation is Non-Negotiable8
- The Problem: Common building materials are covered in contaminants that block adhesion. Wood has dust and porous grain. Painted drywall has a dusty texture. Metal surfaces can have a thin layer of machine oil. Even a seemingly clean surface has oils from fingerprints.
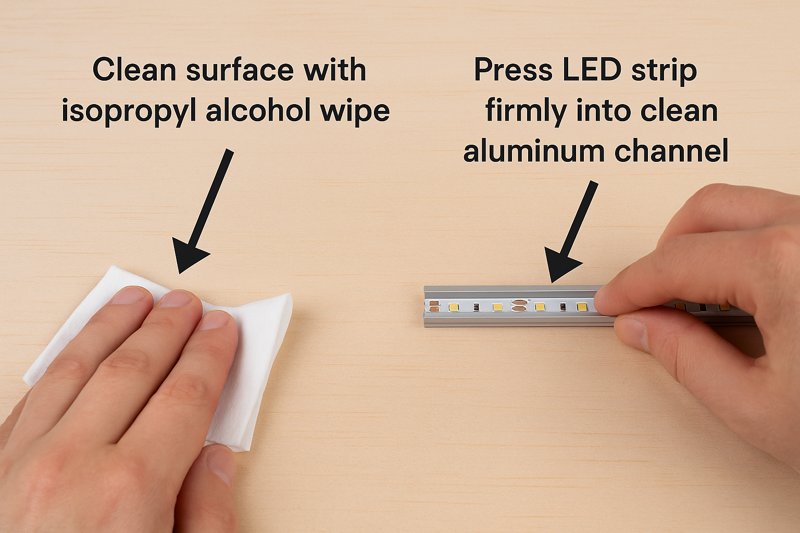
- The Pro Solution: The surface must be clean, dry, and non-porous.
- Step 1: Clean. Thoroughly wipe down the entire mounting surface with a lint-free cloth and a 50/50 mix of isopropyl alcohol and water. Alcohol is a solvent that effectively removes dust, oils, and residues without leaving a film. Do not use household cleaners, as they often leave behind soap or silicone residues.
- Step 2: Dry. Allow the surface to air dry completely.
- Step 3: Adhesion Promoter (Optional but Recommended). For difficult surfaces like low-energy plastics or certain powder coats, using a 3M Primer 94 adhesion promoter9 pen can create a chemical bond that is incredibly strong.
-
Use Aluminum Mounting Channels10 for a Professional Finish
- The Problem: Directly sticking a strip to a porous or uneven surface like raw wood or orange-peel textured drywall is doomed to fail. The adhesive simply can’t make enough surface contact. Furthermore, LED strips need a way to dissipate heat to ensure a long lifespan.
- The Pro Solution: Use aluminum mounting channels (extrusions). This solves multiple problems at once:
- Perfect Surface: The channel provides a smooth, clean, thermally conductive metal surface that is ideal for adhesive.
- Heat Sink: The aluminum acts as a heat sink, drawing heat away from the LEDs and extending the lifespan of the strip significantly. For high-output strips, this is not optional; it is required.
- Protection & Diffusion: The channel physically protects the strip from bumps and damage, and the optional frosted lens diffuses the light, eliminating hot spots and creating a smooth, linear glow.
- Secure Mounting: You can securely screw the channel to any surface (wood, drywall, etc.) and then apply the strip inside the clean channel. The installation is now mechanically fastened and permanent.
-
- The Problem: The pressure-sensitive adhesive used on strips needs firm, even pressure to "wet out" and flow into the microscopic pores of the surface to create a strong bond. Simply pressing it on lightly with your fingertips is not enough.
- The Pro Solution: After applying the strip, use a small roller (like a J-roller for laminate) or a hard plastic tool to press down firmly along the entire length of the strip. This ensures full contact and activates the bond.
Conclusion
Troubleshooting LED strips is a process of elimination. Start with the power supply, analyze the wiring for voltage drop, and ensure every physical connection and mounting is secure. Mastering these fundamentals will prevent almost all common failures.
-
Understanding the 80% Rule can help you choose the right power supply, ensuring reliability and preventing flickering. ↩
-
Discover the significance of using certified power supplies to avoid flickering and ensure safety in your installations. ↩
-
Explore how PWM dimmers provide smooth, flicker-free dimming for LED strips, improving your lighting experience. ↩
-
Explore the advantages of using 24V systems for LED installations, including reduced voltage drop and improved performance. ↩
-
Learn effective techniques for power injection to minimize voltage drop in long LED runs, ensuring consistent brightness. ↩
-
Discover why using thicker gauge wire is crucial for reducing voltage drop and maintaining optimal performance in LED systems. ↩
-
Find reliable voltage drop calculators to help you select the right wire gauge for your LED projects, ensuring efficiency. ↩
-
Understanding surface preparation is crucial for ensuring a strong bond. Explore this link for expert tips and techniques. ↩
-
3M Primer 94 can significantly improve adhesion on challenging surfaces. Find out how it works and when to use it. ↩
-
Aluminum channels enhance both the aesthetics and functionality of LED installations. Discover their benefits in detail. ↩
-
Learn why applying the right pressure is essential for a lasting bond in adhesive applications. This resource provides valuable insights. ↩
Interested in Our LED Solutions?
Get professional consultation and customized LED lighting solutions for your projects. Contact our expert team today.
Related Articles

How Do You Build Profitable Custom Vehicle and RV Interior LED Rope Lights?
You lose RV installation contracts because your interior lights fail on rough roads. Standard strips show bright dots on glossy…

How to Perfect Bookshelf and Display Cabinet LED Rope Lighting?
You lose retail clients when bookshelves look incredibly dark. Ugly shadows hide expensive products inside display cabinets daily. You need…

How to Master Mirror and Vanity LED Rope Light Installation?
Your clients complain about ugly shadows in their bathroom mirrors. Bad lighting ruins expensive vanity designs. You lose future contracts…
