
Why Are Your Professional LED Strip Installations Flickering?
The final invoice is sent, the client is happy, and the project looks stunning. Then you get the call: "The lights you installed are flickering." Your heart sinks. It’s an unplanned service call, a dent in your reputation, and a hit to your profit margin.
Flickering in professional LED strip installations is almost never a fault of the LEDs themselves. It is a symptom of an unstable power system, most commonly caused by an overloaded power supply, an incompatible dimmer, or a poor electrical connection.
Over my years of manufacturing and consulting, flickering lights are the number one technical issue my clients, like Tom, ask me about. The first reaction for many installers is to blame the LED strip itself. But in my experience, that’s the issue less than 1% of the time. Modern LEDs are incredibly robust solid-state devices. The flicker you see is the final, visible symptom of a problem that exists somewhere else in the electrical chain. To solve it efficiently, you have to stop thinking of it as a "bad strip" and start thinking like a system diagnostician. The problem is in the power delivery. Let’s walk through the professional diagnostic process I share with my top clients to find and fix the root cause, every single time.
Can an Overloaded Power Supply Cause Flickering?
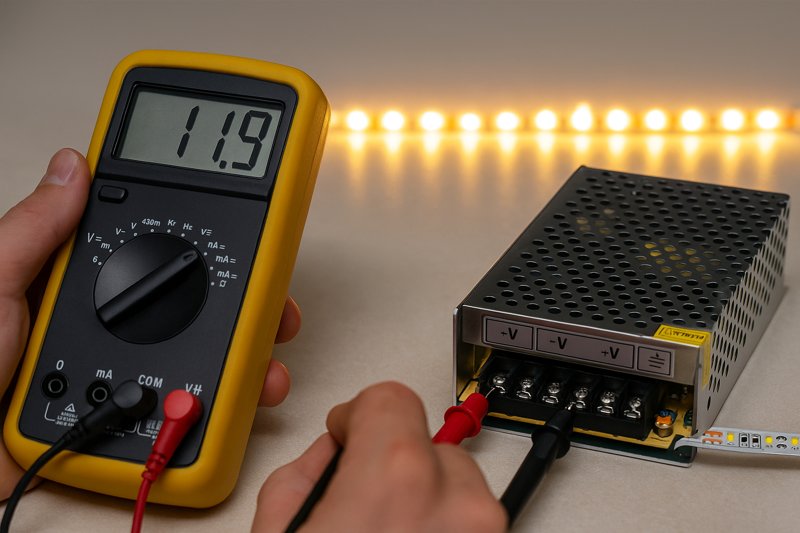
You meticulously calculated the total wattage of your LED strip run. You bought a power supply with a matching wattage rating. So why is the installation flickering, especially when at full brightness?
Absolutely. An overloaded or improperly sized power supply is the single most common cause of LED flickering. Running a power supply at or near 100% of its rated capacity causes it to overheat and deliver unstable DC voltage, resulting in strobing or flickering.
This is the first place I tell every installer to check. It’s a simple mistake born from a logical assumption: a 90-watt load should work with a 90-watt power supply. But in the world of electronics, this is a recipe for failure. A power supply, or driver, is an electronic device converting high-voltage AC to low-voltage DC. Pushing it to its absolute maximum limit is like constantly redlining a car engine. It will run hot, components will be under extreme stress, and its performance will degrade rapidly. It simply cannot maintain the clean, stable DC voltage the LEDs need to operate correctly, and that instability is what you see as flicker.
A Deeper Dive into Power Supply Sizing and Quality
For a professional like Tom, whose reputation depends on reliability, understanding the nuance of power delivery is non-negotiable. It’s not just about matching watts; it’s about building in a robust safety margin and choosing quality components.
-
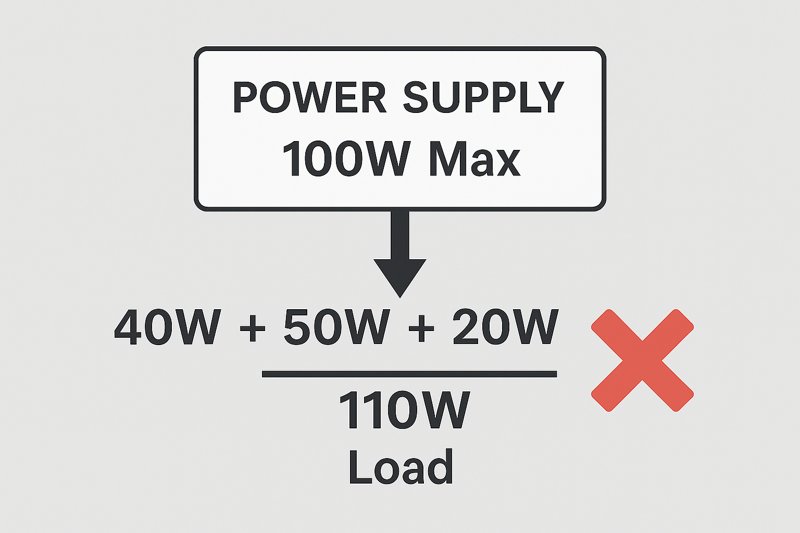
The 80% Rule1: A Professional Mandate
You must never load a power supply to more than 80% of its stated maximum capacity. This is known as providing 20% "headroom." This safety margin ensures the components operate well within their thermal and electrical limits, providing clean power and a long, reliable service life.- Real-World Example:
- Your Project: 30 feet of our premium LED strip, which consumes 4.5 watts per foot.
- Incorrect Calculation: 30 ft * 4.5 W/ft = 135 Watts. You might be tempted to buy a 135W or 140W power supply. This will fail.
- Correct Professional Calculation:
- Total Load: 30 ft * 4.5 W/ft = 135 Watts
- Apply 80% Rule: 135W / 0.8 = 168.75 Watts
- Required PSU: You need a power supply with a capacity of at least 168.75 Watts. The correct and professional choice would be a 180W or 200W unit.
- Real-World Example:
-
Power Supply Quality2: "Dirty" vs. "Clean" Power
Not all watts are created equal. Inexpensive, non-certified power supplies often have poor internal filtering. They produce "dirty" DC power with a high amount of AC ripple. LEDs are very sensitive to this ripple, and it can manifest as a high-frequency flicker that might be imperceptible to the naked eye but is very noticeable on video or to sensitive individuals.
| Feature | Professional-Grade PSU3 (e.g., Mean Well) | Cheap, Non-Certified PSU |
|---|---|---|
| Certifications | UL Listed, CE, Class 2 | Often none or falsified |
| Efficiency | High (85-95%) | Low (can be <75%) |
| Output Stability | Low voltage ripple, clean DC output | High ripple ("dirty" power) |
| Load Regulation4 | Maintains stable voltage from 10-100% load | Voltage sags under heavy load |
| Lifespan | Long; often backed by 5-7 year warranty | Short; prone to early failure |
Choosing a reputable, certified power supply and sizing it correctly using the 80% rule will single-handedly prevent more than half of all flickering issues you will ever encounter.
Is an Incompatible Dimmer Causing the Flicker?
The flicker only happens when you dim the lights below 50%. At full brightness, they are perfectly stable. You’ve swapped the power supply, but the problem persists. What’s going on?
Yes, dimmer incompatibility is a major cause of flickering, especially at low light levels. Using a standard AC wall dimmer with a non-dimmable driver or pairing incompatible dimming technologies (like TRIAC and PWM) will create severe flickering.
This is a highly technical area where many skilled installers get tripped up. The word "dimmable" is not a universal standard. There are multiple ways to dim an LED, and if your "dimmer" and your "driver" (power supply) are not speaking the same language, the result is chaos. The flickering you see is the driver struggling to interpret a corrupted or unexpected electrical signal from the dimmer. This is especially true for TRIAC dimmers, an older technology designed for incandescent bulbs, which behave very differently from modern electronic drivers.
A Deeper Dive into Dimming Technologies
To solve these issues, you must understand the two primary categories of dimming used in professional installations. Choosing the right method from the start is crucial for a smooth, flicker-free dimming curve.
-
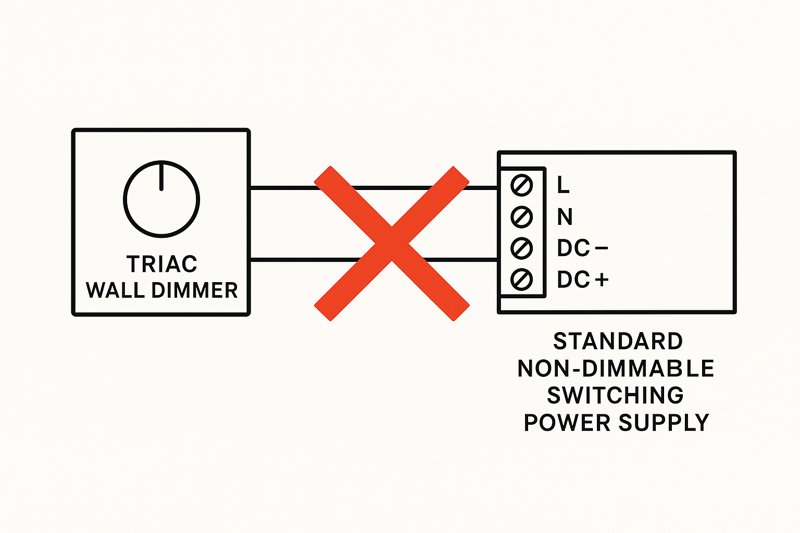
High-Voltage (AC) Dimming5: The Traditional Method
This method involves placing a dimmer on the 120V/240V AC line before the power supply.- How it Works: These dimmers (TRIAC, ELV) work by "chopping" the AC sine wave. A "dimmable driver" is specifically designed to interpret this chopped waveform and translate it into a reduced DC output.
- The Problem: If you connect a standard, non-dimmable switching power supply to a TRIAC wall dimmer, the driver’s circuitry gets confused. It sees the rapidly chopped voltage as an unstable input and tries to compensate, resulting in strobing, flickering, and humming. You must pair a TRIAC dimmer6 with a TRIAC-dimmable driver.
- Best Use Case: Retrofit projects where the client wants to use existing wall dimmer wiring.
-
Low-Voltage (DC) PWM Dimming7: The Modern, Reliable Method
This method involves using a standard, stable, non-dimmable power supply and placing a dimming controller on the low-voltage (12V/24V) side, between the power supply and the LED strip.- How it Works: Pulse Width Modulation (PWM) dimmers don’t change the voltage. They turn the LEDs on and off at an extremely high frequency. To dim the lights to 10% brightness, the controller leaves the LEDs on for 10% of the time and off for 90% of the time. Because this happens thousands of times per second, the human eye perceives it as a smooth, continuous dimming effect.
- The Pro Advantage: This is the most reliable, stable, and flexible method. It provides a full, smooth dimming range from 0-100%. All high-quality smart home controllers (Zigbee, Z-Wave, Lutron, etc.) and RF remote systems use PWM dimming. When specifying a new system, this is the superior technical choice.
- PWM Frequency8: Ask your supplier about the PWM frequency of their controllers. Cheaper controllers use a low frequency (<500 Hz), which can cause flickering on cameras. Professional-grade controllers use high frequencies (>2000 Hz) for a completely flicker-free experience, even on slow-motion video.
How Do Loose Connections Cause LED Strips to Flicker?
You’ve checked the power supply and the dimmer, and they are both correct. The flickering seems random, sometimes happening when a door slams or someone walks heavily across the floor. What could this be?
Loose electrical connections create a microscopic, intermittent break in the circuit. This causes the flow of current to be unstable, resulting in a random, erratic flicker as the connection is made and lost.
This is often the last place installers look, but it can be the most frustrating culprit. Unlike a systemic flicker from a bad power supply, a flicker from a loose connection is often unpredictable and hard to replicate. Every point where wires are joined—screw terminals, wire nuts, solderless connectors—is a potential point of failure. The current traveling to your LED strip needs a solid, uninterrupted highway. A loose connection turns that highway into a bumpy road with potholes, and the LEDs flicker with every bump.
A Deeper Dive into Creating Rock-Solid Connections
A truly professional installation is defined by its attention to detail, and nothing is more important than the quality of the electrical connections. They must be mechanically and electrically sound to last for years.
-
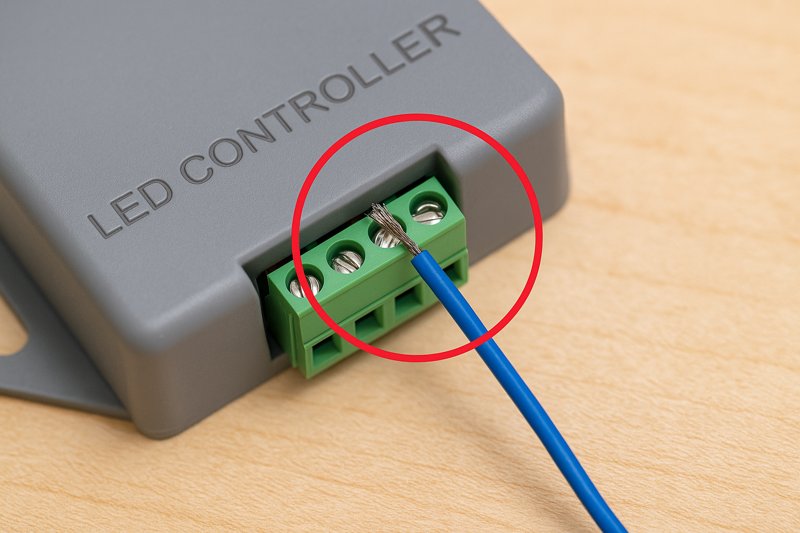
Terminal Block Best Practices9
Many power supplies and controllers use screw-down terminal blocks.- The Problem: Installers often insert frayed, untwisted stranded wire directly into the terminal, or they fail to tighten the screw sufficiently. Over time, vibrations can cause the wires to loosen, creating a poor connection.
- The Pro Solution:
- Twist & Tin: Tightly twist the strands of your wire together. For an even better connection, "tin" the tip with a soldering iron and a small amount of solder. This turns the stranded wire into a solid, durable pin.
- Use Ferrules: The most professional method is to crimp a wire ferrule onto the end of the stranded wire. This creates a clean, solid pin that makes a perfect, secure connection inside the terminal block.
- The Tug Test: After tightening the screw, give the wire a firm but gentle tug. If it moves at all, it’s not secure enough.
-
Solderless Connectors10: A Point of Failure?
Clamp-style or "clip-on" connectors are fast and easy, but they are often the weakest link in a system.- The Problem: The small metal prongs inside these connectors must pierce the waterproof coating (if any) and make perfect contact with the copper pads on the LED strip. If the alignment is slightly off, or if the strip is flexed, the connection can be poor and intermittent. They are also prone to corrosion in humid environments.
- The Pro Solution: For any permanent, high-end architectural installation, soldered connections11 are always superior. Soldering creates a direct, fused electrical bond between the wire and the copper pad that is incredibly durable and reliable. It takes more time, but it eliminates an entire class of potential failures and callbacks.
-
The Importance of Strain Relief12
Never let the weight of a wire hang directly from a connection point. This tension will eventually cause the connection to fail. Secure the wires with a zip tie or cable clamp a few inches away from the connection. This "strain relief" ensures that any tugs or vibrations are absorbed by the cable management, not by the critical electrical joint itself.
Conclusion
Stop blaming the strip. Flickering comes from your power supply, dimmer, or connections. Master these three system checks to solve flickering issues permanently and protect your professional reputation.
-
Understanding the 80% Rule is crucial for ensuring reliability and longevity in power supply systems. ↩
-
Exploring power supply quality can help you choose components that ensure stable and clean power delivery. ↩
-
Learn why investing in a Professional-Grade PSU can enhance performance and reliability in your projects. ↩
-
Understanding load regulation is key to ensuring stable voltage and preventing flickering in LED applications. ↩
-
Explore this link to understand the traditional dimming method and its applications in professional installations. ↩
-
Learn about TRIAC dimmers and their importance in achieving flicker-free lighting solutions. ↩
-
Discover the advantages of PWM dimming technology for reliable and smooth lighting control in modern setups. ↩
-
Find out why PWM frequency matters for flicker-free performance and how to choose the right controller. ↩
-
Explore this resource to learn essential techniques for ensuring secure and reliable terminal block connections. ↩
-
Discover insights on the reliability of solderless connectors and why soldered connections may be a better choice. ↩
-
Learn about the benefits of soldered connections and how they enhance the durability and reliability of electrical systems. ↩
-
Understand the significance of strain relief in preventing connection failures and ensuring long-lasting installations. ↩
Interested in Our LED Solutions?
Get professional consultation and customized LED lighting solutions for your projects. Contact our expert team today.
Related Articles

How Do You Build Profitable Custom Vehicle and RV Interior LED Rope Lights?
You lose RV installation contracts because your interior lights fail on rough roads. Standard strips show bright dots on glossy…

How to Perfect Bookshelf and Display Cabinet LED Rope Lighting?
You lose retail clients when bookshelves look incredibly dark. Ugly shadows hide expensive products inside display cabinets daily. You need…

How to Master Mirror and Vanity LED Rope Light Installation?
Your clients complain about ugly shadows in their bathroom mirrors. Bad lighting ruins expensive vanity designs. You lose future contracts…
