
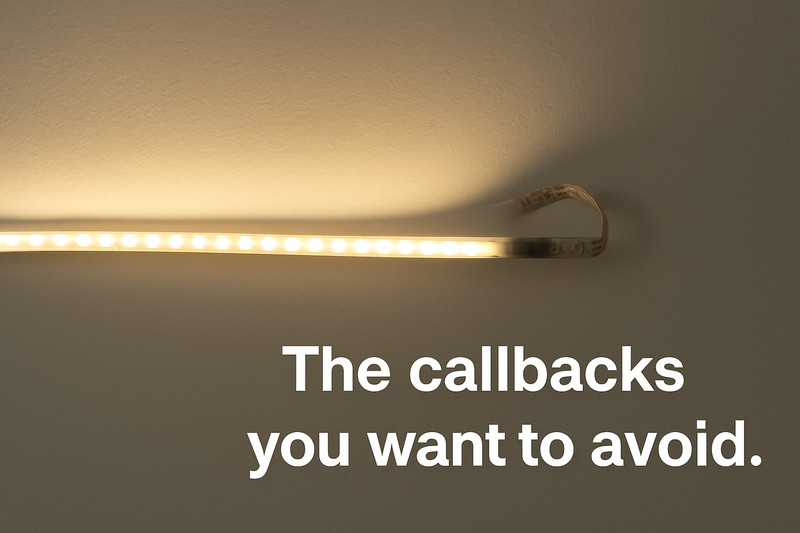
Why Is Your Outdoor LED Strip Installation Failing?
It is the dread of every contractor: the phone rings six months after a job, and the client says, "half the lights are dead." You lose profit on the repair, but you lose your reputation on the failure.
The most common failures in outdoor LED projects are adhesive detachment due to thermal cycles, water ingress at connection points, voltage drop causing color inaccuracy, and UV degradation yellowing the lens. Solving these requires mechanical mounting, proper silicone sealing, power injection calculations, and specifying UV-stabilized materials.
In my factory in Shenzhen, I see the returns box. I dissect the strips that failed in the field to understand why. Usually, the LED chip is fine; it is the installation method or the material choice that failed the chip. Let’s look at the four biggest problems so you can prevent them before you even order your materials.
Why Do Outdoor Strips Fall Down After a Few Months?
You cleaned the surface. You used the "3M" backing tape. It felt solid when you left. But three months of summer heat later, the strip is drooping like a sad smiley face. Why does chemical bonding fail outdoors?
Adhesive tape relies on surface energy and static conditions. Outdoors, surfaces (wood, stucco, metal) expand and contract with temperature changes at different rates than the LED strip. This "shearing force" eventually breaks the adhesive bond. Furthermore, moisture and dust degrade the glue over time. Tape is for temporary placement; mechanical fasteners are for permanence.

The Myth of "Peel and Stick"
I tell all my B2B clients: Do not trust the tape.
On the back of our strips, we apply 3M VHB (Very High Bond) tape1. It is excellent stuff. However, in an outdoor environment, you are fighting physics.
- Thermal Cycles: Imagine you stick a strip to an aluminum pergola. In the day, the sun hits the black aluminum, and it heats up to 140°F (60°C). The metal expands. At night, it cools to 60°F (15°C). The metal shrinks. The LED strip (made of copper and silicone) expands and contracts too, but at a different rate. Every day, the tape is being pulled and pushed. Eventually, it gives up.
- Surface Tension: Most outdoor surfaces are porous (wood, concrete) or oxidized (painted metal). Tape needs a perfectly smooth, high-energy surface to bond. Porous materials suck the moisture out of the glue or simply don’t offer enough surface area.
- The Solution: You must use Mechanical Mounting2.
- Mounting Clips: Use screw-down silicone brackets every 12 inches. One screw holds better than 10 feet of tape.
- Aluminum Channels3: This is the pro move. Screw an aluminum channel to the building, then stick the LED strip inside the channel. The tape bonds well to the smooth aluminum inside, and the channel protects the strip. Plus, the channel looks like architectural trim, not a sticker.
- Construction Adhesive4: If you can’t use screws (like on stone), use clear silicone structural adhesive (like GE Silicone II or a construction epoxy) in dabs every foot. Don’t rely on the thin tape backing.
| Surface Type | Recommended Mounting Method | Why? |
|---|---|---|
| Wood / Eaves | Aluminum Channel + Screws | Wood warps and absorbs moisture; tape will fail. |
| Concrete / Stone | Construction Adhesive / Silicone | Surface is too rough for tape; drilling is hard. |
| Smooth Metal | 3M VHB + End Clips | Metal is smooth, but thermal expansion requires safety clips. |
| Plastic / Vinyl | Screw Clips | Plastic releases oils (plasticizers) that dissolve glue. |
Why Do Sections of the Strip Turn Red or Die?
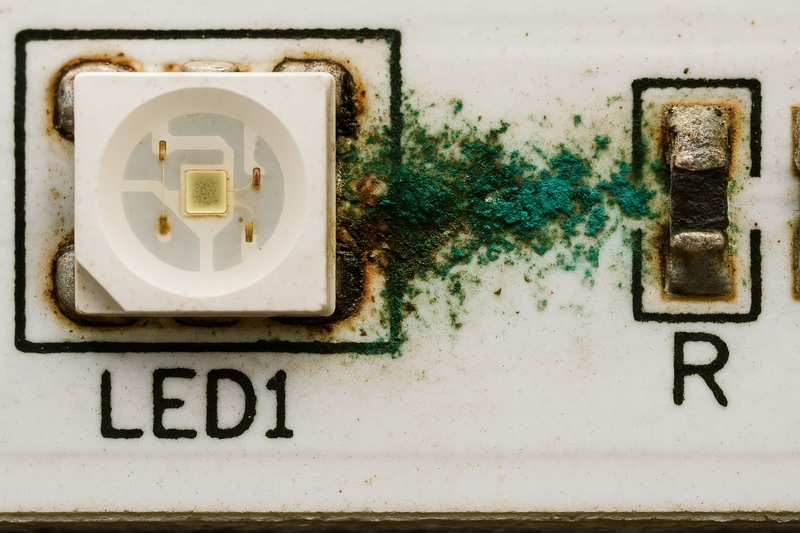
The lights work perfectly for a week. Then, after a heavy rainstorm, you see flickering. Or worse, the end of the strip turns red while the rest stays white. Is the chip defective? No, it’s usually the copper.
When water breaches the silicone coating, it causes electrolysis. The electrical current flowing through the copper PCB reacts with the water, rapidly corroding the copper traces. This breaks the connection (dead light) or increases resistance (dim/red light). The entry point is rarely the strip body—it is almost always the cut points or the soldered wire connections.
The "Capillary Action5" Killer
Water is sneaky. It doesn’t just splash on the strip; it gets sucked into it.
- The Syringe Effect: Many contractors use wire nuts inside a junction box that isn’t perfectly sealed. When air heats up inside the strip during operation, it expands and pushes out. When the strip cools down at night (often when dew forms or sprinklers run), the air inside the strip contracts, creating a vacuum. This vacuum sucks moisture through the wire insulation right into the LED strip. We call this the "Straw Effect."
- Field Cuts: You buy IP67 waterproof strips. But then you cut them to fit the patio length. The moment you cut that silicone tube, the waterproofing is gone. You are now responsible for resealing it.
- How to Seal Correctly:
- Don’t use just the end cap: The little plastic cap we send is not enough.
- Fill it: You must fill the end cap with Neutral Cure Silicone6. (Do not use Acid Cure / Vinegar smelling silicone—it eats the chips!).
- Shrink it: Put adhesive-lined heat shrink over the cap and the wire connection. The glue inside the heat shrink melts and forms a watertight barrier.
- Drip Loop: Always create a U-shape bend in the wire before it enters the wall. This forces water to drip off the bottom of the loop rather than running down the wire into the connection.
| Symptom | Cause | Fix |
|---|---|---|
| Flickering | Loose connection / Oxidation | Resolder joints; add dielectric grease. |
| Section Dead | Broken internal circuit | Corrosion ate the copper path. Replace section. |
| Red/Pink hue (on RGBW) | Water across pins | Water is bridging the R, G, B pins. Dry & reseal. |
| Fog inside tube | Seal failure | Capillary suction. improving sealing at wire ends. |
Why Is the End of the Run Dimmer (or Pink)?
You installed a 40-foot run around a pool deck. It looks bright at the power source, but on the far side, it looks weak and yellowish. You double-checked the wattage, so what went wrong?
This is Voltage Drop. LED strips are thin flexible circuit boards made of copper. As electricity travels down the strip, the resistance of the copper lowers the voltage. A 24V signal might drop to 19V by the end of a long run, causing LEDs to dim or color-shift (white turning yellow/pink).

The Physics of Copper Resistance
In the US, you are used to running 12-gauge or 14-gauge Romex wire in walls. That wire is thick and carries current easily.
An LED strip, however, has extremely thin copper traces—often only 2 ounces (2oz) or 3 ounces (3oz) thick. It is like trying to push a firehose volume of water through a drinking straw. The friction (resistance) steals the energy.
- The "Pink" Phenomenon: If you are using RGB or RGBW strips, voltage drop looks pink. Why? The Blue LED needs the most voltage (around 3.0V). The Red LED needs the least (around 2.0V). When voltage drops, the Blue dies first, leaving only the Red glowing. So your "White" mix turns pink.
- The 24V Advantage: Always use 24V (or even 48V) for outdoors. 12V drops voltage twice as fast. A 12V strip can only run about 16 feet reliably. A 24V strip can run 32 feet.
- The Power Injection Solution: You cannot solve this by buying a bigger power supply. The bottleneck is the strip itself.
- Center Feed: Instead of powering from one end, run your wire to the middle of the 40-foot strip. Now electricity only travels 20 feet in each direction.
- Looping: Run a wire parallel to the strip and connect it to the end of the strip as well. Now power hits the strip from both sides, equalizing the pressure.
| Run Length (24V System) | Wiring Method | Result |
|---|---|---|
| < 16 ft (5m) | Single End Feed | Perfect Evenness. |
| 16 – 32 ft (5m-10m) | Single End Feed (High CRI) | Slight dimming at end (acceptable). |
| 32 – 50 ft (10m-15m) | Double End Feed (Loop) | Mandatory to prevent pink/dim ends. |
| > 50 ft (15m+) | Middle Feed + Ends | Requires multiple injection points. |
Why Did My "Ip67" Strip Turn Yellow After One Summer?
The waterproofing is intact, and the lights work, but the crisp 3000K white has turned into a muddy, urine-colored yellow. The client thinks the LEDs are burning out. They aren’t. Standard waterproofing is ruining your light.
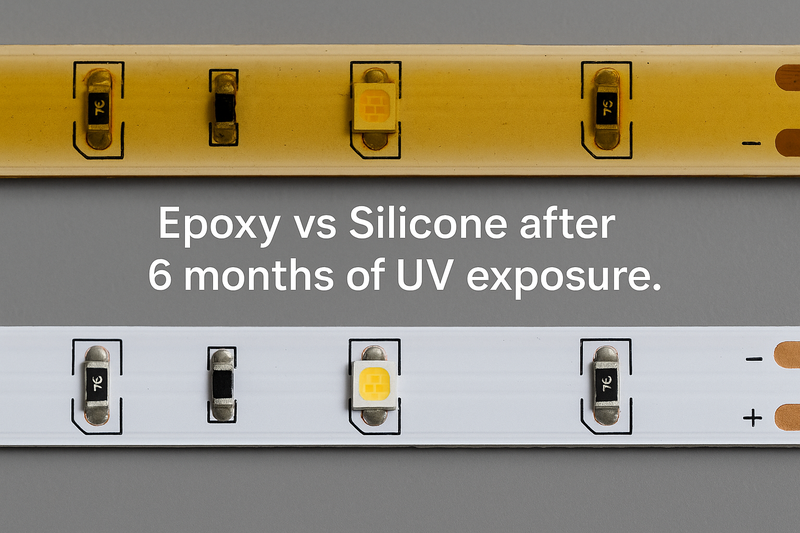
Low-quality waterproof strips use Epoxy or standard PU (Polyurethane) glue. These materials are not UV stable. Sunlight causes the chemical polymer to break down and yellow within 3-6 months, acting like a yellow filter over your light. For outdoor use in direct sun, you must specify Silicone Extrusion technology.
Material Science: Epoxy vs. Silicone
When you source products from Alibaba or generic distributors, they will sell you "Waterproof IP65" or "IP67." They usually send you a strip covered in Epoxy Resin7.
- The Epoxy Problem: Epoxy is cheap. It hardens well. But under UV radiation (sunlight), the molecular chains snap. It turns yellow and brittle. It eventually cracks, letting water in. It is garbage for outdoor use.
- The Silicon Solution: You need to ask for Silicone Encased8 or Silicone Extrusion strips.
- Silicone is an inorganic polymer. It does not react to UV light. It stays clear for years.
- It remains flexible in freezing winters (Epoxy gets hard and cracks in winter).
- It dissipates heat better than epoxy.
- How to tell the difference?
- Smell test: Cheap PU/Epoxy often has a strong chemical smell. High-grade Food Silicone has almost no smell.
- Feel test: Epoxy feels hard like plastic fingernails. Silicone feels soft and rubbery like a kitchen spatula.
- Burn test (Factory Trick): If you burn proper silicone, the ash is white. If you burn epoxy/PU, the ash is black and sticky.
Pro Tip: Even if you buy Silicone, ensure the strip is hollow or "Integrated Extrusion." Glued-on silicone covers can peel off. Integrated extrusion means the silicone and the PCB are molded together as one solid unit. This is the only true IP67.
| Material | UV Stability | Flexibility | Heat Resistance | Best Use |
|---|---|---|---|---|
| Epoxy Glue | Poor (Yellows fast) | Poor (Cracks in cold) | Poor (Traps heat) | Indoor Kitchens Only. |
| PU Glue | Moderate | Good | Moderate | Covered Outdoor Patios. |
| Pure Silicone | Excellent (Stays Clear) | Excellent (Stays Soft) | Excellent | Direct Sunlight / Decking. |
Why Do the Lights Flash or Strobe Like a Disco?
Everything is installed. You hit the switch. The lights turn on for a second, then turn off. Then on. Then off. It is the "hiccup mode" of death. You didn’t install a flasher, so what is happening?
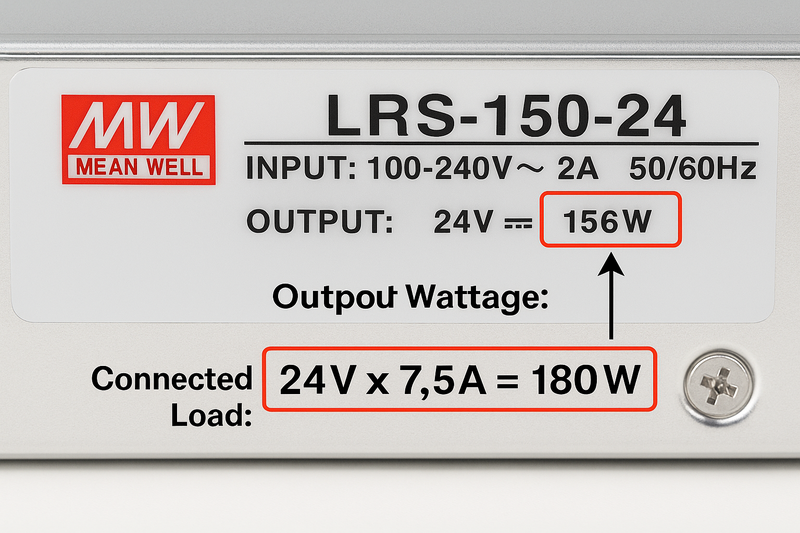
Flashing usually indicates the Power Supply (Driver) is entering protection mode. This happens if the total wattage of the strips exceeds the driver’s capacity (Overload), or if there is a short circuit in the wiring. Drivers should always be "derated," meaning you only load them to 80% of their maximum capacity.
The "80% Rule" and Inrush Current
I see this mistake on 30% of quotes. A client has 100 Watts of LED strip. They buy a 100 Watt power supply. It works for 10 minutes, gets hot, and shuts down.
- Thermal Headroom: Electronics degrade with heat. If you run a driver at 100%, it generates max heat. If it is sitting in a hot plastic box in a garden, it will trip its thermal safety switch. It turns off, cools down, turns on, heats up, turns off. That is the flashing.
- The 80% Rule: Always buffer your power. If you have 100W of light, buy a 120W or 150W driver. This keeps the components cooler and extends the lifespan by years.
- Inrush Current: When LEDs first turn on, they are cold. Cold electronics pull a massive spike of current for a millisecond—sometimes 50x the normal running current. If your driver and breaker are too small, this spike trips the system immediately.
- Voltage Drop (Again): Sometimes flashing happens because the voltage is too low at the end of the line for the receiver to understand the signal (common in smart/RGB systems).
Troubleshooting the Short:
If you have a big enough driver and it still flashes, you have a short. Disconnect the strip output. Turn on the driver. - Driver LED stays on? The driver is fine; the short is in your wire/strip.
- Driver LED flashes with nothing attached? The driver is dead.
| Feature | Cheap Driver (Generic) | Pro Driver (e.g., Mean Well HLG) |
|---|---|---|
| Warranty | 1-2 Years | 5-7 Years |
| Casing | Vented Metal (Not Waterproof) | Potting (Filled with Glue, IP67) |
| Protection | Simple Fuse | Hiccup Mode / Auto-Recover |
| Load Handling | Fails at 90% load | Handles peaks well |
Conclusion
Outdoor lighting is less about the light and more about the "armor" around it. To avoid callbacks, you must upgrade your specs: use Silicone Extrusion for UV resistance, Mechanical Clips instead of tape, 24V systems with power injection, and always derate your power supplies by 20%. Spend the extra 15% on materials now to save 100% of the labor cost of fixing it later.
-
Explore this link to understand the unique properties of 3M VHB tape and its applications in various environments. ↩
-
Discover why Mechanical Mounting is essential for durability and performance in outdoor settings. ↩
-
Learn how Aluminum Channels enhance the aesthetics and longevity of LED installations. ↩
-
Find out which Construction Adhesives are most effective for outdoor applications and their benefits. ↩
-
Learn about capillary action to grasp its impact on moisture intrusion in LED strips and how to prevent it. ↩
-
Explore this link to understand the benefits of Neutral Cure Silicone for sealing LED strips effectively. ↩
-
Understanding the drawbacks of Epoxy Resin can help you make informed choices for outdoor applications. ↩
-
Exploring the advantages of Silicone Encased products will guide you in selecting durable and reliable materials. ↩
Interested in Our LED Solutions?
Get professional consultation and customized LED lighting solutions for your projects. Contact our expert team today.
Related Articles

How Do You Build Profitable Custom Vehicle and RV Interior LED Rope Lights?
You lose RV installation contracts because your interior lights fail on rough roads. Standard strips show bright dots on glossy…

How to Perfect Bookshelf and Display Cabinet LED Rope Lighting?
You lose retail clients when bookshelves look incredibly dark. Ugly shadows hide expensive products inside display cabinets daily. You need…

How to Master Mirror and Vanity LED Rope Light Installation?
Your clients complain about ugly shadows in their bathroom mirrors. Bad lighting ruins expensive vanity designs. You lose future contracts…
