
How Can You Light Outdoor Stairs for Maximum Safety Without Blinding the Homeowner?
You have finished a beautiful tiered deck or a stone landscape staircase. The client wants lights. If you do this wrong, you create a tripping hazard that could lead to a lawsuit. If you do it right, you add thousands of dollars in value to the project.
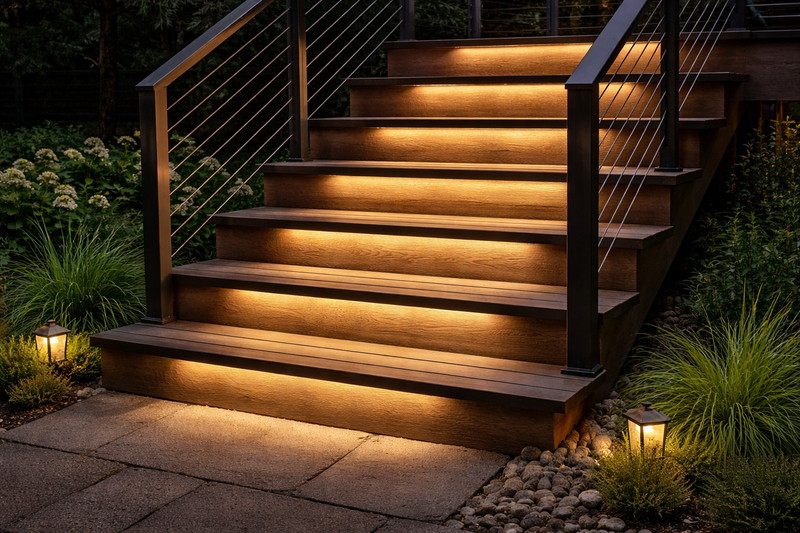
The key to safe and beautiful outdoor stair lighting is concealing the source. You must mount LED strips under the tread nosing or inside harsh-glare-shielded aluminum channels facing downward. Always use "Dot-Free" COB strips to prevent visual confusion, and ensure a minimum IP67 rating for water resistance against pressure washing and rain.
In my factory in Shenzhen, we test our lights against salt spray, heavy impact, and high-pressure water jets. We do this because we know where these lights end up: under boots and in the rain. Stair lighting is not just about decoration; it is about survival. A dark step is dangerous, but a step with a blinding, poorly placed light in your face is even worse. Let’s look at how to balance these demands so you can install a system that is safe, durable, and profitable.
Where is the Best Position to Mount LED Strips on Stairs?
I see many ambitious DIYers and inexperienced contractors sticking lights on the side walls or facing up. This is a mistake. The position of the light determines the safety of the step.
The most effective mounting position is directly under the "nosing" (the overhanging lip) of the stair tread. This location protects the strip from physical damage, shields the light source from the viewer’s eye to eliminate glare, and casts light directly onto the tread below where the foot needs to land.

You need to understand the geometry of a staircase. When a person walks down stairs, they are looking at their feet. If you mount a light on the riser facing out, or on the side wall without a shield, you are shining a light directly into their retina. This causes the pupil to constrict (close up), making the rest of the dark staircase harder to see. This is called "disability glare."
The Optics of Safety
The "Under-Nosing" mount is the industry standard for three specific reasons involving human vision and physics:
- Glare Cut-off1: The lip of the stair blocks the direct view of the LED chips. The user sees the effect of the light (the illuminated step below), not the painful source of the light.
- Texture Definition: The light grazes down the vertical riser. If you have a stone texture, brick, or wood grain, this steep angle highlights the material beautifully, adding architectural value.
- Mechanical Protection2: The nosing acts as a roof. It protects the strip from direct rain, hail, and most importantly, the heavy boots of people walking up the stairs. If the light is on top of the step, it gets crushed. If it is under the lip, it is safe.
Scenarios Without Overhangs
However, not all stairs have a nosing (like modern concrete block stairs or open-riser floating steel steps). For those, you cannot just stick a tape light on the edge. You have to route a channel into the concrete or use specific side-mounted fixtures. For floating steps, we often recommend routing a groove near the front edge of the underside to flush-mount the channel, keeping the "invisible source" logic intact.
| Stair Type | Recommended Mount Position | Installation Method |
|---|---|---|
| Wood Decking (with overhang) | Under Nosing | Screw-in Aluminum Clips or Router Channel |
| Solid Stone/Concrete (with overhang) | Under Nosing | Construction Adhesive + Mechanical anchors |
| Modern Floating Steps (No overhang) | Underside of Step | Route channel near the front edge (facing down) |
| Side Wall / Retaining Wall | 6 inches above tread | Use "Scoop" or "Eyelid" covers to block upward light |
Why Must You Use COB Strips Instead of Standard SMD LEDs?
Ten years ago, we only had SMD (Surface Mounted Device) LEDs—the ones with the little yellow dots. Using those on stairs today is a sign of an outdated installer working with old inventory.
You should exclusively use COB (Chip on Board) LED strips for stair applications. COB strips create a continuous, solid line of light with no visible "dots," which is critical for reflective surfaces like varnished wood or wet stone, preventing distracting reflections that can confuse the eye.
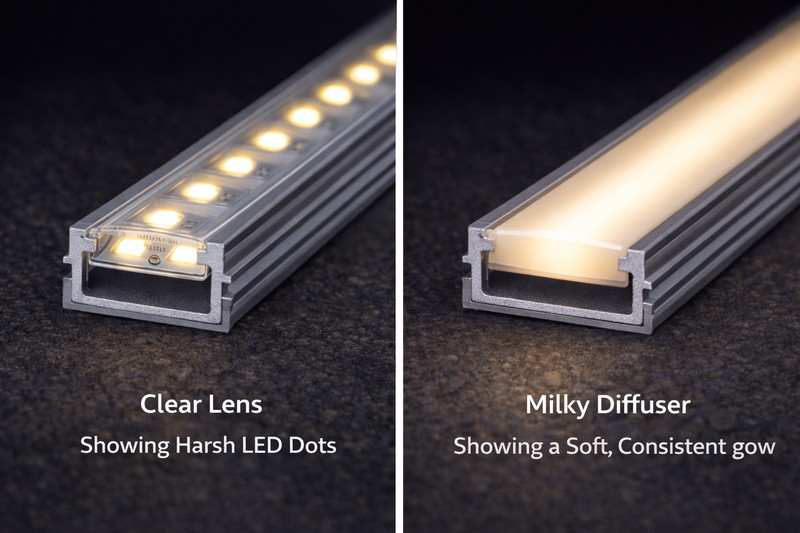
Let’s talk about the manufacturing difference and why it matters for your liability. In a standard SMD 5050 strip, the light chips are spaced maybe 20mm apart. On a staircase, especially if the wood is glossy or the stone is wet from rain, each one of those dots creates a reflection.
The Danger of "Dot" Reflections
Why is this dangerous? When you are walking down stairs at night, your brain uses visual cues to judge the depth of the step. If your brain sees 20 little bright dots reflecting off the edge of the step, it creates visual noise. It becomes hard to distinguish the actual edge of the step from the reflection of the light. It looks like a funhouse mirror. This split-second confusion can cause a misstep.
The COB Solution
COB Strips3 solve this. We pack hundreds of tiny chips together (usually 300 to 500 per meter) and cover them with a continuous layer of yellow phosphor. The result is a single, solid bar of light. It looks like a neon tube.
- Linear Reflection: When a COB strip reflects on a wet step, it reflects as a single straight line. This actually helps the user see the edge of the step.
- Wider Beam Angle: COB strips usually have a wider 180-degree beam angle (compared to 120 for SMD). This helps wrap the light around the riser, softening shadows and ensuring the entire tread is lit.
- Premium Aesthetic: Even if the light is hidden, if someone is walking up the stairs, they might catch a glimpse of the underside of the tread. Seeing a high-tech solid line looks expensive. Seeing a circuit board with welded dots looks cheap.
| Feature | Standard SMD Strip | COB (Chip on Board) Strip | Benefit for Stairs |
|---|---|---|---|
| Light Consistency4 | Spotted / Dotted | Continuous / Solid | Prevents confusing reflections. |
| Beam Angle | 120 Degrees | 180 Degrees | Better coverage of the tread. |
| Flexibility | Moderate | High | Follows curved staircases easily. |
| Aesthetics | Electronic / Component | Architectural / Linear | Looks like a finished fixture. |
How Do You Handle Waterproofing and Drainage on Stairs?
Indoor stairs are easy. Outdoor stairs are a war zone. They get hit by UV rays, ice, snow shovels, and landscaping crews with pressure washers.
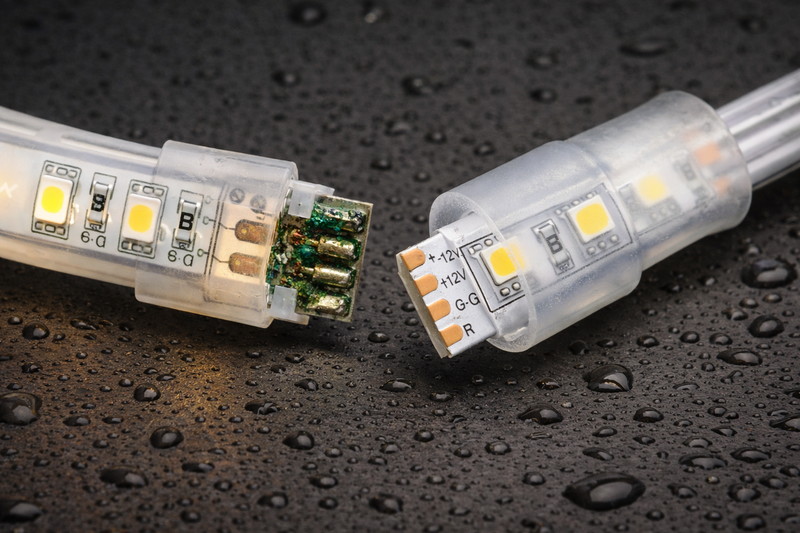
Do not trust standard "IP65" coatings for stairs. You need IP67 strips encased in silicone sleeves (not epoxy) and proper drainage. Water flows downhill, so stair connectors are highly vulnerable; you must seal all cut ends with neutral-cure silicone and heat shrink to prevent moisture wicking.
I have seen thousands of "waterproof" strips turn yellow and crack after one summer. This is usually because the manufacturer used Epoxy or PU (Polyurethane) coating. Although cheaper, these materials are not built for the thermal expansion of outdoor decking.
The Material Difference: Silicone vs. Epoxy
- The Yellowing: Sunlight breaks down epoxy. It turns brown within 6 months of harsh UV exposure. This changes the color of your light from "Warm White" to "Dirty Brown," ruining the look of the stone or wood.
- The Cracking: Outdoor temperatures inhibit flexibility. When the temperature drops to freezing, epoxy gets hard and brittle. When the wood of the deck contracts in the cold, the glued epoxy cracks. Once it cracks, water gets in, touches the copper, and the light fails.
- The Solution: You must specify Silicone Extrusion5. Silicone does not react to UV light. It stays flexible at -20 degrees and +50 degrees. When you buy strips for stairs, ask your supplier: "Is this food-grade silicone extrusion6?" If they say yes, you are good.
Managing the Water Flow
Stairs are designed to shed water; they are gravity-fed water systems. When you mount a channel under the nosing, you must ensure you are not creating a trap.
- Orientation Matters: Never mount a U-channel facing up on a stair. It will fill with water and drown the light. Even "waterproof" lights cannot survive being submerged in freezing ice for weeks.
- The Drip Loop: When you drill a hole through the stringer to run your wire, ensure the wire goes down slightly before it enters the hole (a "U" shape). This way, rain drips off the bottom of the loop instead of running down the wire, into the hole, and rotting the wood or shorting the connector.
- The Pressure Washer Warning: Tell your clients this: "IP677 means it can handle rain. It does not mean it can handle a 2000 PSI jet of water from 1 inch away." The cleaning crew is the biggest enemy of your lighting installation.
| Material | Weather Resistance | UV Stability | Recommendation |
|---|---|---|---|
| Bare PCB (IP20) | None | Low | Never use outdoors. |
| Epoxy Glue (IP65) | Low (Cracks in cold) | Poor (Yellows) | Avoid. Failure likely < 1 year. |
| Silicone Tube (IP67) | High | Excellent | Best Standard Choice. |
| Solid Silicone Run (IP68) | Very High | Excellent | Required for in-ground/uncovered steps. |
How Do You Plan the Wiring Layout for 15+ Steps?
Wiring is the hardest part. You have 15 individual lights that all need power. If you realize you have nowhere to hide the wires after the stairs are built, you are in trouble.
For new construction, pre-wire a central "trunk" line running down one stringer, with "pigtail" drops at every riser. For retrofitting, route a channel on the backside of the stringer or under the side fascia. Always wire in parallel (not series) to ensure if one step fails, the others stay on.

The logistics of stair wiring separate the pros from the amateurs. You have two main challenges here: Voltage Drop and Physical Concealment.
Voltage Drop Management
A typical staircase has 12 to 15 treads. If you try to "Daisy Chain" the LED strips (connecting the end of Step 1 to the start of Step 2, and so on), you are creating a very long electrical path. By the time the power reaches Step 15, the resistance in the thin copper PCB will cause a voltage drop. Step 15 will be 30% dimmer than Step 1.
- The "Bus Line" Method: Do not daisy chain. Instead, run a thick "Main Trunk" wire (14 AWG or 12 AWG landscape wire) down the side of the stairs.
- Parallel Taps: Tap into this main line for every single step. This ensures that Step 1 and Step 15 receive the exact same voltage from the large wire. It also means if one strip breaks, the rest of the stairs stay lit.
Concealing the Connections
The connection point (where the thin strip wire meets the thick main wire) is bulky and ugly. You cannot leave this visible.
- Wood/Composite Decking: This is easier. You can drill through the stringers. You can hide wires under the hollow deck boards. Use stainless steel staples to keep wires tight against the wood so squirrels don’t chew them.
- Concrete/Stone: You must install conduit (PVC pipes) before the concrete is poured. If the stairs are already there, you have to use an angle grinder to cut a slot in the corner of the stairs for the wire, then cover it with matching mortar. It is messy work, so plan ahead. Ideally, push the connection through a hole to the back side of the stairs (under the deck) where it can be serviced later.
| Wiring Strategy | Application | Pros | Cons |
|---|---|---|---|
| Daisy Chain | Short stairs (< 5 steps) | Less wire used. | Voltage drop (dimming); one fail = all fail. |
| Bus Line (Trunk) | Standard stairs (10-20 steps) | Consistent brightness; reliable. | More wire; more splicing labor. |
| Home Run | Luxury / Complex Control | Total control (animating steps). | Massive amount of wire bundle. |
What Sensors and Controls Should You Integrate?
A switch on the wall is fine. But a staircase that lights up as you approach it? That is luxury. It also saves energy and extends the lifespan of the LEDs.
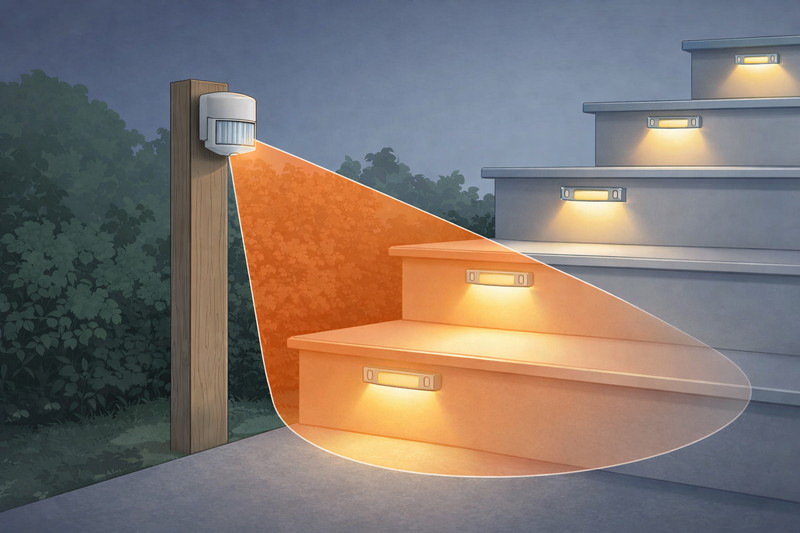
Integrate PIR (Passive Infrared) motion sensors at the top and bottom of the staircase to activate lights only when needed. For a high-end effect, use a sequential controller that lights up the steps one by one as the person walks, creating a stunning "follow-me" visual logic.
Clients love automation. Automation also extends the life of your LEDs. If the lights only run for 1 hour a cumulative day instead of 8 hours continuously, they effectively last 8 times longer.
Motion Detection Logic
You cannot use just one sensor. You need a system that understands direction.
- Dual Sensors: You need one PIR sensor at the top landing and one at the bottom landing.
- The Logic: The drivers we sell often have "Step" inputs. If the Top Sensor triggers, the lights turn on. If the Bottom Sensor triggers, the lights turn on.
- Hold Time: Set the "Hold Time" to at least 2 minutes. You do not want the lights turning off while an elderly person is halfway down the stairs.
- Dusk-to-Dawn Lockout: Ensure your motion sensor has a built-in photocell. It shouldn’t trigger during the day. That is a waste of electricity and looks strange.
The Sequential "Piano" Effect
For clients with a high budget (around $2,000+ extra just for controls), you can offer Sequential Lighting.
- How it works: When the top sensor is triggered, Step 1 lights up, then Step 2, then Step 3… cascading down like a waterfall. It feels like the house is welcoming you.
- Installation Reality: This requires a specialized controller and roughly 300% more wiring labor. You cannot use the "Bus Line" method mentioned above. You must run a separate wire from every single step all the way back to the controller (Home Run wiring). Be sure to price this labor correctly, or you will lose money on the job.
| Control Type | Complexity | Cost | User Experience |
|---|---|---|---|
| Standard Switch | Low | Low | Manual. Often forgotten left on. |
| Dusk-to-Dawn Timer | Low | Low | Always on at night. Good for security. |
| Motion Sensor (All On) | Medium | Medium | On-demand. Saves energy. Dramatic. |
| Sequential (Step-by-Step) | High | Very High | "Wow" factor. High installation labor. |
Conclusion
Outdoor stair lighting is a balance of physics and aesthetics. By mounting COB Strips under the nosing for glare control, using Silicone IP67 waterproofing to survive the elements, and wiring with a Bus Line method to ensure consistent brightness, you create a staircase that is safe to climb and stunning to look at. Don’t cut corners on the waterproofing, or you will be back to fix it for free.
-
Understanding glare cut-off can enhance your lighting design, ensuring comfort and safety in spaces. ↩
-
Exploring mechanical protection in stair lighting can help you choose durable solutions that withstand wear and tear. ↩
-
Explore how COB Strips enhance visibility and safety on stairs, reducing the risk of accidents. ↩
-
Learn about the significance of light consistency in preventing accidents on stairs and improving safety. ↩
-
Explore the advantages of Silicone Extrusion for durability and flexibility in various applications. ↩
-
Discover the importance of food-grade silicone extrusion for safety and quality in various applications. ↩
-
Understand the significance of IP67 ratings to ensure your lighting can withstand outdoor elements. ↩
Interested in Our LED Solutions?
Get professional consultation and customized LED lighting solutions for your projects. Contact our expert team today.
Related Articles

How Do You Build Profitable Custom Vehicle and RV Interior LED Rope Lights?
You lose RV installation contracts because your interior lights fail on rough roads. Standard strips show bright dots on glossy…

How to Perfect Bookshelf and Display Cabinet LED Rope Lighting?
You lose retail clients when bookshelves look incredibly dark. Ugly shadows hide expensive products inside display cabinets daily. You need…

How to Master Mirror and Vanity LED Rope Light Installation?
Your clients complain about ugly shadows in their bathroom mirrors. Bad lighting ruins expensive vanity designs. You lose future contracts…
