
How Can You Use LED Strips to Create an Inspirational Garden and Landscape?
Your garden is a sanctuary during the day, full of color, texture, and life. But when the sun sets, it vanishes into an intimidating, dark void. You want to extend its beauty into the night, but harsh, glaring floodlights will only destroy the natural serenity.
The secret is to use multi-layered, indirect LED strip lighting. By strategically hiding light sources, you can transform your garden into a magical nightscape, guiding visitors down glowing pathways, sculpting trees with light and shadow, and turning water features into shimmering jewels.
As a manufacturer, I’ve learned that landscape lighting is not about illumination; it’s about revelation. It’s about deciding which elements of the garden you want to reveal and which you want to leave to the mystery of the night. LED strips, with their low profile and linear form, are the perfect tool for this art form. This guide is more than a list of ideas; it’s a professional’s playbook for using light to paint a living masterpiece in the dark, creating spaces that feel safe, enchanting, and deeply impressive.
How Do You Properly Light a Garden Pathway for Safety and Ambiance?
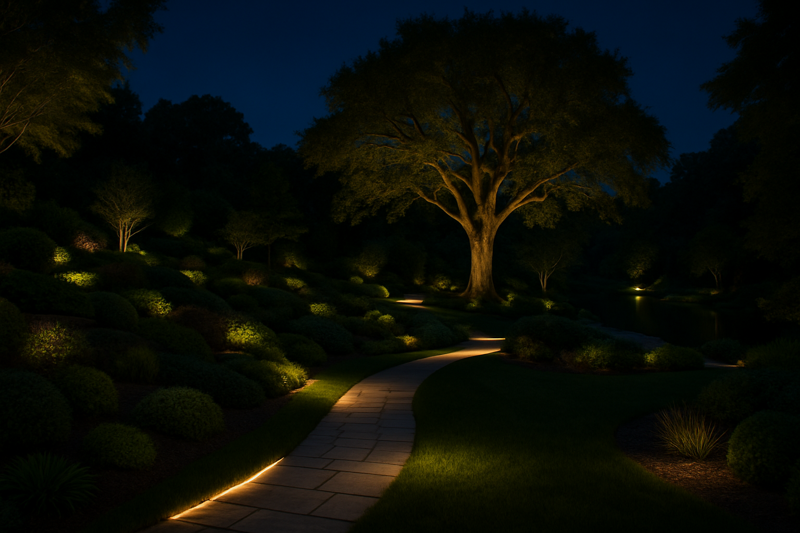
A dark garden path is a major trip hazard and makes the entire space feel uninviting. Yet, lining it with bright, fixture-heavy lights like an airport runway completely shatters the natural, organic feeling of the garden.
Use low-level, indirect "wayfinding" light. Install continuous LED strips along the base of retaining walls, tucked under the edge of raised planters, or integrated into stair risers. This illuminates the walking surface for safety without any distracting glare, creating a gentle, guiding glow.
This is the absolute foundation of good landscape lighting design. The principle is called "wayfinding." You’re not just lighting the path; you’re using light to guide movement and create a sense of journey. A person should always see where they are going, but they should almost never see the light source itself. For a professional like Tom, mastering this technique is crucial. It immediately signals a high-end, thoughtful design and solves a critical safety problem in the most elegant way possible. It’s a reliable, high-impact service that clients instantly understand and appreciate.
A Deeper Dive into Path Lighting Techniques
Let’s break down the professional methods for creating safe and beautiful pathways.
-
Principle 1: Low-Level Mounting1
The key to glare-free path lighting is to keep the source low to the ground. The light should be directed across the walking surface, not up into people’s eyes.
- Ideal Height: Mounting a strip between 6 to 18 inches (15-45 cm) off the ground is the sweet spot. This provides a wide enough spread to illuminate the path without creating distracting hot spots.
-
Principle 2: Indirect Illumination2
The strip itself must be hidden. This can be achieved in several ways:
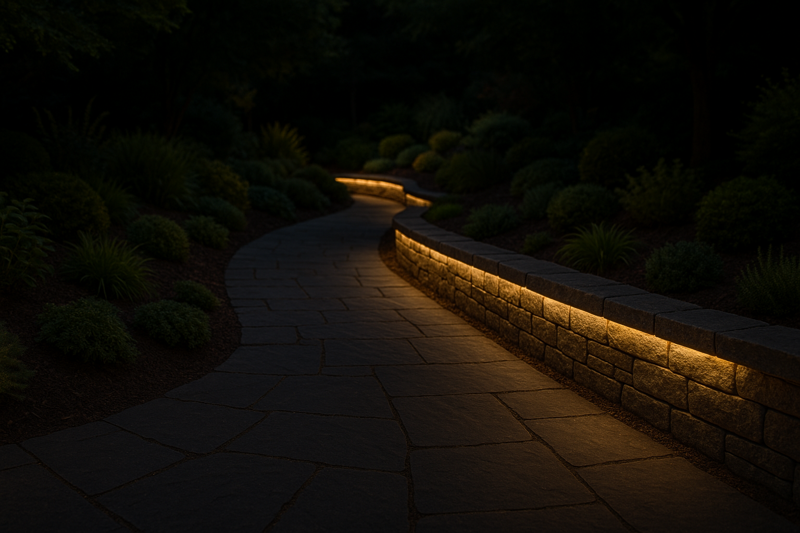
- Under-Coping: Tucking a strip in a channel under the overhanging capstone of a low garden wall is the classic technique. It washes the wall’s texture and the path below.
- Planter Edge: Installing a strip under the lip of a raised planter bed that borders a path creates a beautiful floating effect while lighting the way.
- Stair Integration: For garden steps, mounting a strip under each step’s nosing is non-negotiable. It makes the stairs a safe and stunning design feature.
-
Principle 3: Durability is Paramount3
Path lighting lives in a harsh environment. It gets hit with rain, dirt, snow, and the occasional kick of a boot. Material choice here is everything.
- IP67 Silicone Strips4: Don’t even consider anything less. You need a fully waterproof system. Critically, the housing must be silicone. Cheaper epoxy or PVC will crack from sun and temperature changes, allowing water in and causing failure within a season or two.
- Protective Channels: A robust aluminum channel is not optional. It acts as a heat sink, but more importantly, it provides essential physical protection from shovels, foot traffic, and impacts.
| Path Lighting Technique | Primary Function | Best For | Professional Tip |
|---|---|---|---|
| Side-Wall Under-Coping | Wayfinding & Texture Highlight | Paths running alongside garden walls. | Mounts the strip as close to the front edge as possible to maximize path lighting. |
| Integrated Stair Light5 | Safety & High-Drama Feature | Any change in elevation with two or more steps. | Requires an IP67 rating minimum. Plan your low-voltage wiring runs carefully. |
| Raised Planter Edge6 | Wayfinding & Floating Effect | Paths bordered by modern raised beds. | Use a strip with a high CRI (90+) to make the plants in the bed look vibrant. |
| In-Ground Uplighting | Minimalist Modern Accent | Sleek, contemporary path designs. | Use IP68-rated, drive-over channels and space them to create a rhythm. |
How Can You Make Plants and Trees the Main Feature at Night?
Your client is proud of their mature Japanese maple and carefully curated flowerbeds, but at night they become invisible. A single, powerful spotlight just blasts them with light, flattening their shape and washing out their color.
Treat light and shadow like an artist’s tools. Use "grazing" to reveal the dramatic texture of tree bark, "silhouetting" to showcase the delicate form of ornamental grasses, and gentle "washing" to bring out the rich colors of a flowerbed.

This is where a lighting designer truly shows their value. Instead of fighting the darkness, you use it. The shadows you create are just as important as the light you cast. By using smaller, well-placed LED strips instead of one big floodlight, you can selectively sculpt the landscape. You can choose to highlight a single, perfect rose while letting the rest of the bush fall into soft shadow. This selective focus creates depth, mystery, and a powerful emotional impact. It shows the client you’re not just an installer; you’re a designer who understands art.
A Deeper Dive into Plant Illumination Artistry
Let’s explore these artistic techniques that create visual masterpieces.
-
Technique 1: Grazing for Texture7
This technique is all about revealing surface detail.
- Application: Best for subjects with deep, interesting textures, like the bark of an old oak, a stone wall, or a brick facade.
- How to do it: Place a short, powerful LED strip in an upward-facing channel extremely close to the base of the object. Aim the light almost parallel to the surface. The light will "graze" across the surface, creating deep shadows in every crack and crevice, making the texture explode with detail.
-
Technique 2: Silhouetting for Form8
This technique focuses on the shape or outline of an object.
- Application: Perfect for plants with a unique and recognizable shape, like Japanese maples, ornamental grasses, or ferns.
- How to do it: Place the light source behind the plant, aimed back at a lit surface like a wall or fence. The plant itself remains dark, appearing as a dramatic, detailed silhouette against a glowing backdrop. This creates a huge sense of depth.
-
Technique 3: Washing for Color9
This is about broad, soft illumination that reveals color accurately.
- Application: Ideal for wide flowerbeds, hedges, or areas of ground cover.
- How to do it: Place a longer LED strip a few feet away from the area and aim it at a 45-degree angle. This "washes" the entire area in a soft, even light. Here, High CRI (Color Rendering Index)10 is everything. A CRI 90+ strip will make reds look rich, greens look lush, and purples look vibrant. A low-CRI light will make everything look dull and muddy.
| Plant Lighting Technique | Artistic Goal | Best Suited For | Professional Tip |
|---|---|---|---|
| Grazing | Revealing deep texture. | Tree trunks, stone walls, architectural details. | The closer the light is to the surface, the more dramatic the shadows. |
| Silhouetting | Highlighting a unique shape. | Japanese maples, ferns, ornamental grasses. | The lit background wall should be a light, neutral color for the best effect. |
| Washing | Showcasing vibrant color. | Flowerbeds, colorful shrubs, hedges. | Absolutely must use a high-CRI (90+) strip to render colors accurately. |
| Uplighting | Creating a heroic canopy. | Large, spreading deciduous trees. | Place lights further from the trunk to illuminate the underside of the leaves. |
How Do You Integrate Lighting into Hardscapes and Water Features?
Gardens aren’t just plants; they’re also stone walls, ponds, fountains, and other structures. These features are major investments. How do you ensure they remain stunning focal points after dark?
Make the feature itself the source of light. Embed waterproof strips inside fountains to make water glow, tuck them under the coping of ponds to create mirror-like reflections, and build them into walls to add dimension and warmth to the stone.
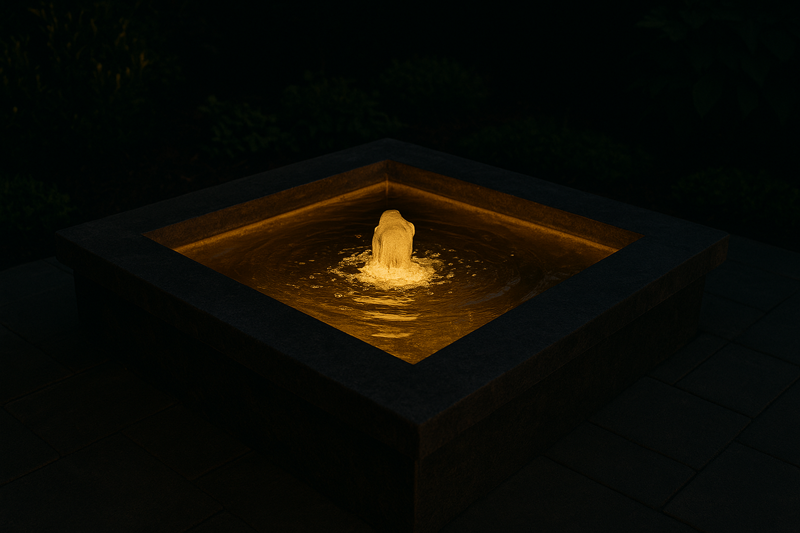
This is the pinnacle of landscape lighting integration. When you make the light part of the structure, it feels intentional, permanent, and incredibly luxurious. For water features, it’s pure magic. Light refracting through moving water creates a dynamic, shimmering effect that no other technique can replicate. For hardscapes, it’s about transforming them from flat, heavy objects into features with depth and warmth. As a manufacturer, this is why we produce fully submersible IP68 strips and robust channels. They are the essential tools for achieving these elite, high-value effects that truly set a professional’s work apart.
A Deeper Dive into Structural Lighting
Let’s look at the specifics for lighting these permanent garden fixtures.
-
The Magic of Water and Light
This combination requires the highest level of waterproofing.
- Submerged Lighting: To make a fountain or waterfall glow, you must use a fully submersible, low-voltage (12V or 24V for safety) IP68 LED strip. The strip is placed directly in the basin or behind the falling water. The effect is breathtaking, turning the feature into a living lantern. Silicone-encased strips are best as they resist mineral buildup from hard water.
- Surface Reflection: For ponds or pools, hide a regular IP67 strip under the overhanging coping. It will cast a glow onto the water’s surface, creating beautiful, shimmering reflections and allowing for nighttime viewing of koi or other fish.
-
Bringing Hardscapes to Life
Use light to soften stone and wood.
- Built-in Wall Lighting: During construction, building a channel directly into a retaining wall to create a line of downlight is a stunning effect. Alternatively, the "under-coping" technique works perfectly, washing the face of the wall with a soft graze that highlights its texture.
- Floating Steps and Caps: Any horizontal stone surface is an opportunity. Tucking a light under a thick stair tread or the cap of a stone pillar makes these heavy elements appear to float, creating a powerful architectural statement.
-
Highlighting Structures
Don’t forget gazebos and pergolas.
- Overhead Ambiance: Weaving LED strips into the overhead beams of a pergola or gazebo creates a "starlight" effect and provides functional ambient light for the seating area beneath it. It defines the space as an outdoor room.
| Hardscape Technique | Design Effect | Required Hardware | Professional Tip |
|---|---|---|---|
| Submerged Glow | Magical, glowing water. | IP68 rated, low-voltage (24V) silicone strip. | Choose a cooler white (4000K) to enhance the sense of water, or warm for a softer feel. |
| Pond Coping Reflection | Shimmering surface, highlights fish. | IP67 rated strip in a channel. | The goal is to see the reflection, not the light source. Hide the strip completely. |
| Wall Grazing/Washing | Reveals stone texture, adds warmth. | IP67 strip in a surface-mount channel. | Mount close for grazing, further away for a soft wash. |
| Pergola Overhead Glow | Defines an "outdoor room," ambiance. | IP65 or IP67 strip, depending on exposure. | Route wires inside the wood beams before assembly for a perfectly clean, wireless look. |
Conclusion
Inspirational garden lighting comes from a clear design strategy. It’s about creating safe, beautiful pathways for movement, using light and shadow to artistically reveal plants, and integrating light directly into hardscapes for a truly custom, high-end look that will last for years.
-
Explore how Low-Level Mounting enhances safety and aesthetics in path lighting. ↩
-
Learn about the advantages of Indirect Illumination for creating a beautiful and safe pathway. ↩
-
Understand the significance of durability in path lighting to ensure long-lasting performance. ↩
-
Discover why IP67 Silicone Strips are essential for waterproof and reliable path lighting. ↩
-
Find out how Integrated Stair Lights can improve safety and aesthetics for garden steps. ↩
-
Explore the design benefits of using a Raised Planter Edge for effective path lighting. ↩
-
Explore the grazing technique to master texture illumination, adding depth and detail to your artistic projects. ↩
-
Learn about silhouetting to create stunning visual contrasts and highlight unique shapes in your garden or landscape. ↩
-
Discover the washing technique to achieve soft, even illumination that showcases the true colors of your plants. ↩
-
Understanding High CRI is crucial for achieving vibrant colors in plant illumination, enhancing your artistic lighting techniques. ↩
Interested in Our LED Solutions?
Get professional consultation and customized LED lighting solutions for your projects. Contact our expert team today.
Related Articles

How Do You Build Profitable Custom Vehicle and RV Interior LED Rope Lights?
You lose RV installation contracts because your interior lights fail on rough roads. Standard strips show bright dots on glossy…

How to Perfect Bookshelf and Display Cabinet LED Rope Lighting?
You lose retail clients when bookshelves look incredibly dark. Ugly shadows hide expensive products inside display cabinets daily. You need…

How to Master Mirror and Vanity LED Rope Light Installation?
Your clients complain about ugly shadows in their bathroom mirrors. Bad lighting ruins expensive vanity designs. You lose future contracts…
