
How Do You Calculate the Right Power Supply Wattage for LED Strips?
You’ve designed a beautiful lighting layout, but the LED strips are flickering or dim. The power supply feels dangerously hot. You’ve chosen the wrong wattage, risking the entire installation and your reputation.
To calculate the correct wattage, multiply the strip’s power consumption in watts per meter by the total length of the run in meters. Then, add a 20% safety headroom to that total. This ensures the power supply runs efficiently and safely without being overworked.
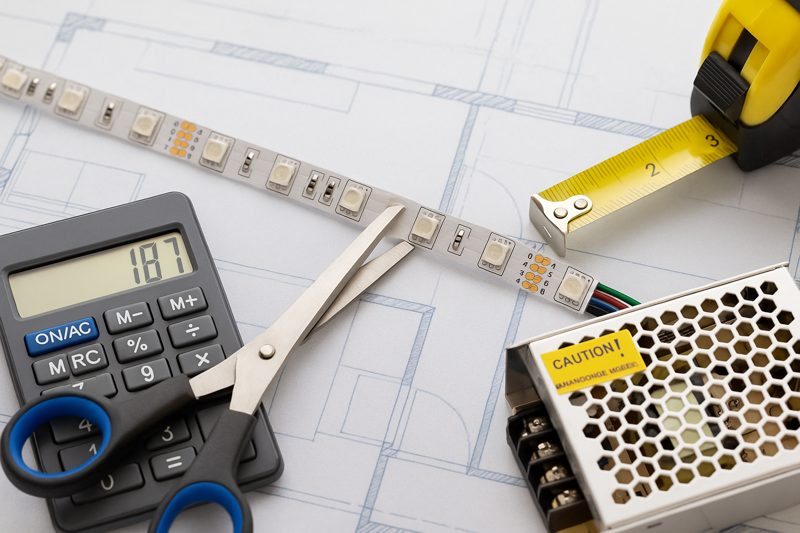
From my factory floor, I see thousands of meters of high-quality LED strips shipped out daily. But I also hear the stories from clients like Tom when a project goes wrong. In a surprising number of cases, the issue isn’t the LED strip itself, but a mismatched power supply. Undersizing a power supply is the single most common cause of premature failure in an LED lighting system. It’s an easily avoidable mistake, and getting it right is the first step in building a system that is not only beautiful but also safe and reliable for years to come.
What Information Do You Need Before Calculating?
You’re ready to buy a power supply, but you’re just guessing based on the reel size. This gamble can lead to buying an undersized unit that will fail, or an oversized one that wastes money and energy.
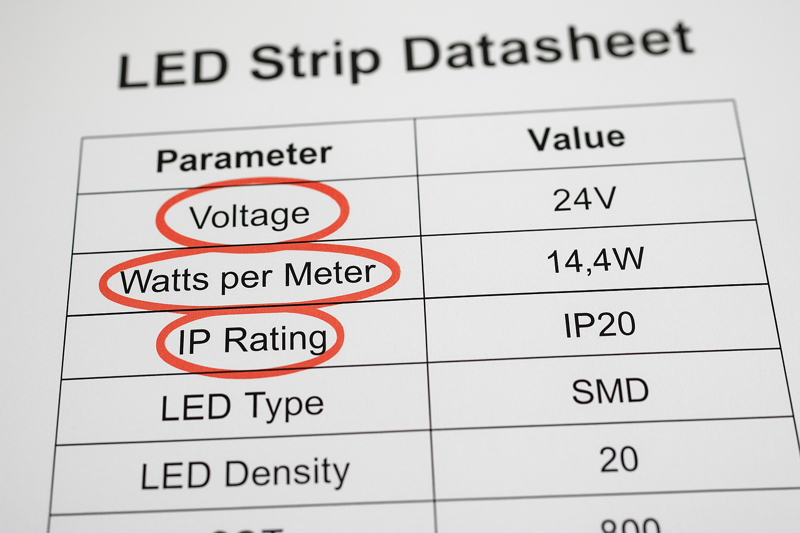
Before calculating, you need three key specifications from the LED strip’s data sheet: the operating voltage (e.g., 24V), the power consumption in watts per meter (W/m), and the precise total length of the strip you plan to install.
Calculation is impossible without the correct inputs. I often tell my clients that a power supply is like the engine for a car; you wouldn’t choose an engine without knowing the size and weight of the vehicle. Sourcing these three simple numbers is the foundational work that prevents major headaches down the road. Treating the manufacturer’s datasheet as your source of truth is the mark of a professional.
Finding the Watts per Meter (W/m)1
This is the most important number in your calculation. It represents how much power the strip consumes for every meter of its length. You can find this value on the product’s official technical specification sheet, on the packaging, or on the product page of a reputable supplier’s website. Be cautious of generic numbers. The power consumption can vary significantly based on the type of LED chip used (e.g., SMD 2835, 5050), the density of the chips (e.g., 60 LEDs/m vs. 120 LEDs/m), and the quality of the components. A high-CRI, high-efficiency strip2 from a quality manufacturer like us might have a different wattage from a low-cost strip with the same chip count. Never assume; always verify this number on the spec sheet for the exact product you are using. A typical value might be 14.4 W/m, but it can range from 5 W/m to over 25 W/m.
Determining the Total Length (m)
This sounds simple, but accuracy is key. Do not just use the default length of the reel (e.g., 5 meters). You must measure the exact total length3 that will be lit by a single power supply. If your project involves a 3.5-meter section and a 2.5-meter section running from the same power source, your total length is 6.0 meters. Use the architectural plans or a tape measure on-site to get a precise measurement. It’s better to slightly overestimate by a few inches than to underestimate. For complex jobs, I advise my clients to create a simple wiring diagram that clearly labels the length of each segment. This documentation helps avoid errors and is valuable for future maintenance.
Verifying the Voltage4 (12V vs. 24V)
This number isn’t part of the wattage calculation itself, but it is an absolute go/no-go requirement. The voltage of the power supply must match the voltage of the LED strip. Connecting a 12V strip to a 24V power supply will instantly and permanently destroy the strip. Connecting a 24V strip to a 12V supply won’t cause damage, but it will be extremely dim or may not light up at all. This specification is clearly marked on the strip itself, usually on the cut lines, and on the datasheet. As a rule, for most professional projects, we strongly recommend 24V systems because they suffer from less voltage drop over long distances.
How Do You Perform the Core Wattage Calculation?
You have the numbers: 14.4 W/m and a total run of 8 meters. What’s next? You worry about complex electrical formulas, but in reality, the core calculation is simple enough to do in your head.
Simply multiply the power consumption in watts per meter by the total project length in meters. This gives you the total power your LED strips will actually draw. This number is your "minimum required wattage."
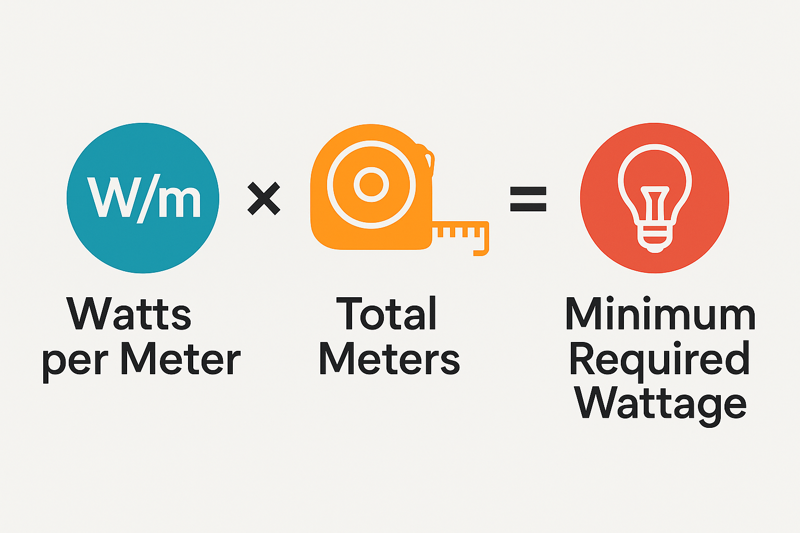
The fundamental calculation is straightforward multiplication. It tells you the exact power load your lighting will place on the power supply. Getting this step right ensures you are basing your component selection on the actual needs of your system, not on a guess. Let’s walk through a clear, practical example that we often use to guide our B2B clients during the sourcing process.
Step-by-Step Calculation Example
Let’s imagine a common architectural accent lighting project. A lighting designer, Tom, wants to install a run of our premium 24V LED strip lighting in a ceiling cove.
-
Gather the Data:
- From our datasheet, Tom confirms the strip he selected consumes 14.4 Watts per meter (W/m)5.
- He measures the ceiling cove and determines the total required length is 8 meters (m).
- He confirms the strip is 24V6.
-
Perform the Multiplication:
- The formula is:
(Watts per Meter) x (Total Length in Meters) - The calculation is:
14.4 W/m x 8 m - The result is: 115.2 Watts
- The formula is:
This number, 115.2W, is the actual, real-world power that the 8-meter length of LED strip will consume when it is on at full brightness. This is the minimum power the supply must be able to provide continuously. Any power supply with a wattage rating less than this will be overloaded and will fail. This is your baseline. However, we are not done yet. A professional never selects a power supply rated for exactly 115.2W. The next step is the most crucial for ensuring safety and longevity.
Why You Don’t Stop at the Minimum
Stopping here is a classic amateur mistake. A power supply, like any piece of electronics, should not be run at 100% of its maximum capacity for extended periods. This generates excessive heat, strains the internal components like capacitors and transformers, and will drastically shorten its lifespan. It’s inefficient and can even be a safety hazard. An overworked power supply is a hot power supply, which is the last thing you want to install inside a wall or ceiling. Therefore, we must add a "safety headroom7" to our calculated load, which is the next critical step in the process.
| Project Component | Specification / Value | Source of Information |
|---|---|---|
| LED Strip Model | RH-2835-24-120D | Manufacturer’s Datasheet |
| Power Consumption | 14.4 W/m | Manufacturer’s Datasheet |
| Total Length | 8 meters | On-site Measurement / Blueprints |
| Calculated Minimum Load | 115.2 Watts8 | The multiplication we just performed |
Why Must You Add a 20% "Safety Headroom"?
Your calculation shows a load of 115W. You find a 120W power supply. It seems perfect, it’s just over the minimum. But installing it is a mistake that will likely lead to a callback from an unhappy client.
Adding a 20% safety headroom ensures the power supply operates below 80% of its maximum capacity. This prevents overheating, increases efficiency, extends the unit’s lifespan, and provides a buffer for minor voltage fluctuations, guaranteeing system reliability.
This "80% Rule" or "20% Headroom Rule" is not just a suggestion; it’s a best practice followed by all experienced lighting professionals. As a manufacturer, we design our power supplies to handle their rated load, but we advise all our clients to build in this buffer. A system with proper headroom is a system that lasts. An under-specified system is a system that is destined for early failure, and the cost of replacing a failed power supply is always higher than the cost of buying the correct one in the first place.
The Calculation with Headroom
Let’s continue with Tom’s project. His minimum calculated load was 115.2 Watts. Now we apply the 20% headroom.
-
Calculate the Headroom Amount9:
- Multiply the minimum load by 20% (or 0.20).
115.2W x 0.20 = 23.04W
-
Add the Headroom to the Minimum Load:
- This gives you the final, recommended power supply wattage.
115.2W + 23.04W = 138.24W
A simpler way to do this in one step is to multiply your minimum load by 1.2.
115.2W x 1.2 = 138.24W
Now, you have your target: 138.24W. Power supplies don’t come in this exact size. The final step is to choose the next standard size up. Common sizes are 100W, 120W, 150W, 200W, etc. In this case, the clear professional choice is the 150W power supply. A 120W unit would be too small, as it would be running at 96% of its capacity (115.2 / 120 = 0.96). A 150W unit will be running at a cool and efficient 77% (115.2 / 150 = 0.768), well within the ideal range.
The Benefits of a Cooler, More Efficient System
Running a power supply at 70-80% of its capacity provides tangible benefits that a professional buyer like Tom can leverage as selling points to his own clients.
- Longevity10: The number one killer of electronic components is heat. A power supply running at 95% capacity gets much hotter than one running at 75%. This heat degrades components over time. A properly sized power supply will simply last for more years.
- Efficiency11: Power supplies have an efficiency curve. They are most efficient when they are not fully loaded. An 80% load is often the "sweet spot" where you get the most light for the least amount of wasted energy (heat).
- Safety: A unit that isn’t straining is a safer unit. Overloading a power supply can cause safety circuits to trip, shutting down the lights, or in the worst case with a cheap, non-certified unit, create a fire risk.
- Voltage Stability12: A power supply that has headroom can better manage small fluctuations from the main power line, delivering a more stable DC voltage to your LEDs, which contributes to their lifespan and color consistency.
Does Voltage (12V vs. 24V) Affect Your Power Supply Choice?
You’ve correctly calculated that you need a 150W power supply. You see two 150W models on a supplier’s site, one 12V and one 24V. Does it matter which one you pick for your 24V strip?
Yes, it is absolutely critical. The voltage of the power supply MUST match the voltage of the LED strip. The wattage calculation remains the same, but selecting the wrong voltage will either destroy the strip or cause it to fail to light up properly.
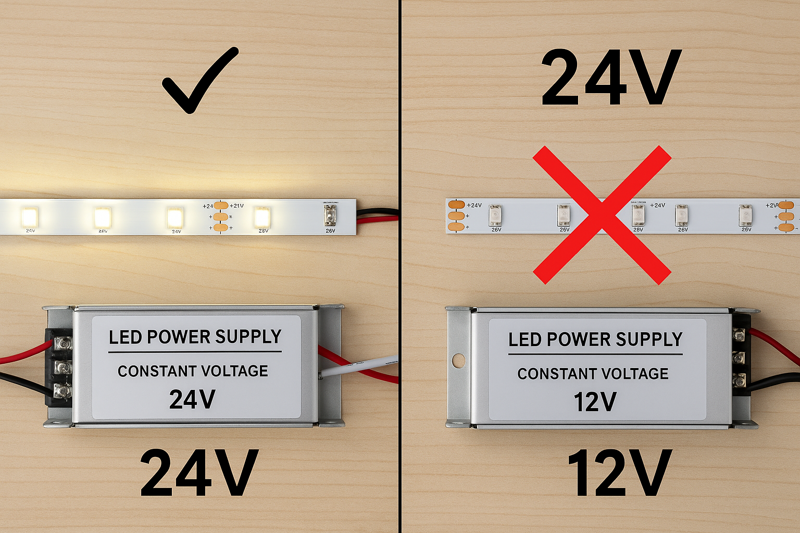
This might seem basic, but it’s a mistake that can be costly in terms of both time and materials. After ensuring the wattage is correct, verifying the voltage is the final and most important check before making a purchase. While wattage tells you how much power the supply can deliver, voltage tells you how it delivers it. The two are not interchangeable.
The Relationship Between Voltage, Amps, and Watts
To understand why this is important, we need to look at Ohm’s Law for power: Power (Watts) = Voltage (Volts) x Current (Amps). Let’s use our 115.2W system as an example.
-
For a 24V System:
115.2W = 24V x Current (A)Current (A) = 115.2W / 24VCurrent (A) = 4.8 Amps
-
For a 12V System (with the same power):
115.2W = 12V x Current (A)Current (A) = 115.2W / 12VCurrent (A) = 9.6 Amps
As you can see, the 12V system requires twice the amperage (current) to deliver the same amount of power (watts). This has significant practical implications. Higher amperage requires thicker, more expensive wiring to prevent overheating. It also increases the effects of voltage drop, which is why 12V strips have shorter maximum run lengths before they start to dim.
Why 24V is the Professional Standard
For my clients in North America and Japan who are working on architectural, commercial, or large residential projects, I almost exclusively recommend our 24V systems. The choice between 12V and 24V is a critical design decision that impacts more than just the power supply.
| Feature | 12V DC System | 24V DC System | Professional Recommendation |
|---|---|---|---|
| Current (Amperage) | High (Requires thicker wire) | Low (Allows for thinner, less expensive wire) | 24V is more efficient and cost-effective for wiring. |
| Max Run Length | Shorter (Typically max 5 meters before power injection) | Longer (Typically up to 10 meters before power injection) | 24V offers greater design flexibility with fewer power injection points. |
| Voltage Drop | More significant | Less significant | 24V provides more consistent brightness and color over longer distances. |
| Component Stress | Higher stress on connectors and PCB traces | Lower stress on components | 24V systems generally have better long-term reliability. |
By choosing a 24V system from the start, you not only make the wiring and installation easier but also build a more robust and efficient system. When you select your 150W power supply for Tom’s 8-meter project, you must ensure you are selecting the 150W / 24V model to match his 24V LED strip.
Conclusion
Calculating your LED power supply wattage is a simple but critical process. By using the formula (W/m x m) x 1.2, you ensure a safe, reliable, and long-lasting lighting installation every single time.
-
Understanding Watts per Meter is crucial for calculating power consumption accurately in LED strip lighting. ↩
-
Explore the benefits of high-CRI, high-efficiency strips for better lighting quality and energy savings. ↩
-
Learn the best practices for measuring total length to ensure your LED strip lighting project is successful. ↩
-
Discover why matching voltage is critical to prevent damage and ensure optimal performance of LED strips. ↩
-
Understanding power consumption is crucial for selecting the right power supply for LED strips. ↩
-
Learn about the advantages of using 24V systems in LED lighting for efficiency and safety. ↩
-
Discover why adding safety headroom is essential for the longevity and safety of your lighting system. ↩
-
Explore detailed calculations to ensure your LED lighting setup is safe and efficient. ↩
-
Understanding headroom amount is crucial for ensuring your power supply operates efficiently and safely. ↩
-
Exploring longevity can help you understand how to extend the life of your electronic devices and reduce costs. ↩
-
Learning about efficiency can help you save energy and improve performance in your electronic systems. ↩
-
Discovering the significance of voltage stability can enhance the reliability and performance of your electronic devices. ↩
Interested in Our LED Solutions?
Get professional consultation and customized LED lighting solutions for your projects. Contact our expert team today.
Related Articles

How Do You Build Profitable Custom Vehicle and RV Interior LED Rope Lights?
You lose RV installation contracts because your interior lights fail on rough roads. Standard strips show bright dots on glossy…

How to Perfect Bookshelf and Display Cabinet LED Rope Lighting?
You lose retail clients when bookshelves look incredibly dark. Ugly shadows hide expensive products inside display cabinets daily. You need…

How to Master Mirror and Vanity LED Rope Light Installation?
Your clients complain about ugly shadows in their bathroom mirrors. Bad lighting ruins expensive vanity designs. You lose future contracts…
