
How Do You Choose RV LED Strips That Won’t Peel Off or Flicker on the Highway?
You are upgrading a $100,000 motorhome for a client. They want underglow lighting and awning lights to be the envy of the campground. But if you use standard residential LED tape, the first time they hit the highway, the wind will rip the lights off, or the alternator’s voltage spike will burn out the chips.
To successfully install RV and Camper LED lighting, you must use 12V strips with wide-voltage tolerance (10V-30V) or dedicated stabilizers to handle battery fluctuations. For mounting, discard standard adhesive and use industrial 3M VHB tape or screw-mounted aluminum channels to withstand 70mph wind loads and constant road vibration.
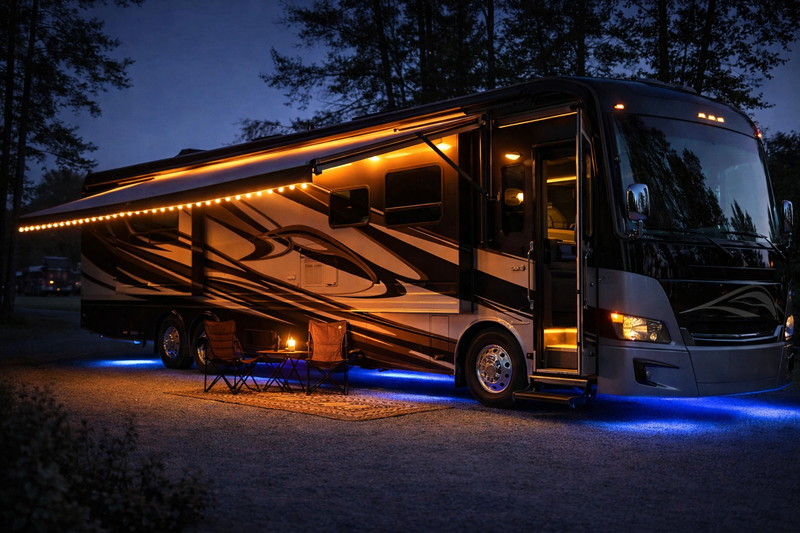
In my factory, we don’t just test lights in a quiet room. We put them on vibration tables to simulate a bumpy road. We blast them with heat to simulate Arizona summers. RVs are not houses; they are earthquakes on wheels that withstand hurricane-force winds. When you sell a lighting package to an RV owner, you aren’t just selling "pretty lights"; you are selling equipment that must survive the journey. Here is how to engineer a system that lasts as long as the vehicle.
Why Do Standard 12V LED Strips Burn Out in RVs?
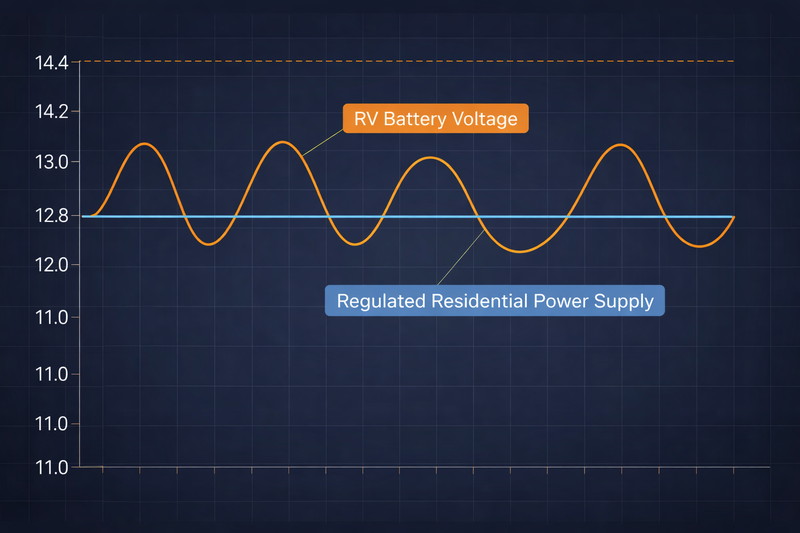
I see this complaint constantly: "I bought a 12V roll, hooked it to my RV battery, and it started flickering after a month." This is not a defect in the LED; it is a misunderstanding of the power source.
An RV "12V" system is rarely 12 volts; it fluctuates between 11V (drained battery) and 14.5V (alternator charging). You must use "Constant Current" LED strips that can handle this range without overheating, or install a DC-DC voltage stabilizer to protect standard static-voltage strips from these lethal spikes.
The Physics of Battery Power
In a home, the power coming from the wall is regulated by a driver to be a perfect 12.0V or 24.0V. It never changes. An RV is different.
- The Alternator Spike: When the RV engine is running (or the tow vehicle is connected), the alternator pushes voltage up to 13.8V or even 14.5V1 to charge the lead-acid or lithium batteries.
- The Consequence: Standard 12V resistor-based LED strips are designed strictly for 12.0V. If you feed them 14.4V, you are overdriving them by 20%. The current increases exponentially, the heat skyrockets, and the lifespan drops from 50,000 hours to 500 hours.
- The Solutions:
- Regulated Driver: The safest method is to install a small waterproof DC-DC regulator between the battery and the LEDs. This box takes any input from 10V-30V and outputs a clean, flat 12.0V. It acts as a firewall for your lights.
- Constant Current (IC) Strips2: My factory produces strips with integrated circuit (IC) chips on the board. These chips actively manage the current. Even if the voltage goes to 15V, the chip restricts the flow, keeping the LED safe. We market these as "Wide Voltage" or "Automotive Grade" strips. They cost 15% more but eliminate warranty claims.
- 24V Systems: Some large diesel pushers use 24V systems. The same logic applies; a 24V alternator can hit 28V. You must check the system voltage before you quote the job.
| Feature | Standard "Resistor" Strip | "Constant Current" Strip | DC-DC Stabilizer Method |
|---|---|---|---|
| Voltage Range | Strict 12V (+/- 3%) | Wide 10V-18V | Input: 10-30V / Output: 12V |
| Lifespan in RV | Short (Overheats) | Long (Protected) | Longest (Total isolation) |
| Brightness | Fluctuates with battery | Steady/Constant | Steady/Constant |
| Cost | Low | Medium | High (Extra hardware) |
How Do You Keep Lights Attached at 70 MPH?
Adhesive failure is the number one reason RV owners come back to fix their lights. Imagine a strip of plastic dealing with rain, 90-degree heat, and 70 mph wind simultaneously.
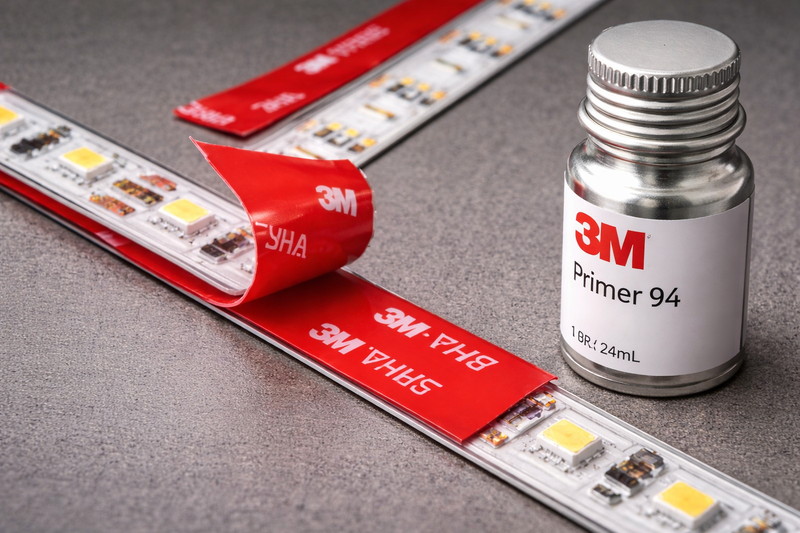
The standard adhesive backing on LED strips is for static indoor use, not highway speeds. You must upgrade to 3M VHB (Very High Bond) foam tape, use "Primer 94" to chemically bond it to the surface, or mechanically fasten the lights using aluminum channels screwed directly into the RV body or awning rail.
The Chemistry of Bonding
The "peel and stick" backing on a standard LED roll is usually 3M 200MP or similar thin transfer tape. This is fine for sticking to a smooth kitchen cabinet. It is useless for the side of a fiberglass camper that flexes and vibrates.
- The VHB Solution: You need 3M VHB (Very High Bond)3 tape. It is usually gray, thicker, and feels squishy. It is essentially a layer of acrylic foam.
- Vibration Damping: Because it is foam, it absorbs the vibration of the road. It stretches and compresses instead of popping off.
- Surface Prep is Everything:
- RVs are often coated with waxes or ceramic coatings to repel dirt. These coatings also repel tape.
- You must clean the surface with Isopropyl Alcohol (IPA) first.
- The Secret Weapon: Use 3M Primer 944. This is a liquid adhesion promoter. Wipe it on the fiberglass where the tape will go. It modifies the surface energy of the material, making the bond up to 500% stronger. Once VHB touches Primer 94, it is permanent. You will rip the paint off before you rip the light off.
- Mechanical Backup:
- For underglow lighting (under the chassis), never trust tape alone. Road grime, oil, and salt will destroy the bond.
- Use screw-in silicone clips every 12 inches.
- Use Zip-ties around frame rails where possible.
- If drilling into the floor, ensure you seal the screw holes with silicone to prevent water rot in the RV subfloor.
Can LED Lights Keep Bugs Away from the Campsite?
Nobody wants to sit under an awning that is swarming with mosquitoes and moths. Clients often ask for "bug lights," but they don’t know what that means scientifically.
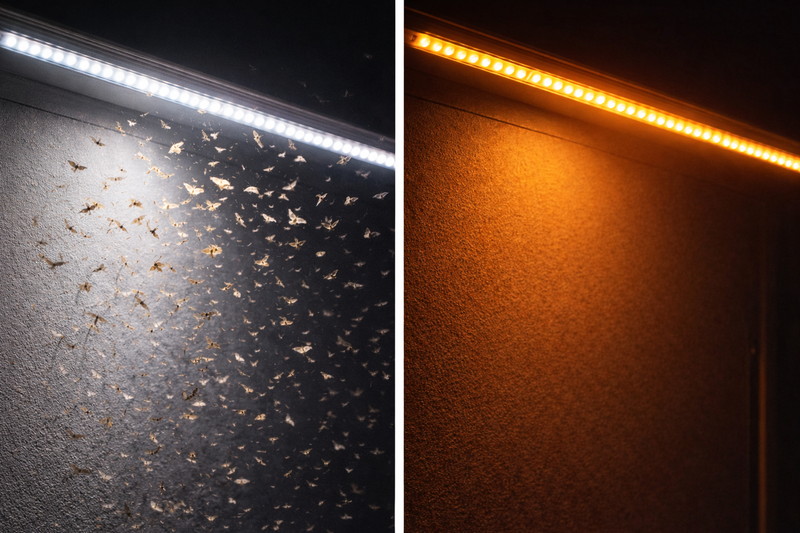
Standard cool white LEDs attract insects like a magnet. To reduce pests, you should install RGB or dedicated dual-color strips that can switch to "Amber" (590nm wavelength). This yellow-orange spectrum is nearly invisible to most flying insects, allowing your clients to enjoy the outdoors without swarms.
The Science of Insect Attraction
Bugs do not see the world the way we do. Their eyes are highly sensitive to UV, blue, and cool white light.
- The "Blue" Trap: Most standard white LEDs have a high "blue spike" in their spectrum (even if they look white). This blue light mimics the moonlight that insects use for navigation. It confuses them and draws them in.
- The "Amber" Shield: Insects have very poor vision in the yellow/orange/red spectrum (above 550 nanometers).
- Specific Wavelength: The magic number is around 590nm to 600nm5. This is a deep, rich yellow-orange.
- It doesn’t "repel" bugs (it’s not bug spray). It simply hides you. To a mosquito, an amber light looks like darkness. They don’t know you are there.
- Implementation:
- RGB Strips: You can advise the client to simply turn their RGB lights to "Orange" or "Yellow" mode. It works reasonably well.
- Dedicated "Bug" Strips: For serious campers, we manufacture strips with dual chips: One Cool White chip (for cooking/cleaning) and one dedicated 590nm Amber chip (for relaxing).
- Placement Strategy:
- Install the Amber lights on the awning (where people sit).
- Install a bright White light on the other side of the RV or high up on a pole.
- The Decoy: Turn both on. The bugs will be drawn to the bright white light away from the party, leaving the amber zone bug-free.
How Do You Waterproof for Pressure Washers and Road Spray?
An RV traveling in the rain is essentially being pressure-washed by highway spray for hours. Then the owner takes it to a truck wash and blasts it with soap. IP65 (Splash proof) is worthless here.
For RV exteriors, you require IP68 Silicone-Encased strips. Unlike cheap epoxy coatings that crack in the sun, silicone resists UV damage and remains flexible. Critical attention must be paid to the wire ingress points, which must be sealed with liquid electrical tape or heat-shrink caps to prevent capillary action from sucking water into the strip.
Addressing the Weakest Link
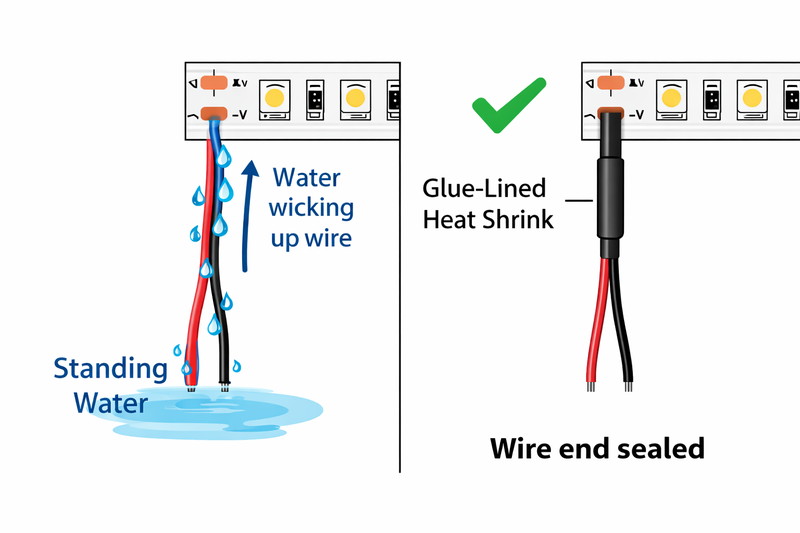
The strip itself is usually waterproof. The failure point is always the Connector.
- The Wicking Effect (Capillary Action): This is a phenomenon most installers miss.
- The copper wire inside the insulation acts like a straw.
- If the connection point is not sealed, changes in temperature create a vacuum. As the light heats up and cools down, it literally sucks moisture up the wire, inside the insulation, and into the LED strip.
- You will see the copper pads turn black or green inside the silicone tube.
- The Sealing Protocol:
- Solder, Don’t Clip: Never use plastic "snap-on" connectors for RV exteriors. Vibration will loosen them, and water will enter. You must solder the wires directly to the pads.
- Glue-Lined Heat Shrink: Use "Marine Grade" heat shrink tubing that has adhesive inside. When you heat it, the glue melts and creates a watertight seal around the wire and the silicone tube.
- Silicone End Caps: Put a blob of clear neutral-cure silicone inside the end cap before sliding it on.
- Material Selection:
- PU Glue (Polyurethane): Good, but yellows over time.
- Epoxy: Terrible for RVs. It gets brittle in the wind and cracks.
- Silicone Extrusion: The gold standard. It feels soft like a rubber band. It withstands the flexing of the RV body and the intense UV of a beach campsite without degrading.
| Protection Level | Material | Best Application | RV Suitability |
|---|---|---|---|
| IP20 | Bare Board | Inside Cabinets | OK for Interior |
| IP65 | Dropped Silicone | Under Cabinets | NO (Will yellow/crack outside) |
| IP67 | Silicone Sleeve | Awning / Walls | Good (Must seal ends) |
| IP68 | Solid Silicone Fill | Underglow / Wheel Wells | Essential for lower exterior |
Conclusion
Outfitting an RV with LED strips is a high-stakes game of durability. By mitigating voltage spikes with DC-DC stabilizers, fighting wind loads with Primer 94 and VHB tape, and using 590nm Amber light to manage pests, you provide a system that enhances the camping experience rather than becoming a maintenance headache. Build it to survive the highway, and your clients will trust you with their next rig.
-
Understanding the effects of higher voltages on LED strips can help you make informed decisions for your lighting needs. ↩
-
Exploring the advantages of Constant Current IC Strips can enhance your knowledge of efficient and safe LED lighting solutions. ↩
-
Explore this link to understand the unique properties of 3M VHB tape and how it can enhance your bonding projects. ↩
-
Discover the benefits of using 3M Primer 94 to improve adhesion and ensure a long-lasting bond in your applications. ↩
-
Understanding this wavelength can help you effectively use lighting to keep bugs away. ↩
Interested in Our LED Solutions?
Get professional consultation and customized LED lighting solutions for your projects. Contact our expert team today.
Related Articles

How Do You Build Profitable Custom Vehicle and RV Interior LED Rope Lights?
You lose RV installation contracts because your interior lights fail on rough roads. Standard strips show bright dots on glossy…

How to Perfect Bookshelf and Display Cabinet LED Rope Lighting?
You lose retail clients when bookshelves look incredibly dark. Ugly shadows hide expensive products inside display cabinets daily. You need…

How to Master Mirror and Vanity LED Rope Light Installation?
Your clients complain about ugly shadows in their bathroom mirrors. Bad lighting ruins expensive vanity designs. You lose future contracts…
