
How Do You Cut, Connect, and Extend LED Strip Lights Properly?
You have a 5-meter reel of top-quality LED strip lights, but the project requires precise, custom lengths. One wrong snip or a weak connection can ruin the entire section, wasting material and time.
The professional method is to cut only on the designated lines between the copper pads. For connections, soldering provides the most durable and reliable bond. To extend strips over long distances, you must inject power at regular intervals to prevent voltage drop and maintain consistent brightness.

As a manufacturer, I’ve seen countless installations over the years. The most common failures I see are not due to the LED chips themselves, but to mistakes made during these three fundamental steps: cutting, connecting, and extending. A sloppy connection or a failure to manage voltage drop can make a premium, high-CRI strip light look cheap and unreliable. For a professional like Tom, whose reputation depends on the quality of his work, mastering these techniques is non-negotiable. It’s the foundation of every successful linear lighting project.
How Do You Cut an LED Strip Without Damaging It?
You see the small scissor icon on the strip, but you’re still hesitant. A shaky hand or the wrong tool could sever a delicate component, rendering an entire section of your expensive strip completely useless.
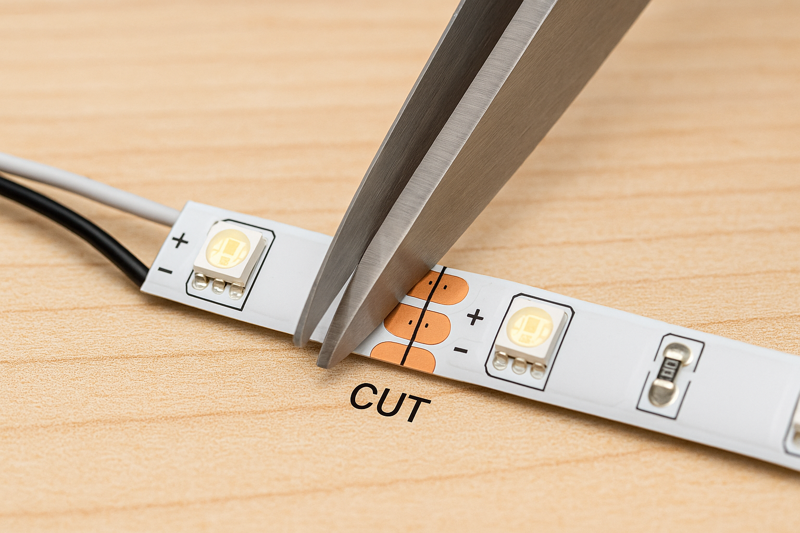
Use a pair of sharp, fine-tipped scissors and cut directly down the center of the printed cut line, precisely between the copper solder pads. This ensures a clean separation without damaging the circuit on either side of the cut.
The ability to cut LED strips to custom lengths is one of their greatest advantages. However, this flexibility comes with a rule that cannot be broken. It’s a simple process, but precision is everything. A bad cut is an unfixable mistake that directly impacts your material costs and project timeline. Getting it right the first time, every time, is the mark of a professional installer.
The Anatomy of a Cut Point
To understand why we cut where we do, you have to understand the basic architecture of an LED strip1. The strip is not one continuous circuit. Instead, it is a series of many small, independent circuits linked together. Each "segment" typically consists of a few LEDs and a resistor, and it operates independently from the next. The copper pads at each cut line are the start and end points of these segments. The printed line between them is the only place where the flexible Printed Circuit Board (PCB) has no electrical traces. Cutting anywhere else—even a millimeter off—will sever a trace within a segment, breaking that circuit permanently. The entire segment between the two cut points will fail to light up. I always tell my clients to inspect the cut point first. You’ll see the pads, often labeled with "+", "R", "G", "B", or "W", indicating the different channels. The line is your target.
Tool Selection and Technique for Different Strip Types
The tool you use matters. For standard, non-waterproof (IP20) strips, a pair of sharp scissors2 is perfect. Do not use blunt, heavy-duty shears or wire cutters, as they can "crush" the PCB rather than cutting it cleanly. This crushing force can cause the thin layers of the board to delaminate, making it extremely difficult to get a good solder connection later.
For waterproof strips (IP67/IP68) with a silicone casing, the process requires an extra step.
- Expose the Cut Line: First, use a sharp craft knife or razor blade to carefully cut through the top silicone layer, just enough to expose the PCB and the cut line3.
- Peel Back the Silicone: Gently peel back about a half-inch (1 cm) of the silicone casing to give you clear access to the board.
- Cut the PCB: Now, use your sharp scissors to make the clean cut on the exposed line.
This two-step process for waterproof strips4 is crucial. It ensures you don’t try to force your scissors through the silicone, which can cause the blade to slip and make an inaccurate cut. After connecting, this exposed area will need to be re-sealed, which we’ll discuss later.
| Strip Type | Recommended Tool | Key Technique | Common Mistake to Avoid |
|---|---|---|---|
| Non-Waterproof (IP20) | Sharp Scissors | Cut precisely on the marked line in one clean motion. | Using dull or oversized tools that crush the PCB. |
| Silicone Coated (IP67) | Craft Knife & Sharp Scissors | First, cut and peel back the silicone, then cut the exposed PCB. | Trying to cut through the silicone and PCB in one step. |
| Silicone Tube (IP68) | Craft Knife & Sharp Scissors | Carefully slice the tube lengthwise, expose the strip, pull it out slightly, then cut the strip. | Cutting through the tube and strip at the same time, which guarantees a jagged, imprecise cut. |
What’s the Best Way to Connect Two LED Strips Together?
You’ve cut your strips perfectly. Now you need to join them. You see advertisements for easy, "solderless" plastic connectors. They seem fast, but you’ve heard horror stories of flickering lights and failed connections.
Soldering is the only professional, permanent, and reliable method for connecting LED strips. Solderless clip connectors are designed for temporary, DIY projects and are a primary point of failure in long-term installations due to thermal expansion and corrosion.

I cannot stress this enough to my professional clients: avoid solderless connectors for any job you intend to stand behind. I’ve had contractors like Tom call me, frustrated that a project’s lighting is failing. In almost every case, the root cause is a cheap plastic connector that has loosened or corroded over time. The client doesn’t blame the connector; they blame the installer. Soldering takes a few extra minutes per connection, but it saves you hours of troubleshooting and protects your reputation.
Why Soldering is Superior to Solderless Clips
Let’s break down the technical reasons. A solderless clip connector works by using small metal prongs to make physical, pressure-based contact with the copper pads. This connection is inherently weak and susceptible to several major problems:
- Thermal Expansion5: As the strip heats up during use and cools down when off, the materials expand and contract. This tiny movement, repeated hundreds of times, is enough to loosen the pressure connection of a clip, leading to intermittent contact and flickering.
- Vibration: In any real-world installation, there is subtle vibration. Over time, this also works to loosen the mechanical grip of the clips.
- Corrosion6: The copper pads are exposed to air inside the clip. Over months and years, oxidation will form on the pads, increasing resistance and eventually causing the connection to fail entirely.
- Current Limitations7: The small contact points in a clip are not designed to handle the high current of powerful LED strips. They can overheat, melt the plastic housing, and become a fire hazard.
A soldered connection, by contrast, is a solid-state, metallurgical bond between the wires and the copper pads. It is a single, continuous piece of metal that is not affected by vibration or thermal expansion. It’s a permanent, low-resistance connection that can handle high current safely and will last as long as the LEDs themselves.
How to Make a Perfect Solder Connection
Making a great solder connection is a skill, but it’s an easy one to learn.
- Prepare the Surfaces: If you cut an IP67 strip, you’ll need to scrape off any remaining silicone adhesive from the copper pads. Clean the pads with a little isopropyl alcohol.
- Tin the Pads and Wires: This is the most important step. "Tinning" means applying a small, thin layer of solder to the copper pads on the strip and to the stripped ends of your connection wires before you try to join them.
- Make the Joint: Hold the tinned wire onto the tinned pad. Briefly touch your hot soldering iron (set to around 350°C / 660°F) to the wire and pad. The solder on both will instantly melt and flow together. Remove the iron. The whole process should take 2-3 seconds.
- Seal for Protection8: For outdoor or damp locations, you must re-waterproof this new joint. The best method is to use dual-wall, adhesive-lined heat shrink tubing. Slide it over the joint and use a heat gun to shrink it down. This creates a rock-solid, waterproof seal.
How Can You Extend an LED Strip and Maintain Brightness?
You need to create a 15-meter run of light for a long architectural feature. You connect three 5-meter strips end-to-end, but as you look down the line, the light gets noticeably dimmer and changes color at the far end.
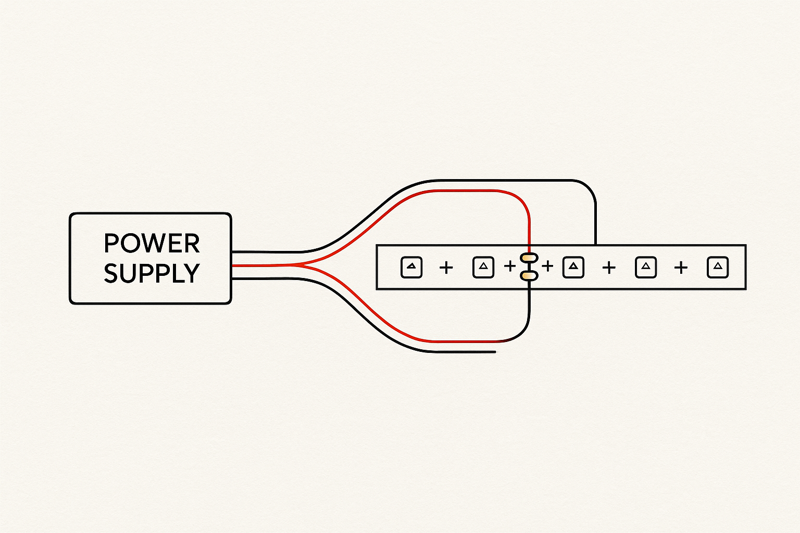
You must combat voltage drop. For 24V strips, inject power in parallel from the power supply every 5 to 10 meters. This ensures the last LED in the run receives the same voltage as the first, guaranteeing uniform brightness and color.
This is one of the most misunderstood concepts in low-voltage lighting, and it’s a critical piece of knowledge for any professional. I often get calls from designers asking if our strips "are dim." The issue isn’t the strip; it’s voltage drop. It is a fundamental law of physics. As electricity travels along a conductor (the copper trace in the LED strip), it loses a small amount of voltage due to the conductor’s resistance. Over a long distance, this small loss adds up, causing the LEDs at the far end of the strip to be underpowered.
Understanding the Effects of Voltage Drop
Voltage drop doesn’t just make the lights dimmer. It also affects the color. An RGB strip might look perfectly white at the start of the run, but by the end, it will have a reddish or yellowish tint. This happens because the blue and green LEDs require slightly more voltage to operate at full brightness than the red LEDs. As the voltage drops, the blue and green diodes dim faster than the red ones, shifting the color balance. For a high-end architectural project, this is completely unacceptable. This is why we almost exclusively recommend 24V LED strips9 for any professional project. A 24V system can run approximately twice as far as a 12V system before showing the same level of voltage drop10, giving you much more flexibility in your designs.
Professional Power Injection Techniques
Connecting strips end-to-end-to-end is a recipe for failure. The correct method is to run separate wires from the power supply to different points in your long run. This is called a "parallel connection" or "power injection11."
| Run Length | 24V System Wiring Strategy | Why It Works |
|---|---|---|
| 0-5 Meters | Power from one end. | A single 5-meter reel is designed to have minimal voltage drop. |
| 5-10 Meters | Power from the center of the total run, with light extending in both directions. OR, power from both ends using a loop of wire. | This halves the distance the electricity has to travel in any one direction, significantly reducing voltage drop. |
| 10+ Meters | Run a separate, thicker gauge "bus bar" wire from the power supply alongside the strip. Connect this main wire to the strip at the beginning, middle, and end. | This is the most robust method. The main wire carries the power with low loss, and the strip only has to carry it for short distances between injection points. |
When running these extra power injection wires, it’s critical to use the correct wire gauge (AWG). For a long run carrying significant current, you’ll need a thicker wire (a lower AWG number) to minimize voltage drop in the wire itself. I always provide my clients with a wire gauge chart12 to ensure they select the right wire for the job, protecting the integrity of their lighting design.
Conclusion
Mastering how to cut, connect, and extend LED strips is not a minor detail—it is the core skill of professional linear lighting installation. Proper technique ensures your work is reliable, safe, and looks perfect for years to come.
-
Understanding the components of an LED strip can help you make informed decisions when cutting and installing. ↩
-
Using sharp scissors ensures a clean cut, preventing damage to the PCB and ensuring proper functionality. ↩
-
Identifying the cut line is crucial for making precise cuts without damaging the circuit. ↩
-
Learning about waterproof strips can help you choose the right type for your project and ensure durability. ↩
-
Understanding thermal expansion can help you appreciate why soldering is a more reliable option for connections. ↩
-
Exploring corrosion’s impact on connections will highlight the advantages of soldered joints in longevity. ↩
-
Learning about current limitations can clarify why soldering is essential for high-power applications. ↩
-
Discovering sealing methods will ensure your soldered connections remain durable and waterproof. ↩
-
Explore the advantages of 24V LED strips for professional projects, including reduced voltage drop and improved color consistency. ↩
-
Understand the factors contributing to voltage drop in LED systems and how to mitigate its effects for better lighting quality. ↩
-
Learn about power injection techniques to enhance LED performance and prevent voltage drop issues in long runs. ↩
-
Discover how a wire gauge chart can help you select the right wire for your lighting projects, ensuring optimal performance. ↩
Interested in Our LED Solutions?
Get professional consultation and customized LED lighting solutions for your projects. Contact our expert team today.
Related Articles

How Do You Build Profitable Custom Vehicle and RV Interior LED Rope Lights?
You lose RV installation contracts because your interior lights fail on rough roads. Standard strips show bright dots on glossy…

How to Perfect Bookshelf and Display Cabinet LED Rope Lighting?
You lose retail clients when bookshelves look incredibly dark. Ugly shadows hide expensive products inside display cabinets daily. You need…

How to Master Mirror and Vanity LED Rope Light Installation?
Your clients complain about ugly shadows in their bathroom mirrors. Bad lighting ruins expensive vanity designs. You lose future contracts…
