
How Do You Properly Install Outdoor LED Strip Lights?
An improper outdoor LED strip installation means angry clients and costly rework. Lights flicker, peel off, and fill with water, damaging your professional reputation and your bottom line.
Proper installation involves four key stages: carefully planning your layout and power needs, correctly wiring a UL-listed 24V power supply, securely mounting the strip in an aluminum channel, and using silicone-filled end caps to create a fully waterproof seal on all connections.
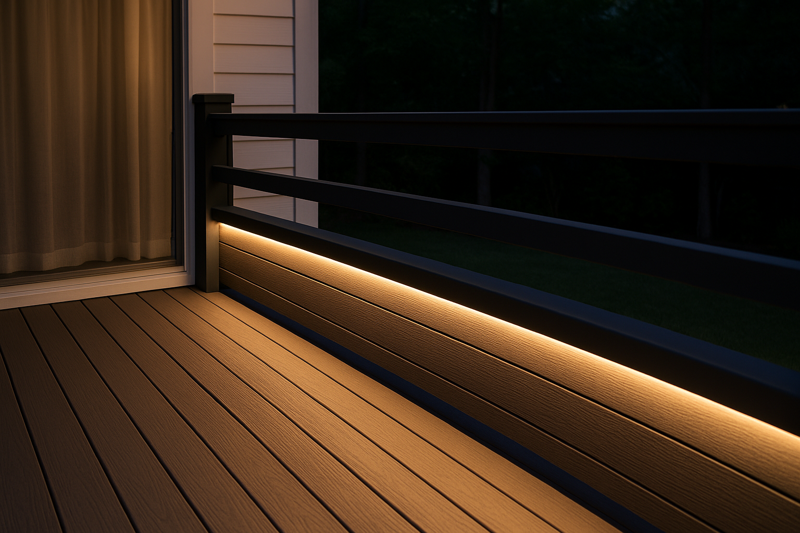
As a manufacturer, I’ve seen firsthand how the best products can fail due to poor installation. The difference between a project that lasts a decade and one that fails in a year is rarely the strip itself; it’s the process. This guide provides the step-by-step method we use and recommend to ensure a flawless, durable, and safe installation every time.
What Are the Essential Planning Steps Before Installation?
You’re halfway through an installation when you realize you’re a foot short on strip or your power supply is too weak for the run. Now the project is delayed, and you look unprepared.
Before any work begins, you must measure the exact length needed, calculate the total wattage to size the power supply, and determine the wiring plan. For runs over 5 meters, a 24V system is essential to avoid voltage drop and ensure consistent brightness.
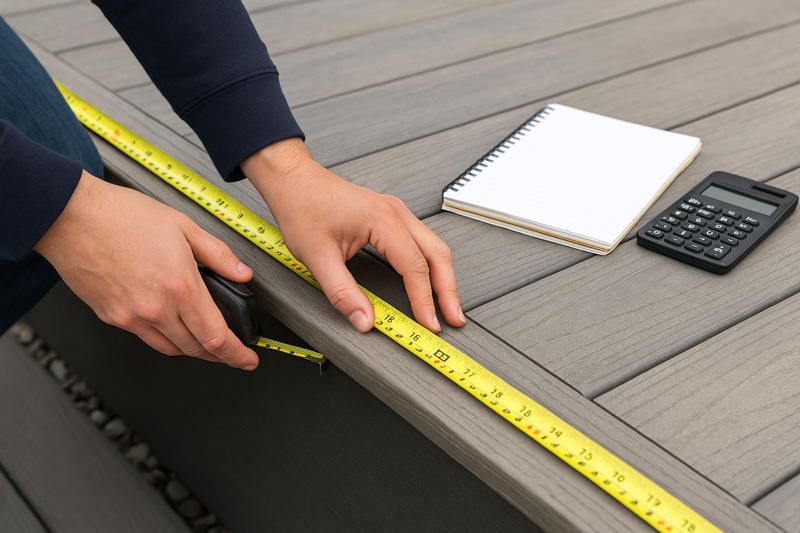
Planning is the most crucial step, yet it’s the one most often rushed. I always tell my clients to treat it like creating a blueprint for the entire electrical system. Spending 30 minutes with a notepad and calculator at the start can save you hours of frustration and extra costs on the job site. A well-laid plan is the foundation for a professional outcome.
Blueprint for a Flawless Project
A successful project is 90% planning and 10% execution. Get these three steps right, and the rest becomes much easier.
- Measure and Map: Don’t estimate. Get the exact measurements for every run. If you have corners, plan where you will cut and reconnect the strips. Draw a simple diagram showing where the power supply will be located and how the low-voltage wiring will run to the start of the LED strip.
- Calculate Total Wattage1: This is simple but critical. Look at the strip’s specification sheet for its "watts per meter" or "watts per foot." Multiply this by the total length of your run. For example, a 10-meter run of a strip that uses 15 watts/meter will consume 150 watts (10m x 15W/m).
- Size Your Power Supply2: Never run a power supply at 100% of its rated capacity. It will run hot and fail prematurely. A professional always follows the "80% rule." Choose a power supply with a wattage rating that is at least 20% higher than your calculated total wattage. For our 150-watt example, you would need a power supply of at least 180 watts (150W x 1.2).
| Component | Key Consideration | Professional Tip |
|---|---|---|
| LED Strip | Total Length Needed | Always buy slightly more than you need for testing. |
| Power Needs | Watts per Meter/Foot | Calculate total wattage for the entire run. |
| Power Supply | UL Listed, 24V, Outdoor Rated | Choose one rated for at least 20% over total wattage. |
How Do You Safely Choose and Wire the Power Supply?
You’ve installed a beautiful lighting system, but you used a cheap, uncertified power supply. Now you’re worried about it being a fire hazard, and you know it would never pass an electrical inspection.
Always use a UL Listed, Class 2, outdoor-rated power supply. It must be mounted in a dry, ventilated location, often inside a NEMA-rated junction box. Safely connect the 120V AC line voltage to the input side and the low-voltage strip wires to the 24V DC output terminals.
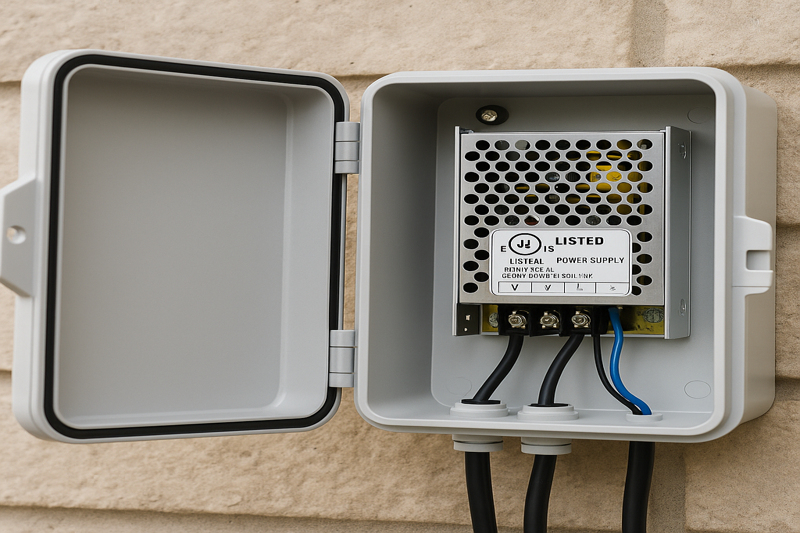
The power supply is the heart of your entire system. This is an area where cutting corners introduces enormous risk, both for the longevity of the project and for safety. I stress to clients like Tom that using a certified component is non-negotiable. It protects the installation, their client’s property, and their own business from liability. Proper wiring and placement ensures the power supply will last for years.
The Heart of Your System: Safety and Power
Wiring a power supply is straightforward, but every step must be done correctly to ensure safety and performance.
- Certification is Key: The "UL Listed3" mark means the power supply has been independently tested for fire and electrical safety. "Class 2" means its power output is limited, which prevents fatal electric shock and reduces fire risk even in a fault condition. It is the standard for low-voltage lighting in North America.
- Location, Location, Location: Even outdoor-rated power supplies last longer when protected. Installing them inside a proper NEMA-rated weatherproof junction box4 is best practice. Crucially, power supplies generate heat. Never bury them or install them in a sealed, unventilated space. Airflow is essential for a long life.
- Correct Wiring: The input side (AC) takes the high-voltage power from the building. The output side (DC) delivers the safe, low voltage to the strip. Always pay close attention to the polarity (+ and -) on the DC side. Reversing it can damage the LED strip.
| Wiring Step | Critical Detail | Why It Matters |
|---|---|---|
| 1. Turn Off Power | De–energize the circuit at the breaker. | Personal safety is the number one priority. |
| 2. Connect AC Input | Connect Line, Neutral, and Ground wires. | Proper grounding is a critical safety feature. |
| 3. Connect DC Output | Connect (+) to (+) and (-) to (-). | Reversing polarity will prevent the strip from working. |
| 4. Verify | Secure all connections and close the junction box. | Loose wires are a major fire and failure risk. |
What Is the Most Reliable Way to Mount the Strip?
You relied only on the strip’s adhesive backing. Six months later, you get a call from your client that the lights are sagging and peeling off, making your professional installation look cheap and sloppy.
The strip’s 3M adhesive backing is only for temporary positioning. For a permanent and reliable outdoor installation, you must mount the waterproof LED strip inside a dedicated aluminum channel, secured with mounting clips screwed directly to the surface.
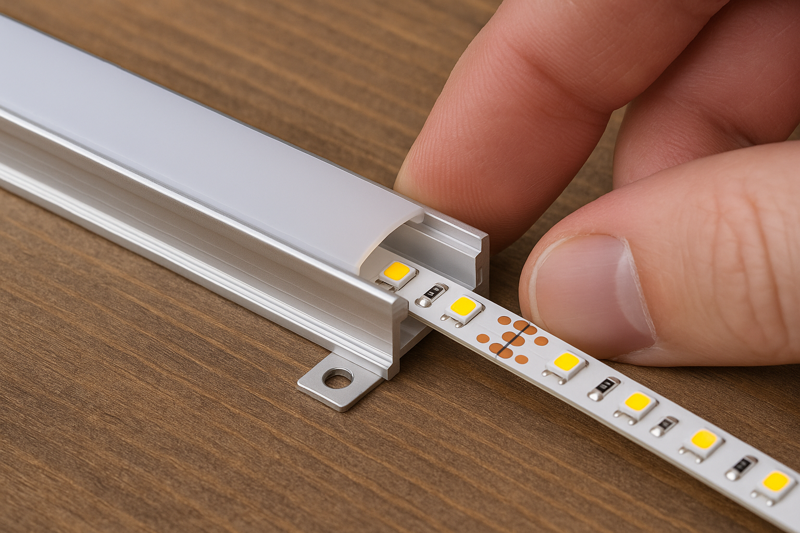
The adhesive on the back of an LED strip will always fail outdoors. Sun, moisture, and the natural expansion and contraction of building materials will quickly degrade its bond. As a factory, we include high-quality tape, but we always educate professionals that it cannot be the only method of mounting. Using a channel and clips is the mark of a true professional. It protects the strip, ensures it stays straight, and guarantees it will never fall down.
Beyond the Sticky Tape: A Permanent Solution
A mechanical fastener is the only way to ensure a lifelong installation. Aluminum channels5 provide three key benefits that adhesive tape alone cannot.
- Secure Mounting6: The channel itself is screwed into the mounting surface (wood, concrete, etc.). The LED strip then sits inside the channel, held in place by clips or a frosted diffuser cover. This creates a powerful mechanical bond that is immune to weather.
- Physical Protection: The channel acts as a protective housing. It shields the LED strip from being hit, stepped on, or damaged by gardening tools, rain, or snow.
- Heat Dissipation: The aluminum acts as a heat sink, pulling heat away from the LEDs themselves. This keeps the LEDs running cooler, which significantly increases their lifespan and prevents color shifting over time. An LED strip that runs cooler will last thousands of hours longer.
| Mounting Method | Pros | Cons / Best Use Case |
|---|---|---|
| Adhesive Tape Only | Fast initial placement | Guaranteed to fail outdoors. Not for professional use. |
| Silicone Clips | Better than tape, low profile | Can still allow for slight sagging between clips. |
| Aluminum Channel | Permanent, protective, looks professional | The only recommended method for outdoor installations. |
How Do You Make Waterproof Connections and Cuts?
You used simple, clip-on connectors to join two sections of strip outdoors. After the first big rainstorm, the connection point is full of water and that section of the strip has failed completely.
Cut the strip only on the designated copper-padded cut marks. For a truly waterproof connection that will last for years, you must solder the wires directly to the copper pads and then completely seal the connection and end cap with 100% silicone sealant.
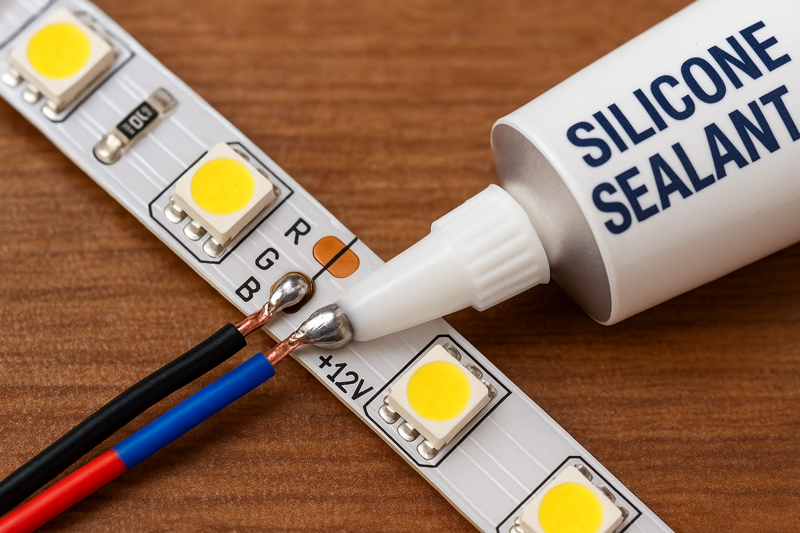
This is where many installations fail. The strip itself might be IP67 rated, but every cut and connection you make creates a potential entry point for water. Solderless, clip-on connectors are not waterproof and should never be used outdoors. They will corrode and fail. A soldered connection creates a solid electrical and mechanical bond, and a generous application of silicone sealant creates a permanent, impenetrable waterproof seal.
Sealing the Deal: The Final Waterproofing Step
This final step is your guarantee against moisture-related failures.
- The Right Cut: LED strips can only be cut at specific points, usually marked with a scissor icon and flanked by copper solder pads. Cutting anywhere else will damage the circuit and that section will not light up.
- The Pro Connection (Soldering): Soldering wires directly to the copper pads is the most reliable method. It creates a solid, permanent bond that won’t come loose or corrode. It requires a bit of skill, but it is the professional standard for low-voltage lighting.
- The Ultimate Seal: Once your wires are soldered, the magic happens. Fill an appropriately sized silicone end cap about halfway with a high-quality, 100% silicone sealant7. Gently push the cap over the end of the strip, ensuring the silicone oozes out around the edges and the wire exit point. This forces out all air and creates a solid, flexible, and completely waterproof barrier that will last for years.
| Connection Type | Waterproof Rating | Professional Recommendation |
|---|---|---|
| Solderless Clip-on | None | Do NOT use outdoors. They will fail. |
| Soldered + Silicone8 | IP67/IP68 | The only acceptable method for a long-lasting, waterproof seal. |
Conclusion
A successful installation combines careful planning, safe wiring, secure channel mounting, and properly sealed connections. This professional process ensures years of reliable performance and protects your most valuable asset: your reputation.
-
Understanding how to calculate total wattage is crucial for ensuring your LED strips function efficiently and safely. ↩
-
Properly sizing your power supply prevents overheating and prolongs the lifespan of your LED setup, ensuring reliable performance. ↩
-
Understanding the UL Listed mark is crucial for ensuring safety and compliance in electrical installations. ↩
-
Exploring NEMA-rated junction boxes can help you choose the best protection for outdoor power supplies, enhancing their longevity. ↩
-
Explore the advantages of aluminum channels for LED strip mounting, including durability and protection. ↩
-
Learn how secure mounting enhances LED strip installations, ensuring longevity and reliability. ↩
-
Explore this link to find top-rated silicone sealants that ensure a durable and waterproof seal for your projects. ↩
-
Discover why the Soldered + Silicone method is recommended for long-lasting waterproofing solutions in low-voltage lighting. ↩
Interested in Our LED Solutions?
Get professional consultation and customized LED lighting solutions for your projects. Contact our expert team today.
Related Articles

How Do You Build Profitable Custom Vehicle and RV Interior LED Rope Lights?
You lose RV installation contracts because your interior lights fail on rough roads. Standard strips show bright dots on glossy…

How to Perfect Bookshelf and Display Cabinet LED Rope Lighting?
You lose retail clients when bookshelves look incredibly dark. Ugly shadows hide expensive products inside display cabinets daily. You need…

How to Master Mirror and Vanity LED Rope Light Installation?
Your clients complain about ugly shadows in their bathroom mirrors. Bad lighting ruins expensive vanity designs. You lose future contracts…
