
How Do You Securely Mount Outdoor LED Strips on Any Exterior Surface?
Your beautiful lighting job is ruined because the strip is sagging and peeling off the wall. This unprofessional result leads to angry client calls and unpaid callbacks to fix a problem that should have been avoided from the start.
The only reliable method is to first install an aluminum mounting channel using mechanical fasteners appropriate for the specific surface. Wood screws for decks, masonry anchors for concrete, and specialized fasteners for metal or stucco ensure a permanent, professional installation that will never fail.
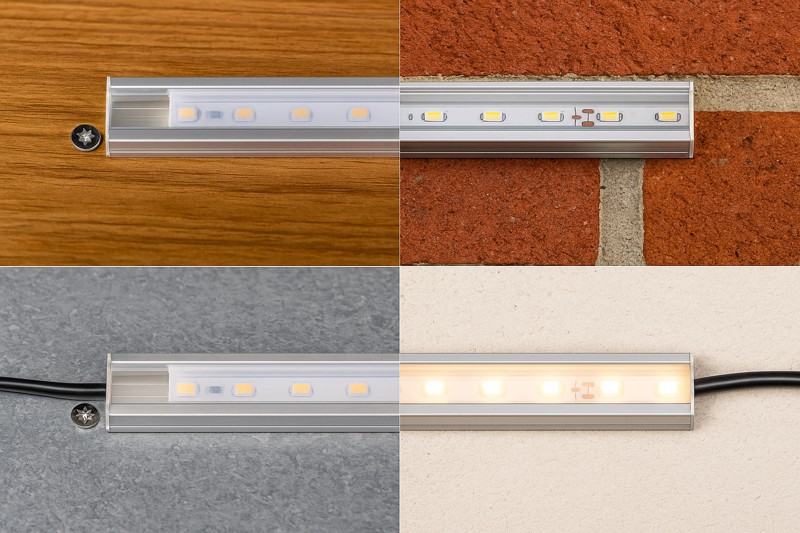
As a manufacturer, I can engineer the most durable, weatherproof LED strip on the market. But the moment it arrives at the job site, its performance and longevity depend entirely on the installation quality. The most common point of failure I see has nothing to do with the electronics; it’s the mounting. Relying on the strip’s adhesive backing is a recipe for disaster. This guide provides the professional standard operating procedure for mounting on any exterior surface you’ll encounter, ensuring your work looks as good in five years as it does on day one.
How Do You Mount LED Strips on Wood Surfaces like Decks and Fences?
You’ve stuck an LED strip under a wooden deck rail. It looks great, but after one season of sun, rain, and temperature swings, the wood expands and contracts. The adhesive fails, and the strip is now hanging down in loops.
For all wood surfaces, you must secure an aluminum mounting channel using stainless steel screws. This provides a stable, permanent base that is immune to the wood’s natural movement and weathering, guaranteeing the strip will never detach.
Wood is probably the most common surface for outdoor lighting, from decks and pergolas to fence caps and siding. It’s also a "living" material. It swells with humidity, shrinks when dry, and moves with temperature changes. No adhesive can maintain its bond under these conditions for long. A mechanical fastener—a screw—is the only way to create a permanent mount. The aluminum channel then provides a perfectly smooth, clean, and stable surface for the LED strip, protecting it and ensuring a professional finish.
A Deeper Dive into Wood Mounting Techniques
Let’s break down the exact process and best practices for a flawless installation on wood.
-
The Core Challenge: Movement and Moisture
The primary challenge with wood is its instability. Direct sun can make it hot to the touch, and a rainstorm can leave it saturated with moisture. This constant expansion and contraction will break the bond of any adhesive over time. Furthermore, the grain and texture of wood, especially if it’s rough-sawn or weathered, provides very little surface area for tape to stick to. You must bypass the wood’s surface and anchor directly into its structure.
-
Required Tools and Fasteners
Using the correct fasteners is critical to prevent future problems, like rust.
- Fasteners: Stainless steel screws1 are non-negotiable. Standard zinc-plated or galvanized screws will eventually rust, especially in woods like cedar or redwood that have natural tannins. This rust will stain the wood, creating ugly streaks running down from every screw head. Choose a screw length that will penetrate at least 3/4 inch (2cm) into the solid wood.
- Tools: A quality power drill2, a set of drill bits for creating pilot holes3, a tape measure, and a pencil.
-
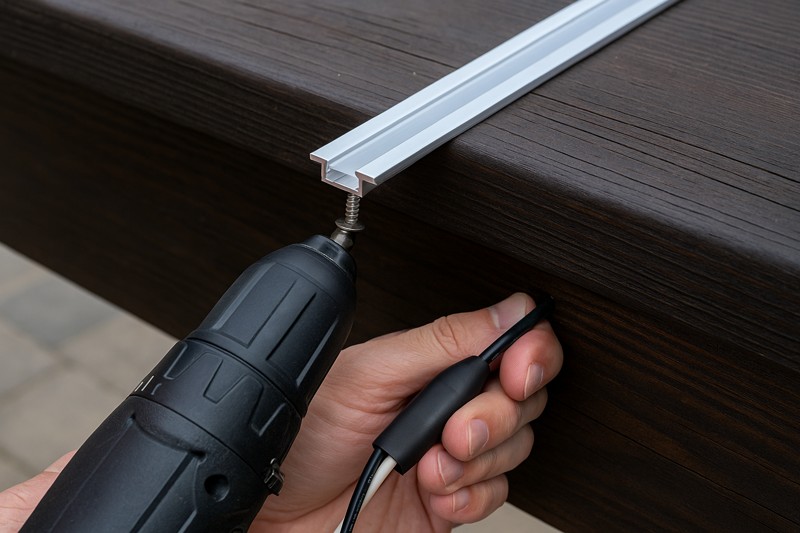
Step-by-Step Professional Process
- Prepare the Surface: Clean the wood of any dirt, dust, or mildew. While the channel is a mechanical mount, a clean surface is always a good starting point.
- Mount the Channel: Measure and cut your aluminum channel4 to the desired length. Hold it in place and mark your screw holes every 18-24 inches.
- Drill Pilot Holes: This is a crucial step, especially in hardwoods or near the edge of a board, to prevent the wood from splitting. Use a drill bit slightly smaller than the diameter of your screw.
- Secure the Channel: Drive your stainless steel screws through the channel and into the pilot holes until the channel is snug against the wood. Do not overtighten.
- Install the Strip: Clean the inside of the aluminum channel with isopropyl alcohol. Peel the backing from your LED strip and press it firmly into the secured channel. Snap on the diffuser cover to finish.
| Wood Type | Surface Prep | Recommended Fastener | Pro Tip |
|---|---|---|---|
| Softwoods (Pine, Cedar) | Clean and dry. | #6 x 1" Stainless Steel Pan Head Screw | Always drill pilot holes to prevent splitting the wood. |
| Hardwoods (Ipe, Teak) | Clean and dry. | #8 x 1" Stainless Steel Trim Head Screw | Use a countersink bit for a flush finish. Ipe is very dense. |
| Composite Decking | Clean with alcohol. | Screws designed specifically for composite materials. | Check manufacturer guidelines; some composites require special screws. |
What’s the Best Way to Mount Strips on Concrete, Brick, or Masonry?
You need to uplight a brick retaining wall, but the surface is rough and dusty. You know tape is useless, and a regular screw won’t work. How do you get a secure anchor point on such a hard, unforgiving surface?
Use a hammer drill to create pilot holes, insert masonry anchors (plugs), and then fasten your aluminum channel to these anchors with screws. This is the only method that provides a solid, mechanical grip on porous and brittle surfaces like concrete or brick.

Concrete, brick, and stone are fantastic surfaces for accent lighting, but they are challenging to mount on. They are often uneven, they generate a lot of dust that kills adhesion, and you cannot simply drive a screw into them. The solution is the two-step process of drilling a hole and inserting an anchor. The anchor expands inside the hole, creating an incredibly strong point to which you can then fasten your channel. This method is permanent and will hold up for decades.
A Deeper Dive into Masonry Mounting Techniques
Let’s walk through the tools and process for anchoring into the hardest surfaces.
-
The Core Challenge: Hardness and Porosity
The obvious challenge is the hardness; you need a specialized tool to drill into it. The second challenge is the porous, dusty nature of the material. No adhesive can form a bond with a surface that is constantly shedding microscopic dust particles. You must bypass the surface entirely and grip the internal structure of the material with an expanding anchor.
-
Required Tools and Fasteners
Having the right drill is 90% of the battle.
- Tools: A hammer drill5 is essential. A standard drill will not work. You will also need masonry drill bits that match the size of your chosen anchors.
- Fasteners: For most applications, high-quality plastic wall plugs/anchors6 and corresponding stainless steel screws are sufficient. For very heavy-duty applications, a metal screw anchor like a Tapcon7 can be drilled directly into the pilot hole.
- Best Practice: Whenever possible, drill into the mortar joints8 between bricks rather than the bricks themselves. Mortar is softer, easier to drill, and can be easily repaired later if the lights are ever removed.
-
Step-by-Step Professional Process
- Prepare the Surface: Use a stiff brush to clean the mounting area of all dust, dirt, and loose material.
- Mark Your Holes: Hold the aluminum channel in place and use a marker to mark where you need to drill, aiming for mortar joints if possible.
- Drill the Holes: Using your hammer drill and the correct size masonry bit, drill to the depth required by your anchor.
- Clean the Holes: Use a small brush or a can of compressed air to blow all the dust out of the drilled holes. This is critical for allowing the anchor to grip securely.
- Insert Anchors and Secure Channel: Tap the plastic anchors into the holes until they are flush with the surface. Align the channel and drive your screws into the anchors until snug.
- Install Strip and Diffuser: Clean the channel, install the LED strip, and snap the diffuser cover into place.
| Surface | Recommended Anchor Type | Pro Tip |
|---|---|---|
| Brick / Block Mortar | Standard Plastic Plugs | This is the preferred location. Easiest to drill and repair. |
| Poured Concrete | Tapcon Screws or Heavy-Duty Anchors | Use a high-quality hammer drill; poured concrete is very hard. |
| Natural Stone | Plastic Plugs in Mortar/Grout Lines | Avoid drilling into the stone itself to prevent cracking it. |
How Should You Approach Mounting on Stucco or EIFS?
A client wants lighting on their home’s stucco facade. You’re worried about drilling into it because you know it’s a thin, brittle coating over foam or wood. How do you mount a channel without cracking the stucco or compromising the home’s weatherproof barrier?
For stucco or EIFS (Exterior Insulation and Finish System), you cannot just mount to the surface. You must use specialty anchors designed to pass through the outer layers and anchor securely into the solid structural sheathing or studs behind it.
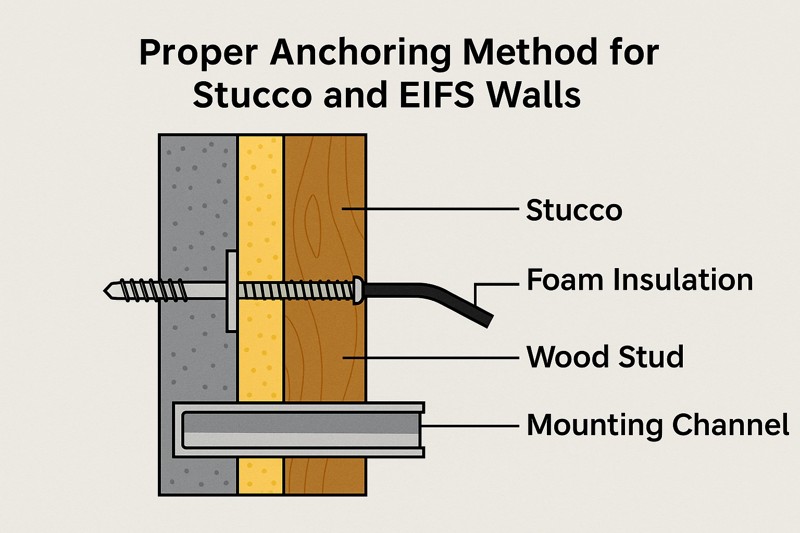
Stucco and EIFS are cosmetic, weatherproof coatings, not structural surfaces. Attempting to anchor something to the thin cementitious layer will cause it to crack and fail. Worse, it creates a path for water to get behind the stucco, which can lead to catastrophic water damage and mold. The only safe and secure method is to bypass the coating entirely. This requires longer screws and anchors and a careful approach to properly seal the penetration point.
A Deeper Dive into Stucco/EIFS Mounting
This is an advanced technique that requires care and the right materials.
-
The Core Challenge: Fragile Surface & Water Intrusion
The main challenge is that the surface you see has no holding power. The goal is to anchor to the solid wood sheathing (like plywood or OSB) or, ideally, a wall stud located behind the stucco and any foam insulation. The second, equally important challenge is to seal the penetration point perfectly to prevent any water from getting into the wall assembly.
-
Required Tools and Fasteners
- Tools: In addition to a drill, you will need a stud finder9 to locate the framing members.
- Fasteners: You will need long screws capable of passing through the stucco and insulation and biting at least 1 inch into the wood sheathing or stud. Specialty EIFS anchors10 are also available which provide a sleeve to support the screw as it passes through the soft insulation layer.
- Sealant: A high-quality, exterior-grade silicone or polyurethane sealant11 is absolutely mandatory.
-
Step-by-Step Professional Process
- Locate Structure: Use a stud finder to locate the solid framing members behind the stucco. Mark their locations. Plan your installation so your channel’s screw holes align with these studs.
- Drill a Pilot Hole: Drill a small pilot hole through the stucco and insulation to confirm you’ve hit solid wood.
- Apply Sealant: Apply a generous bead of sealant into and around the pilot hole before you insert the screw. This is the most critical step for waterproofing.
- Secure the Channel: Drive your long screw through the channel, through the sealant, and into the stud or sheathing behind. The sealant will be forced around the screw threads and under the channel, creating a complete waterproof gasket.
- Tooling the Sealant: Smooth out any sealant that has squeezed out to create a clean, finished look.
- Install the Strip: Once the channel is secure, proceed with installing the LED strip as usual.
| Surface Type | Anchor Target | Key Fastener | Mandatory Step |
|---|---|---|---|
| Traditional Stucco | Wood Sheathing or Stud | Long Exterior-Grade Coated Screws | Seal every penetration with polyurethane sealant. |
| EIFS | Wood Sheathing or Stud | Specialty EIFS Anchors and Screws | Seal every penetration with polyurethane sealant. |
Conclusion
The surface dictates the method, but the principle is always the same: a secure, mechanical fastening is the only professional choice. By using aluminum channels and the correct anchors for each material, you ensure a permanent, reliable installation. This is how you build a reputation for quality that lasts.
-
Explore the advantages of stainless steel screws to ensure durability and prevent rust in your wood projects. ↩
-
Learn about selecting the best power drill to enhance your woodworking efficiency and precision. ↩
-
Understand the significance of pilot holes in preventing wood splitting and ensuring a successful installation. ↩
-
Discover the various applications of aluminum channels in woodworking and how they can improve your projects. ↩
-
Explore this link to find top-rated hammer drills that are essential for effective masonry anchoring. ↩
-
Learn how plastic wall plugs function and why they are crucial for securing fixtures in masonry. ↩
-
Discover the benefits of Tapcon screws for heavy-duty applications in masonry and how to use them effectively. ↩
-
Understand the advantages of drilling into mortar joints for easier installation and repair in masonry projects. ↩
-
Explore this link to find the top-rated stud finders that ensure accurate locating of framing members behind stucco. ↩
-
Learn about Specialty EIFS anchors to understand their unique benefits for securing installations in EIFS systems. ↩
-
Discover the key differences between silicone and polyurethane sealants to choose the best option for waterproofing. ↩
Interested in Our LED Solutions?
Get professional consultation and customized LED lighting solutions for your projects. Contact our expert team today.
Related Articles

How Do You Build Profitable Custom Vehicle and RV Interior LED Rope Lights?
You lose RV installation contracts because your interior lights fail on rough roads. Standard strips show bright dots on glossy…

How to Perfect Bookshelf and Display Cabinet LED Rope Lighting?
You lose retail clients when bookshelves look incredibly dark. Ugly shadows hide expensive products inside display cabinets daily. You need…

How to Master Mirror and Vanity LED Rope Light Installation?
Your clients complain about ugly shadows in their bathroom mirrors. Bad lighting ruins expensive vanity designs. You lose future contracts…
