
How to Master Eave and Soffit LED Strip Lighting for Home Exteriors?
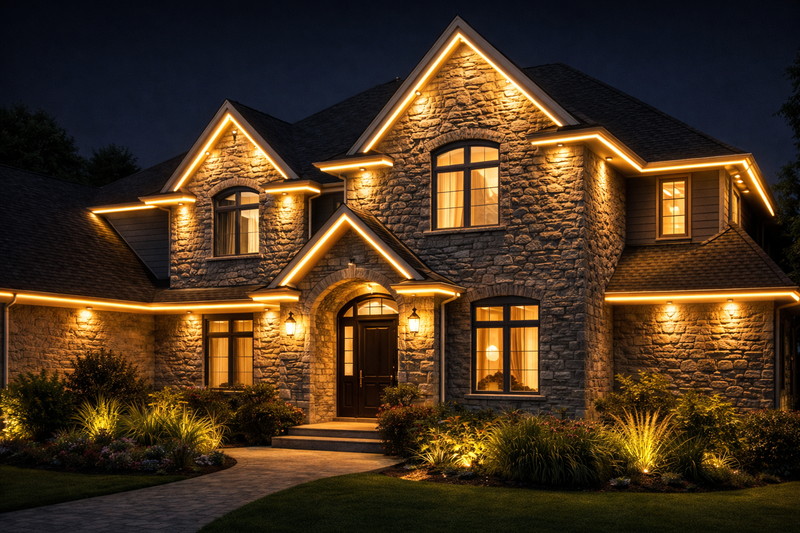
Your client wants their house to look like a luxury resort at night. You could install big, ugly floodlights that blind the neighbors, or you could create a sophisticated "floating roof" effect. The choice makes the difference between a $500 job and a $5,000 architectural upgrade.
Soffit and eave lighting is the practice of mounting LED strips under the roof overhang to wash the exterior walls with light. This technique increases security, enhances architectural details, and boosts curb appeal without glare. For success, use 24V or 48V COB strips inside aluminum channels, pointed towards the wall, to ensure a seamless, dot-free glow.
In my factory in Shenzhen, we ship containers of LED strips to the US every month. I often see orders for "cheap rolls" of lights intended for rooflines. I know those installations will fail within a year. The roof is a brutal environment—hot in summer, freezing in winter, and hard to access for repairs. If you are going to get up on a 20-foot ladder to install lights, let’s make sure you only have to do it once.
Which LED Strip Voltage Is Best for Rooflines?
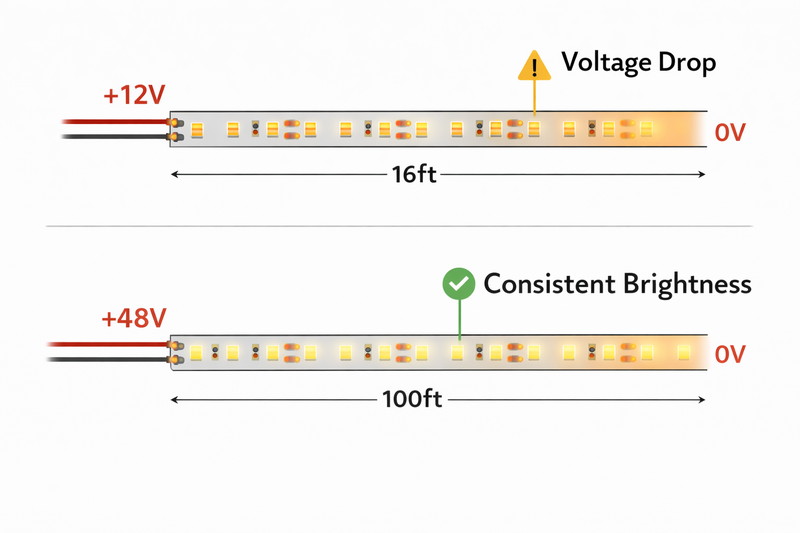
The biggest mistake contractors make on rooflines is using 12V LED strips. Rooflines are long—often 50, 80, or 100 feet. If you use 12V, the light at the start of the house will be bright, and the light at the far end will look like a dying candle.
For extensive perimeter lighting like eaves, you must use 24V or 48V LED strips to eliminate voltage drop. A 24V system allows for runs up to 32 feet (10 meters) from a single feed, while the newer 48V Constant Current technology allows for continuous runs of up to 160 feet (50 meters) with zero brightness loss.
The Economics of Voltage on Long Runs
When you bid on a job for a 3,000-square-foot home, you are looking at roughly 200 linear feet of soffit.
- The 12V Nightmare1: If you use standard 12V tape, you have to inject power every 16 feet. That means you are crawling through a hot attic with a spool of 14-gauge wire, drilling holes through the soffit every few yards to reconnect the power. It is labor-intensive and dangerous.
- The 24V Standard: This is the minimum standard for professional exterior lighting. It doubles your run length. You can usually power a standard 2-car garage span from one corner.
- The 48V Revolution: To be honest, for soffits, I now push all my distributors to buy 48V Constant Current strips2.
- The Logic: You can power the entire front of a house from one single wire coming out of the garage.
- The Savings: The strip costs 20% more, but you save 80% on labor and copper wire. You don’t need to pierce the attic envelope multiple times.
- Reliability: Fewer connection points mean fewer places for water to get in or solder joints to break. Outdoor lighting creates "points of failure" at every splice. By using a 100-foot continuous reel of 48V strip, you eliminate 5 or 6 splice points. That is 5 or 6 fewer potential warranty calls.
| System Voltage | Max Run (Single Feed) | Best Use Case | Wire Cost |
|---|---|---|---|
| 12V DC | 16 ft (5m) | Short Cabinet runs | High (Many feeds) |
| 24V DC | 32 ft (10m) | Standard Rooms / Decks | Medium |
| 48V IC | 160 ft (50m) | Whole Home Perimeter | Low (Single feed) |
| 120V (High Voltage) | 300 ft+ | AVOID (Safety Hazard) | N/A |
How Do You Hide the LEDs to Avoid the "Dot" Look?
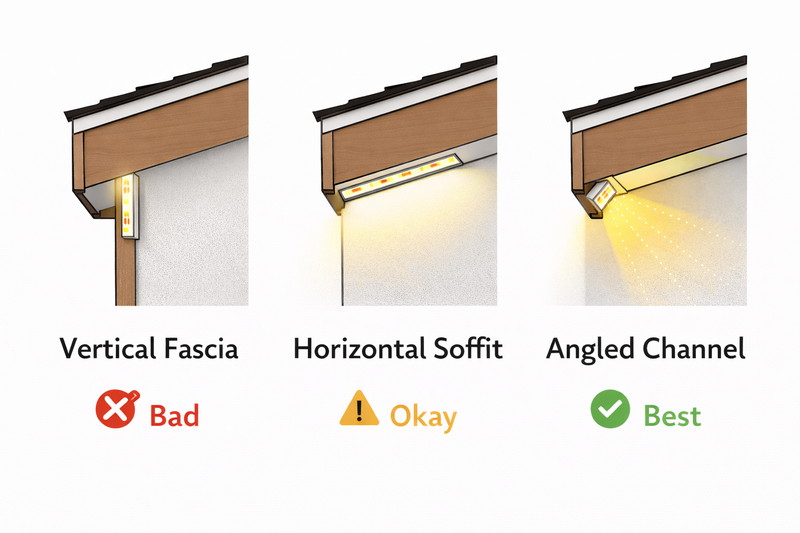
You have seen those houses where the undersides of the eaves look like a landing strip at an airport. You see hundreds of little bright dots reflecting off the vinyl soffit. That is amateur work. The goal is "Wall Washing," not "Dot Projecting."
To achieve a seamless "neon" look, you must use Aluminum Channels with milky diffusers or switch to COB (Chip on Board) LED strips. The channels should be mounted to cast light back toward the siding (Wall Wash effect) rather than pointing straight down into the flower beds.
Geometry and Light Physics
The position of the strip is more important than the brightness of the strip.
- The Reflection Problem: Most soffit materials (vinyl or aluminum) involve glossy paint. If you stick an LED strip facing down, the glossy plastic acts like a mirror. You will see every individual LED chip reflected. It looks cheap.
- The COB Solution: Traditional SMD strips have space between the LEDs. COB (Chip on Board)3 strips have a continuous layer of phosphor over the LEDs. It creates one solid line of light, like a fluorescent tube. For highly reflective surfaces, COB is mandatory.
- The 45-Degree Rule: Do not mount the strip in the middle of the soffit pointing down.
- Technique: Mount an aluminum channel tight against the fascia board (the outer edge), but angle it back 45 degrees pointing toward the house wall.
- The Effect: This washes the light down the texture of the siding (brick, stone, or stucco). It highlights the architecture of the home. The source of the light remains hidden behind the fascia lip, so you don’t get glare in your eyes when you look up.
- Aluminum Channels are Essential4: Never stick tape directly to wood or vinyl soffits.
- Heat Sink: LEDs generate heat. Wood is an insulator. The strip will overheat and die. Aluminum pulls the heat away.
- Adhesion: Wood gets dusty; vinyl releases oils. Tape will fail. You screw the aluminum channel into the soffit, and then the tape sticks perfectly to the smooth aluminum inside.
| Component | Standard Approach | Professional Approach | Why? |
|---|---|---|---|
| LED Type | SMD 5050 (spaced dots) | COB (Continuous Line) | Eliminates hotspots/reflections. |
| Mounting | Stick to Vinyl | Aluminum V-Channel | Heat dissipation & mechanical bond. |
| Direction | Downward | Angled at Wall | Highlights texture, reduces glare. |
| Diffuser | Clear | Milky / Frosted | Softens the light output. |
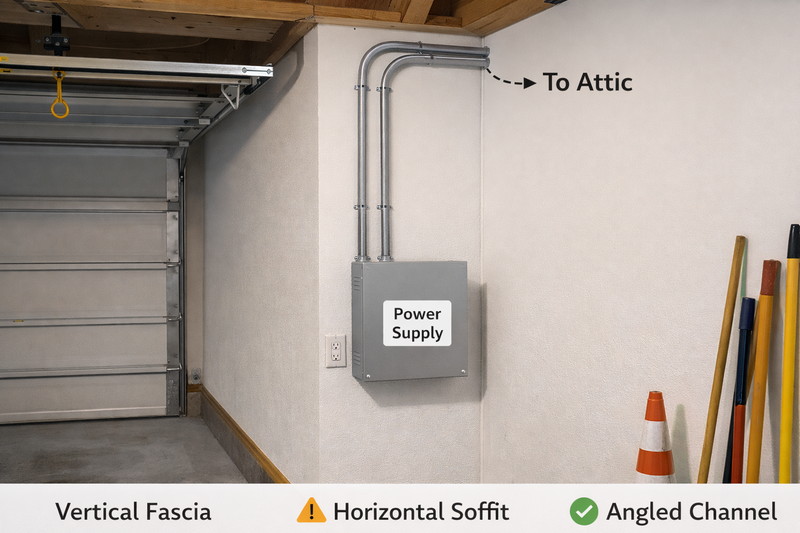
Where Should You Install the Power Supply (Driver)?
This is the number one cause of failure I see in return analysis. A contractor installs a beautiful system, but they put the power supply in the wrong place. Two years later, the lights are dead.
Never install LED drivers in a non-ventilated attic or directly exposed to the elements. Attics can exceed 140°F (60°C) in summer, which cooks the capacitors in the driver. The best practice is to mount drivers in the garage, a utility room, or a shaded, ventilated outdoor enclosure box mounted on the north side of the house.
Managing Heat and Voltage Drop
Electronic components have a lifespan rating that is directly tied to temperature. For every 10°C increase in operating temperature, the life of a capacitor is cut in half.
- The Attic Trap: In the US, attics are ovens. If you throw a plastic-cased LED driver into the insulation, it will thermally shut down or burn out.
- Centralized Hub Strategy: Treat exterior lighting like a sprinkler system.
- Placement: Locate the "Hub" in the garage or basement.
- Cabling: Run low-voltage landscape wire (14/2 or 12/2 CL2 rated) from the garage up to the soffit.
- Calculation: Since the driver is now far away from the lights (maybe 50 feet away), you must account for voltage drop5 in the wire before it hits the strip.
- If using 24V, use thicker wire (12 AWG).
- If using 48V, standard wire (16 AWG or 14 AWG) is usually fine because higher voltage pushes through resistance easier.
- Maintenance: When the driver eventually dies (and it is the first thing to die, usually after 5-7 years), do you want to fetch your ladder and crawl into a spider-filled attic? Or do you want to walk into the garage and swap a box on the wall? Do it for your future self.
- Smart Home Integration6: Placing the driver in the garage allows you to easily stick a Wi-Fi controller (like Shelley or Lutron) between the driver and the lights. Now the homeowner has app control without signal issues from metal roofing blocking the Wi-Fi.
What Color Temperature Should You Choose for Exteriors?
I have had customers return entire orders because "the color looks wrong." Color is not just a preference; it is a relationship with the material of the house.
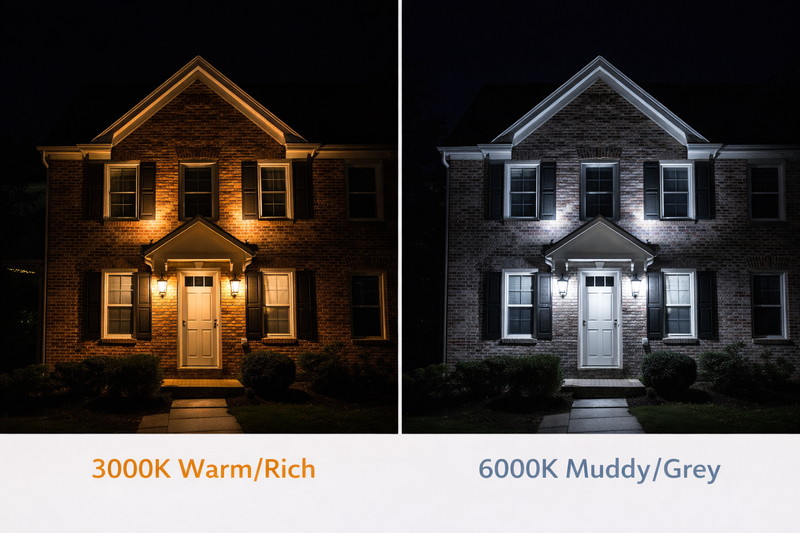
For accurate color rendering, match the Kelvin temperature to the home’s facade material. Use 2700K-3000K (Warm White) for earth tones like red brick, stone, and wood siding. Use 4000K (Natural White) for modern white, grey, or black exteriors. Avoid "Cool White" (6000K) as it makes homes look sterile and clinical.
The Science of CRI and Materials
In the lighting industry, we talk about CRI (Color Rendering Index). For outdoor use, you want a CRI of at least 90. But Kelvin (Color Temperature) is what the neighbors see.
- The "Gold" Standard (3000K): Most residential exterior lighting (porch lights, coach lights) is 2700K or 3000K. If your LED strips are 5000K, the house will look mismatched and cheap. The warm light mimics the sunset and feels inviting.
- The "Modern" Look (4000K): If the house is a modern farmhouse (White Hardie board with black trim), 3000K can make the white siding look yellow/dirty. 4000K keeps the white looking crisp.
- RGBW vs RGB:
- Every homeowner asks for "Color Changing" for Christmas and Halloween.
- The Trap: If you buy standard RGB, the "White" is made by mixing Red, Green, and Blue. It looks like a spaceship, not a home.
- The Upsell: Sell them RGBW (Red Green Blue + Warm White). This strip has a dedicated white chip.
- 330 days a year, they run the dedicated Warm White chip for a classy, luxury look.
- 35 days a year, they turn on the RGB for holidays.
- This is the difference between a "toy" and a "lighting system." It costs about 15% more but doubles the functionality.
| House Material | Recommended Kelvin | Desired Effect |
|---|---|---|
| Red Brick / Wood | 2700K – 3000K | Enhances red/brown tones, feels cozy. |
| Stone (Tan/Beige) | 3000K | Brings out the texture depth. |
| White Vinyl / Siding | 3500K – 4000K | Keeps white looking clean, not yellow. |
| Grey / Black Modern | 4000K | Sharp, high contrast, architectural. |
How Do You Waterproof the Connections?
You bought IP67 waterproof strips. Great. But you had to cut them to fit the corners. Now you have an IP00 (not waterproof) hazardous point. Water enters the cut end, travels down the strip, and corrodes the copper.
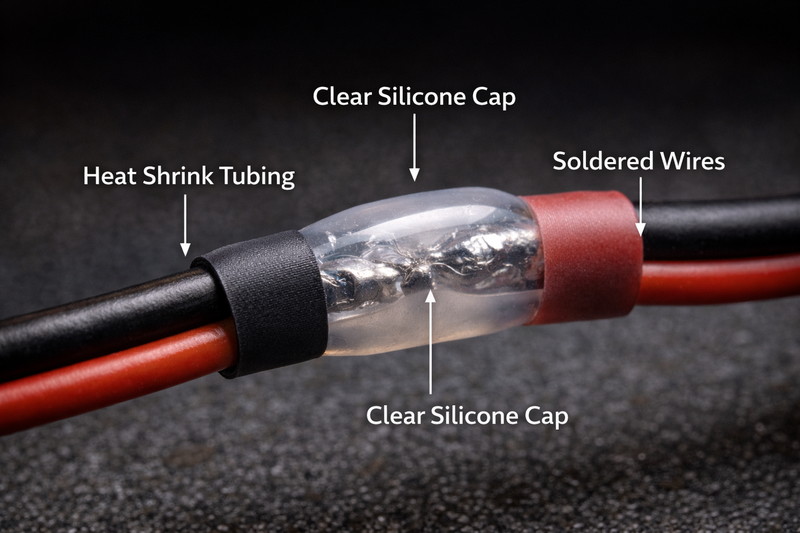
The primary failure point of soffit lighting is not the strip, but the connectors. Never use "clip-on" connectors for outdoor environments, as they oxidize and fail. You must solder wires to the strip and seal the ends with neutral-cure silicone and adhesive-lined heat shrink tubing.
The "Wick" Effect
Water doesn’t just fall on things; it wicks.
- The Problem: If you leave a wire nut exposed, or a cut end of a strip unsealed, humidity gets sucked into the strip as it cools down at night (thermal contraction creates a vacuum). Over 6 months, this moisture travels inches up the strip, turning the copper black.
- Acid Cure vs Neutral Cure7:
- Go to Home Depot. Pick up a tube of silicone. Smell it. Does it smell like vinegar? Put it back.
- Vinegar means it is "Acid Cure." The acid vapor will eat the phosphor off your LED chips and corrode the copper.
- You need "Neutral Cure" silicone. It is often sold as "Window and Door" or electronic grade silicone. It has no smell.
- The Connection Protocol:
- Solder: It is the only way to ensure a connection that withstands vibration from wind and thermal expansion.
- End Caps: Use the silicone end caps provided with the strip.
- Fill: Inject neutral cure silicone into the cap before sliding it on.
- Shrink: Use "Marine Grade8" heat shrink. This heat shrink has a layer of glue inside. When you heat it, the glue melts and fuses with the silicone cap and the wire insulation. It becomes a solid block of plastic.
- Drip Loop: Before the wire enters the house/soffit hole, make a "U" shape. This ensures water drips off the bottom of the loop instead of running down the wire into your connector.
Conclusion
Eave and soffit lighting is a high-margin upgrade that transforms a home’s architecture. By choosing 48V systems to simplify wiring, mounting COB strips in aluminum channels for a dot-free finish, and placing drivers in the garage for longevity, you deliver a system that justifies the premium price. Do not maintain the status quo of cheap 12V kits; build systems that last as long as the roof itself.
-
Learn about the difficulties of 12V systems and why they can be a hassle for large installations, helping you make informed decisions. ↩
-
Explore this link to understand how 48V strips can save you time and money while enhancing reliability in your lighting projects. ↩
-
Explore the advantages of COB technology for seamless lighting and reduced glare, enhancing your lighting design. ↩
-
Learn how aluminum channels improve heat dissipation and adhesion, ensuring longevity and performance of your LED strips. ↩
-
Understanding voltage drop is crucial for ensuring efficient electrical installations and preventing component failure. ↩
-
Exploring Smart Home Integration can enhance your lighting control and improve energy efficiency in your home. ↩
-
Understanding Neutral Cure silicone is crucial for preventing corrosion in LED connections, ensuring longevity and reliability. ↩
-
Exploring Marine Grade heat shrink reveals its superior sealing properties, essential for protecting electrical connections from moisture. ↩
Interested in Our LED Solutions?
Get professional consultation and customized LED lighting solutions for your projects. Contact our expert team today.
Related Articles

How Do You Build Profitable Custom Vehicle and RV Interior LED Rope Lights?
You lose RV installation contracts because your interior lights fail on rough roads. Standard strips show bright dots on glossy…

How to Perfect Bookshelf and Display Cabinet LED Rope Lighting?
You lose retail clients when bookshelves look incredibly dark. Ugly shadows hide expensive products inside display cabinets daily. You need…

How to Master Mirror and Vanity LED Rope Light Installation?
Your clients complain about ugly shadows in their bathroom mirrors. Bad lighting ruins expensive vanity designs. You lose future contracts…
