
Is Your Staircase a Safety Hazard or a Design Masterpiece?
Navigating a dark staircase at night is one of the leading causes of household accidents. You fumble for a switch, miss a step, or simply avoid going downstairs because the lighting is poor. It is a functional failure that puts your family at risk.
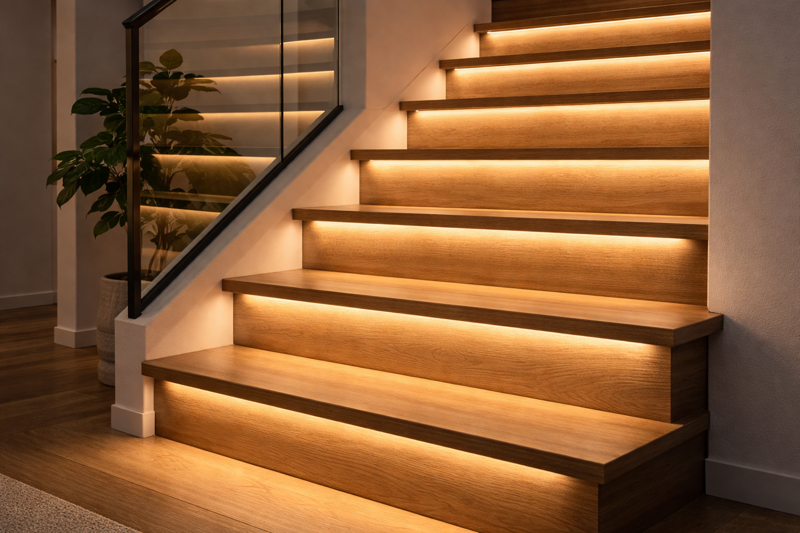
Staircase LED rope lighting solves this by providing focused illumination directly on the treads or handrails, defining the edge of each step to prevent falls. For a professional finish, you must use aluminum channels recessed into the tread nosing or mount the lights along the skirt board, ensuring the source is hidden to avoid blinding glare.
I have supplied lighting for thousands of hotel projects and luxury villas. The staircase is always the most complex part of the blueprint. Why? Because you are fighting gravity and geometry. If you stick a cheap roll of tape light on a stair, it will eventually peel off because of the vibration from footsteps. If you aim the light incorrectly, you will blind the person walking up the stairs. In this guide, I will share the factory-level secrets to installing staircase lighting that is safe, durable, and stunning.
Where is the Safest Place to Mount Stair Lights?
Most DIY enthusiasts make a critical mistake: they mount the light facing upwards or towards the walker. This creates "direct glare," which temporarily blinds you—the exact opposite of what safety lighting should do.
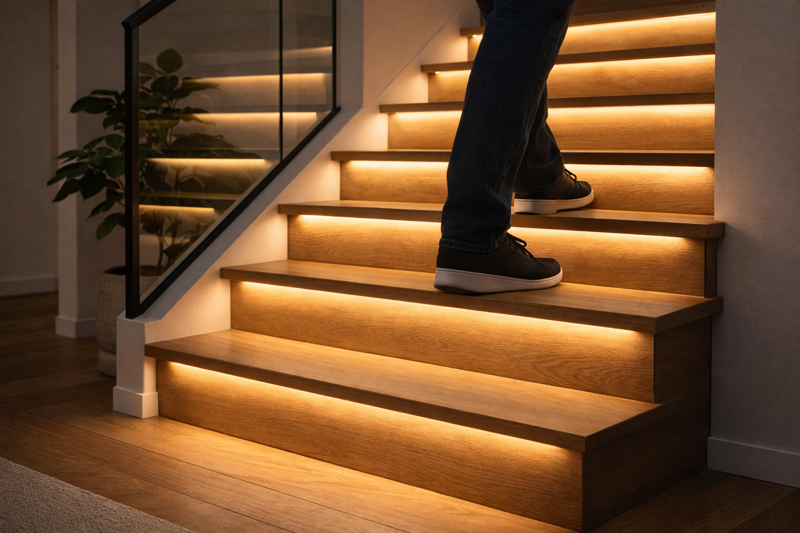
The most effective position for stair lighting is under the "nosing" (the overhanging front edge) of each tread, pointing straight down. This highlights the texture of the step below and clearly defines where your foot should land, while keeping the light source completely invisible to the eye.
The Engineering of Indirect Glare
In my factory, we test lighting angles rigorously. For stairs, the goal is "Visual Cut-Off."
When you stand at the bottom of the stairs and look up, you should not see the LED chips. If you do, they will look like harsh stars hurting your eyes.
To achieve this, you need to use a recessed mounting profile1.
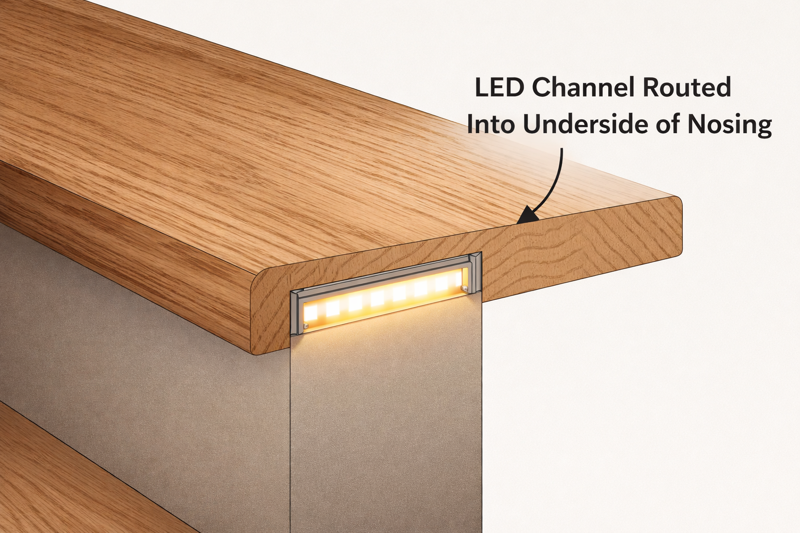
If you are building new stairs or renovating, ask your carpenter to route a channel (a groove) into the underside of the stair nosing. The specific dimension is usually 17mm wide by 7mm deep.
We insert an aluminum profile into this groove. The LED strip goes inside, covered by a milky diffuser. As a result, the light acts like a wash, flowing down the riser.
What if you don’t have a nosing (Open Riser Stairs)?
This is common in modern architecture. For open risers, do not put the light under the step; it will shine into the living room below. Instead, install the light in the Handrail or along the Stringer (the side wall).
Handrail lighting is fantastic because it lights the path and the support simultaneously. We manufacture specific "Round LED Tube" inserts that fit inside stainless steel or wood handrails.
The "Dotless" Requirement:
Because stairs are viewed from close range, standard LED strips (60 chips/meter) look cheap. You will see every dot. You must use COB (Chip on Board)2 strips or high-density strips (120+ chips/meter). This creates a solid laser-like beam of light.
| Mounting Location | Glare Risk | Installation Difficulty | Visual Effect |
|---|---|---|---|
| Under Nosing | Zero (Best) | High (Requires routing) | Floating Steps. |
| Side Wall (Skirt) | Low | Medium | Pathway marker. |
| Handrail | Low | High (Hidden wiring) | Sleek and modern. |
| Riser Face | High | Low | Not Recommended. |
Should You Automate Your Lights with Motion Sensors?
Leaving stair lights on 24 hours a day is a waste of energy and driver lifespan. However, fumbling for a wall switch in the dark defeats the purpose of safety lighting.
The gold standard for modern staircases is a cascading motion sensor system (often called the "Piano Effect"). Sensors at the top and bottom trigger the lights to turn on step-by-step as you walk, creating a futuristic visual while ensuring light is only used when needed.
The Logic of "Follow Me" Lighting
Standard motion sensors are binary: you walk in, everything blasts on.
The "Cascading3" or "SPI" (Serial Peripheral Interface) controller is different. It is intelligent.
When the bottom sensor detects you, Step 1 lights up, then Step 2, then Step 3, matching your walking pace. It feels like the house is welcoming you.
Technical Reality Check:
I sell these controllers, but I must warn you: The wiring is intense.
For a standard system, you wire all positive cables together.
For a cascading system, every single step needs its own individual wire running back to the main controller. If you have 20 steps, that is 40 wires (Positive and Negative for each) going into a massive junction box.
Unless you have a professional electrician and accessible walls (or a closet under the stairs), this is very hard to retrofit.
The Simple Alternative:
If you don’t want to run 40 wires, use a simple "All-On" Dual Sensor.
Place a PIR sensor at the top and bottom. Link them to a central dimmer. When either is triggered, the whole staircase fades in smoothly (Soft Start). This requires far less wire—just one main line running down the side of the stairs connecting all lights.
A safety note from a manufacturer: Ensure your sensors have a "Daylight Override." You don’t want the stair lights triggering at 2 PM when the sun is shining. It looks confusing and wastes power.
| Sensor Type | Wiring Complexity | Cost | Wow Factor |
|---|---|---|---|
| Standard Switch | Low | Low | None. |
| All-On Motion4 | Medium | Medium | Practical & Safe. |
| Cascading (Pixel) | Extreme (2 wires per step) | High | Luxury / Viral. |
How Do You Hide the Ugly Wiring Mess?
Refining the aesthetics of a staircase is useless if you leave a nest of red and black wires exposed. This is the number one reason staircase projects fail inspection or spousal approval.
Successful wire management requires planning the "chase" or conduit paths before the drywall is sealed. For existing staircases, you must drill laterally through the stringers (the side supports) or hide the main trunk line behind the decorative skirt board to keep the look clean.
The "Zig-Zag" vs. "Central Spine" Method
I see contractors panic when they realize they have to power 15 separate strips.
Method A: The Stringer Run (Zig-Zag)
This is for retrofits. You drill a small hole in the corner of each step, passing the wire through the riser to the backside of the stair. Then, you run a main trunk cable along the back zigzag of the stairs.
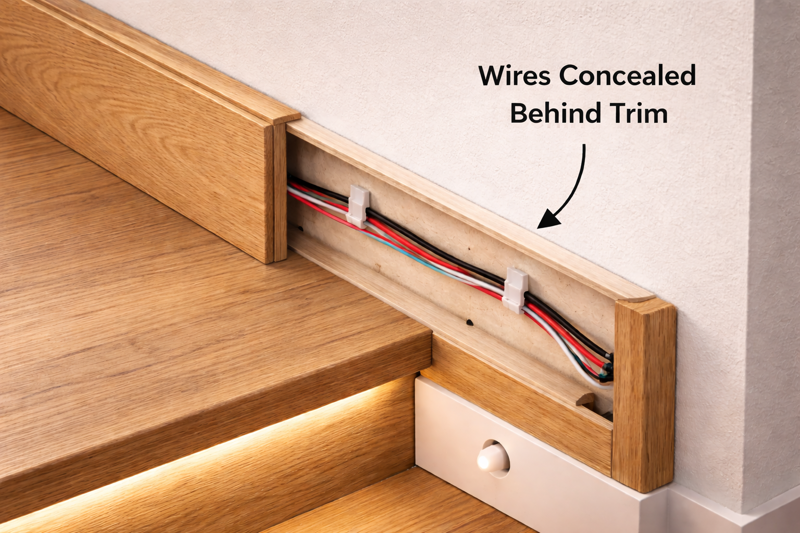
Method B: The Skirt Board Hide
If you have a decorative trim running up the wall (skirt board), pry it off carefully. Route a channel in the drywall behind it. Run your main power lines there. Drill small exit holes at each tread level. Re-install the board. The wires vanish.
Voltage Drop is the Enemy5:
Staircases are long. If you use 12V strip lights, by the time the power reaches the top step (20 feet away), the light will be dim and yellow.
Always use 24V systems for stairs.
Furthermore, use 18AWG or 16AWG wire for your main trunk line. Thin wires (22AWG) add resistance.
Where does the driver go?
Never bury the power supply (Driver) inside the wall. Drivers fail eventually (capacitors dry out). You need to access it.
Place the driver in the "Harry Potter Closet" (under the stairs) or in the basement ceiling. Run the low voltage line from there to the first step.
Also, consider the Connector durability. Do not just twist wires and tape them. Stairs vibrate. Steps flex when you walk on them. Use Wago lever connectors6 or solder-and-shrink-wrap connections. If a connection comes loose inside a finished step, you have to tear the stairs apart to fix it.
| Component | Bad Practice | Factory Standard (Good) | Why? |
|---|---|---|---|
| Wire Gauge | 22AWG (Too thin) | 16AWG or 18AWG | Prevents dimming/fire risk. |
| Connections | Electrical Tape | Solder / Wago | Resists vibration/footsteps. |
| Driver Location | Inside drywall | Accessible closet/panel | Maintenance is guaranteed. |
| Voltage | 12V | 24V | Better consistent brightness. |
Conclusion
Staircase lighting requires more planning than any other room. You must choose Channel Mounting to eliminate glare, decide between Cascading or All-On sensors based on your wiring budget, and prioritize 24V power to ensure the top step is as bright as the bottom one. Do it right, and your stairs become the centerpiece of your home.
-
Explore this link to understand how recessed mounting profiles enhance lighting aesthetics and reduce glare. ↩
-
Learn about COB LED strips to discover their advantages in providing high-quality, glare-free lighting solutions. ↩
-
Explore this link to understand how Cascading lighting enhances ambiance and functionality in your home. ↩
-
Discover the benefits of All-On Motion sensors for efficient and practical lighting solutions in your space. ↩
-
Understanding voltage drop is crucial for ensuring consistent lighting performance, especially in long runs like staircases. ↩
-
Wago lever connectors provide a reliable solution for electrical connections, ensuring durability and safety in your projects. ↩
Interested in Our LED Solutions?
Get professional consultation and customized LED lighting solutions for your projects. Contact our expert team today.
Related Articles

How Do You Build Profitable Custom Vehicle and RV Interior LED Rope Lights?
You lose RV installation contracts because your interior lights fail on rough roads. Standard strips show bright dots on glossy…

How to Perfect Bookshelf and Display Cabinet LED Rope Lighting?
You lose retail clients when bookshelves look incredibly dark. Ugly shadows hide expensive products inside display cabinets daily. You need…

How to Master Mirror and Vanity LED Rope Light Installation?
Your clients complain about ugly shadows in their bathroom mirrors. Bad lighting ruins expensive vanity designs. You lose future contracts…
