How to Properly Install Outdoor LED Strip Lights: A Step-by-Step Professional Guide
How to Properly Install Outdoor LED Strip Lights: A Step-by-Step Professional Guide
Outdoor LED strip installation fails when the job is treated like an indoor tape-light install with a weatherproof product. Exterior projects need better planning, better mounting, better sealing, and better power management. A professional result depends on handling the full system correctly from the first layout drawing to final commissioning.
Step 1: Plan the Layout, Load, and Feed Strategy
Before opening the reel, confirm the full circuit design. That includes:
- total run length by zone
- wattage per meter and total connected load
- driver sizing with safety margin
- voltage selection and expected feed length
- cable routing and power-injection points
- dimming or control requirements
This planning stage prevents common site problems such as undersized drivers, overloaded circuits, dim ends, and badly located junction points.
Step 2: Choose Materials Suitable for Exterior Conditions
Select a strip with the correct IP rating for the real environment. IP65 may suit sheltered details, while IP67 is a safer default for most exposed outdoor work. Use IP68 where submersion is part of the design.
Also confirm:
- UV-resistant waterproofing material
- compatible outdoor-rated driver or enclosure solution
- mounting channel or clip system
- waterproof connector or solder-seal method
- end caps, glands, and junction boxes matched to the site condition
A strip alone does not make an outdoor system.
Step 3: Prepare the Surface Properly
Clean substrate preparation is essential. Dust, oil, chalking paint, rust, and surface moisture all reduce mounting reliability.
Before fixing the strip or channel:
- clean the substrate thoroughly
- repair loose coatings or unstable surfaces
- mark alignment carefully
- confirm fall or drainage direction on horizontal runs
- dry-fit channels, clips, and cable exits
Skipping preparation is one of the fastest ways to create sagging lines and early mounting failure.
Step 4: Mount the Strip with Mechanical Support
Do not rely on strip adhesive alone outdoors. The more reliable method is to install the strip inside an aluminum channel or use mechanically fixed clips appropriate to the surface.
This improves:
- long-term retention
- straightness of the light line
- heat dissipation
- physical protection
- serviceability
Use corrosion-resistant fasteners and avoid any mounting orientation that traps water inside the profile.
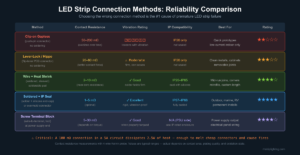
Step 5: Make Clean Electrical Connections and Reseal Every Cut
Cut only at the manufacturer’s cut points. For permanent exterior work, soldered connections are usually more reliable than generic clip connectors. After any cut or join, restore the weather seal using the correct end caps, adhesive-lined heat shrink, gasketed connectors, or approved sealant system.
Pay special attention to:
- polarity marking
- strain relief on cable exits
- sealing of unused ends
- protection of splice points inside channels or enclosures
Most outdoor strip failures begin at the field-made connection, not at the factory section.
Step 6: Protect the Driver, Controller, and Junction Points
The power supply and control gear must be treated as outdoor components. If they are not directly outdoor-rated, place them in appropriate enclosures with correct cable glands, drainage strategy, and heat management.
Install them where they are:
- protected from standing water
- serviceable for maintenance
- close enough to control voltage drop
- not sealed so tightly that heat becomes a new failure mode
Step 7: Test Before Final Handover
Before closing channels and leaving site, test the installation under operating conditions. Check:
- even brightness across the run
- correct dimming and controls
- absence of flicker
- stable voltage at the far end
- secure mounting at all transition points
- integrity of all sealed connections
A brief soak test or inspection after exposure to water is good practice on critical exterior jobs.
Conclusion
To properly install outdoor LED strip lights, plan the electrical layout first, select materials for the real exposure level, mount with mechanical support, reseal every field connection, and protect the driver and junction hardware as carefully as the strip itself. When the whole system is installed with outdoor discipline, the result is cleaner, more reliable, and far less likely to generate costly rework after handover.
Recommended Products
Interested in Our LED Solutions?
Get professional consultation and customized LED lighting solutions for your projects. Contact our expert team today.
Related Articles

Tunable White LED Strips: The Complete Specification Guide for Architects and Lighting Designers
Tunable white LED strips blend warm and cool channels to produce dynamic CCT light. This guide covers dual-channel wiring, driver…

UGR and Glare Control in LED Strip Lighting: How to Specify for Visual Comfort in Commercial Spaces
UGR (Unified Glare Rating) is the most under-specified variable in commercial LED strip projects — yet it determines whether your…
LED Strip Connectors and Soldering: Building Reliable Connections That Last
Connection failures are the #1 cause of LED strip callbacks. This guide compares clip connectors, lever-lock, and soldered joints by…