
LED Strip Lighting for Acoustic Panels and Decorative Wall Surfaces
Acoustic panels, wood slat walls, fluted panels, stone surfaces, leather wall finishes, fabric panels, and decorative feature walls are now common in hotels, offices, cinemas, restaurants, villas, showrooms, and premium commercial interiors. LED strip lighting can make these surfaces look warmer, deeper, and more architectural. But if the lighting is planned poorly, the same wall can look cheap, uneven, or uncomfortable.
The challenge is that decorative wall surfaces are not flat white walls. They have texture, shadow, grooves, reflections, soft fabric, hard stone, wood grain, or acoustic gaps. The LED strip must be selected and positioned around the material, not added as an afterthought.
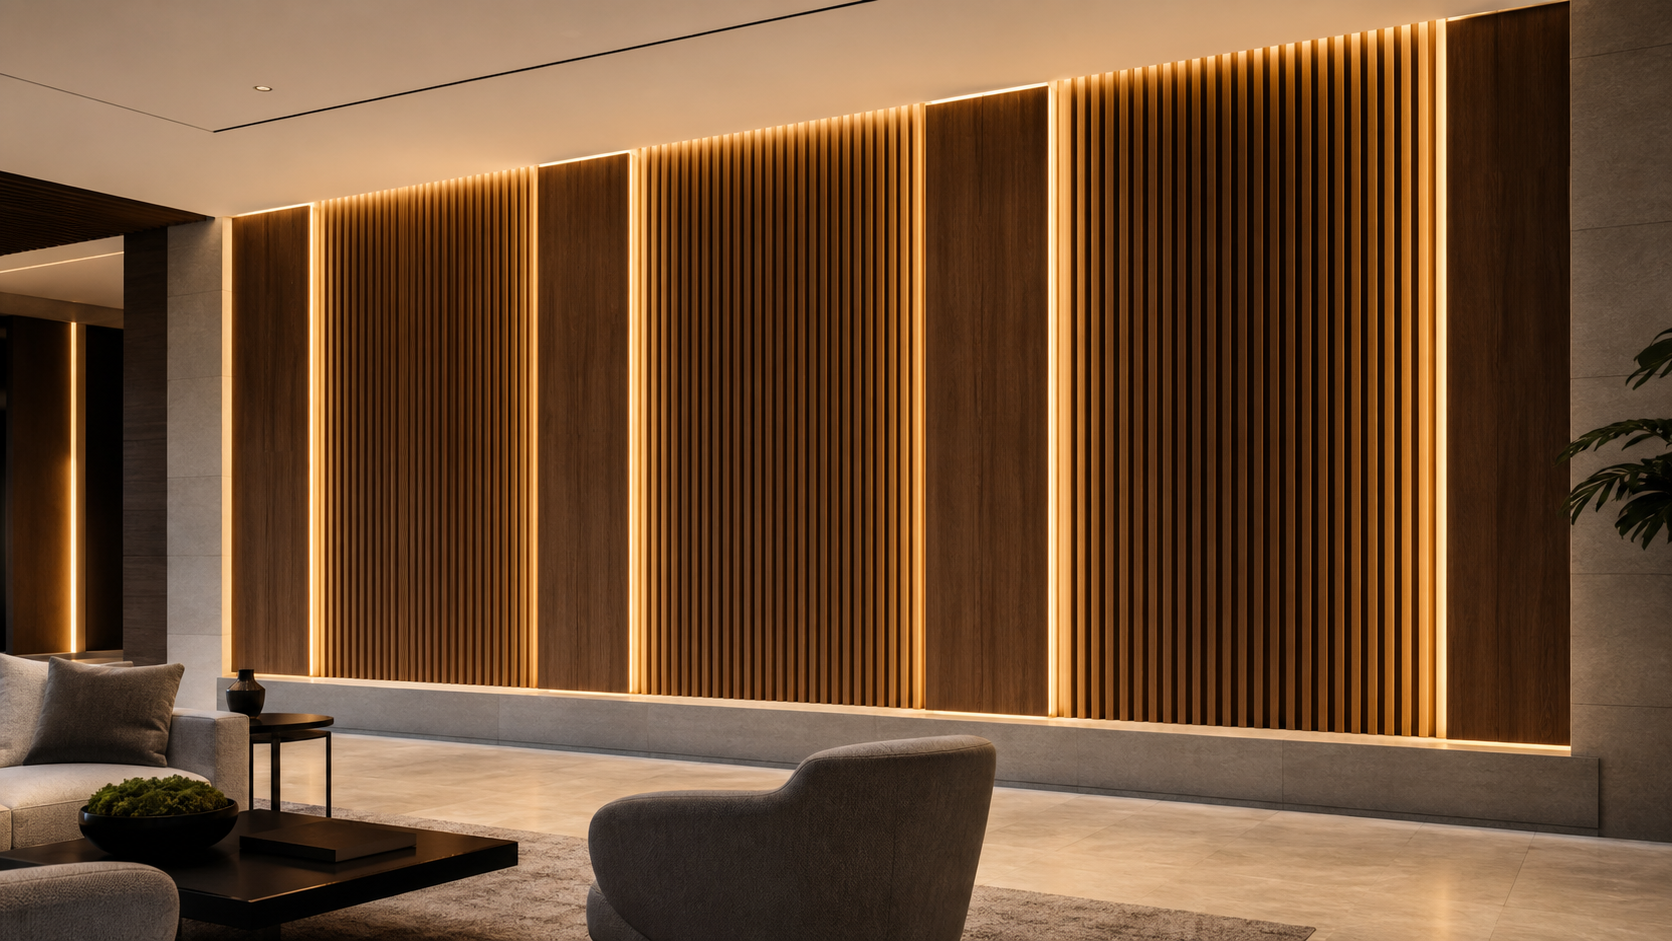
Why Decorative Wall Surfaces Need a Different Lighting Approach
Standard LED strip advice often focuses on brightness, voltage, waterproofing, or adhesive strength. Those details still matter, but decorative wall lighting adds another layer: the light must shape the surface without exposing the source.
On a textured wall, small mistakes become visible. A strip mounted too close to the surface can create harsh lines. A low-density strip can show dots through a narrow gap. A weak diffuser can create uneven brightness. A poorly hidden power feed can damage the design detail. A non-serviceable installation can become expensive to repair later.
For acoustic panels and wall systems, lighting should be planned together with the panel layout, aluminum profile, wiring path, driver location, access panel, and control system. The goal is not only to make the wall bright. The goal is to make the wall look intentionally designed.
This is also where professional lighting standards become useful. The U.S. Department of Energy[1] notes that solid-state lighting quality involves more than energy efficiency, including color, glare, flicker, uniformity, and controls. WELL v2 Light[3] also treats light as a comfort issue, not only a visibility issue, with attention to visual comfort, glare control, color quality, and occupant control. For decorative wall panels, that means the design should be evaluated from the normal viewing positions, not only from a close-up product photo.
Specification note
The product parameters below are based on RH Strip Lighting’s own product-page data: SMD strips include 12V / 24V / 48V options, CRI 80 / 90+, tunable white 2700K-6500K, RGB/RGBW/RGBWW and addressable options; COB strips include CRI >90, 5V / 12V / 24V, 2700K-6500K, RGB/RGBW/RGBCW options, and very high density around 420-672 LEDs/m; LED neon flex is DC 24V with IP67 and IP68 options across top bend, side bend, and 3D profiles.
1. Start With the Wall Material
The same LED strip can look completely different on wood, fabric, stone, painted gypsum board, metal, or leather. Material controls reflection, shadow depth, color perception, and heat sensitivity.
Before selecting the LED strip, identify the surface type:
- Wood slat panels: warm texture, deep grooves, and strong shadow lines.
- Acoustic fabric panels: softer reflection, lower glare, but possible dust and heat concerns.
- Fluted or ribbed panels: repeated highlights and shadows that need careful grazing angle.
- Stone or marble surfaces: reflective areas, strong contrast, and possible color shift.
- Leather or soft panels: premium texture, but heat and mounting method need attention.
- Painted feature walls: usually easier, but surface imperfections can become visible under grazing light.
Once the material is clear, the lighting designer can decide whether the wall should be washed evenly, grazed to reveal texture, backlit around edges, or highlighted only in selected zones.
| Wall material | Best lighting intent | Watch for |
|---|---|---|
| Wood slat or veneer | Warm edge glow, vertical reveals, soft grazing | Cool CCT making wood look gray; visible LED dots in narrow gaps |
| Acoustic fabric or felt | Low-glare indirect accents and perimeter glow | Heat buildup, dust, inaccessible drivers, fabric discoloration |
| Stone, marble, or tile | Controlled grazing to reveal texture and veining | Sharp reflections, harsh contrast, uneven color appearance |
| Soft panel or leather | Warm low-output glow and concealed linear details | Heat, adhesive failure, shadow from seams, difficult repair |
2. Decide the Lighting Effect Before Choosing the Strip
Many failed wall-panel lighting projects start with the product instead of the effect. The buyer asks for a bright LED strip, but the designer actually needs a soft shadow line, hidden cove glow, vertical reveal, backlit panel edge, or low-level accent.
Common effects include:
- Edge glow: light escapes from the side or perimeter of a panel.
- Backlighting: the panel floats visually away from the wall.
- Vertical reveal lighting: light runs between panel sections or beside slats.
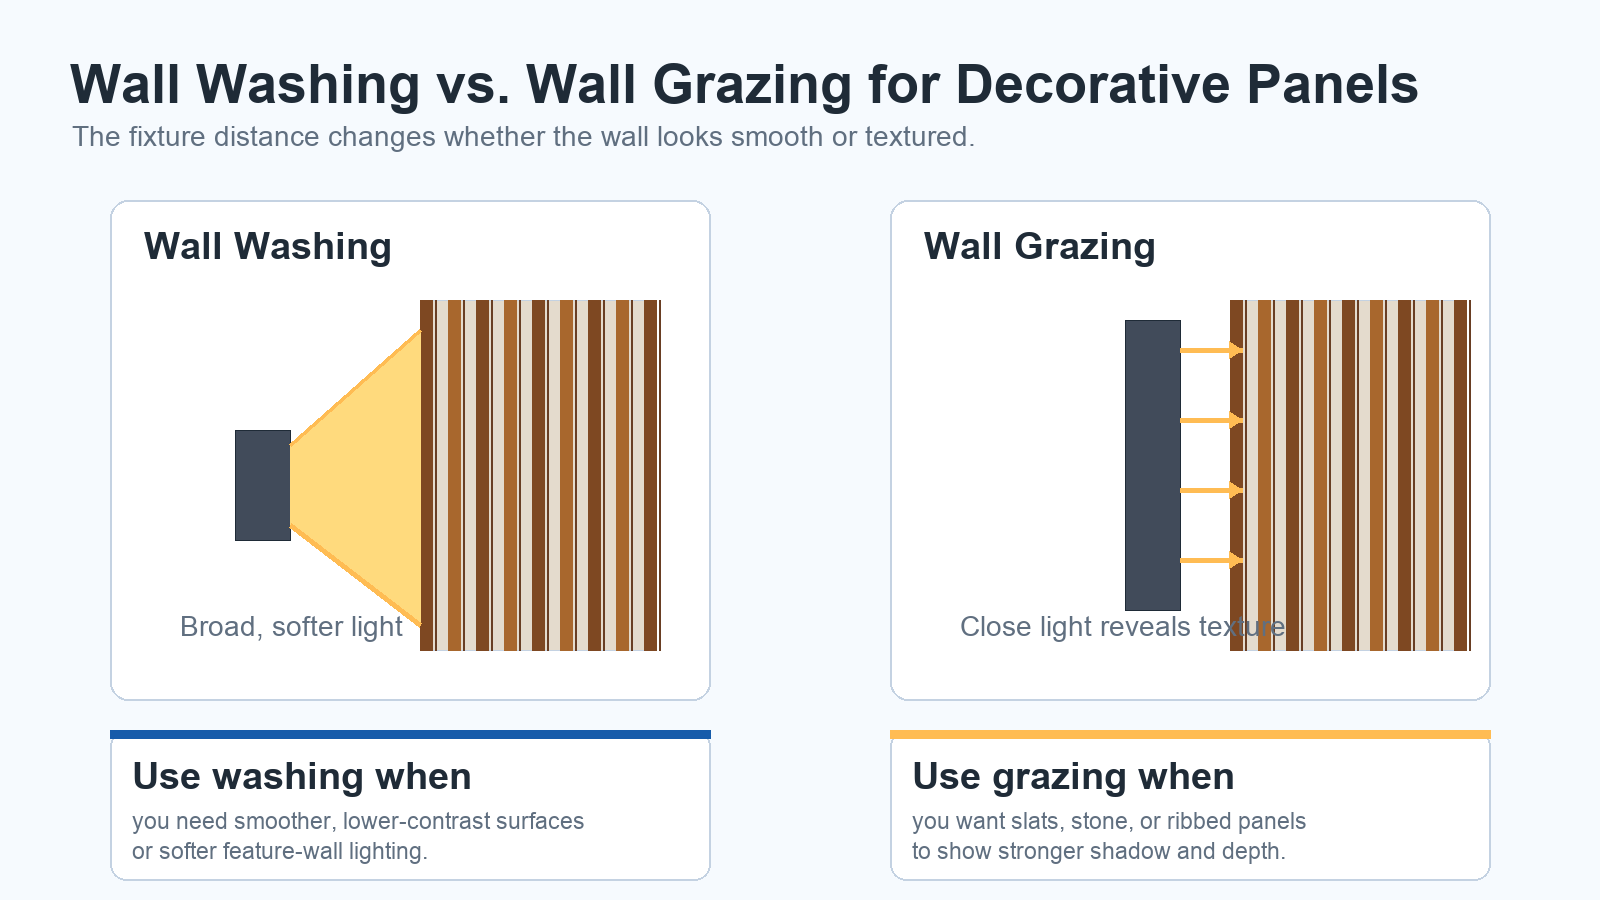
- Wall grazing: light is placed close to the surface to emphasize texture.
- Wall washing: light spreads more evenly across a surface.
- Integrated linear slots: the LED line becomes part of the panel detail.
Each effect needs a different distance, profile, diffuser, beam direction, and brightness level. A strip that works for backlighting may be too visible for a narrow vertical reveal. A strip that looks good inside a deep cove may create dots if used in a shallow slot.
| Effect | Design logic | Typical product direction |
|---|---|---|
| Wall washing | Place light farther from the surface for a broader, softer spread. | SMD or COB strip in profile with diffuser; lower contrast is the goal. |
| Wall grazing | Place light closer to the surface to reveal texture through shadow. | Higher-control profile; test carefully on fluted, stone, or slat surfaces. |
| Narrow reveal | The viewer may be close to the light, so dot control matters. | COB strip or high-density SMD with opal diffuser. |
| Visible luminous line | The light itself is part of the design detail. | LED neon flex or dot-free linear profile. |
3. Choose COB or High-Density SMD for Visible Linear Details
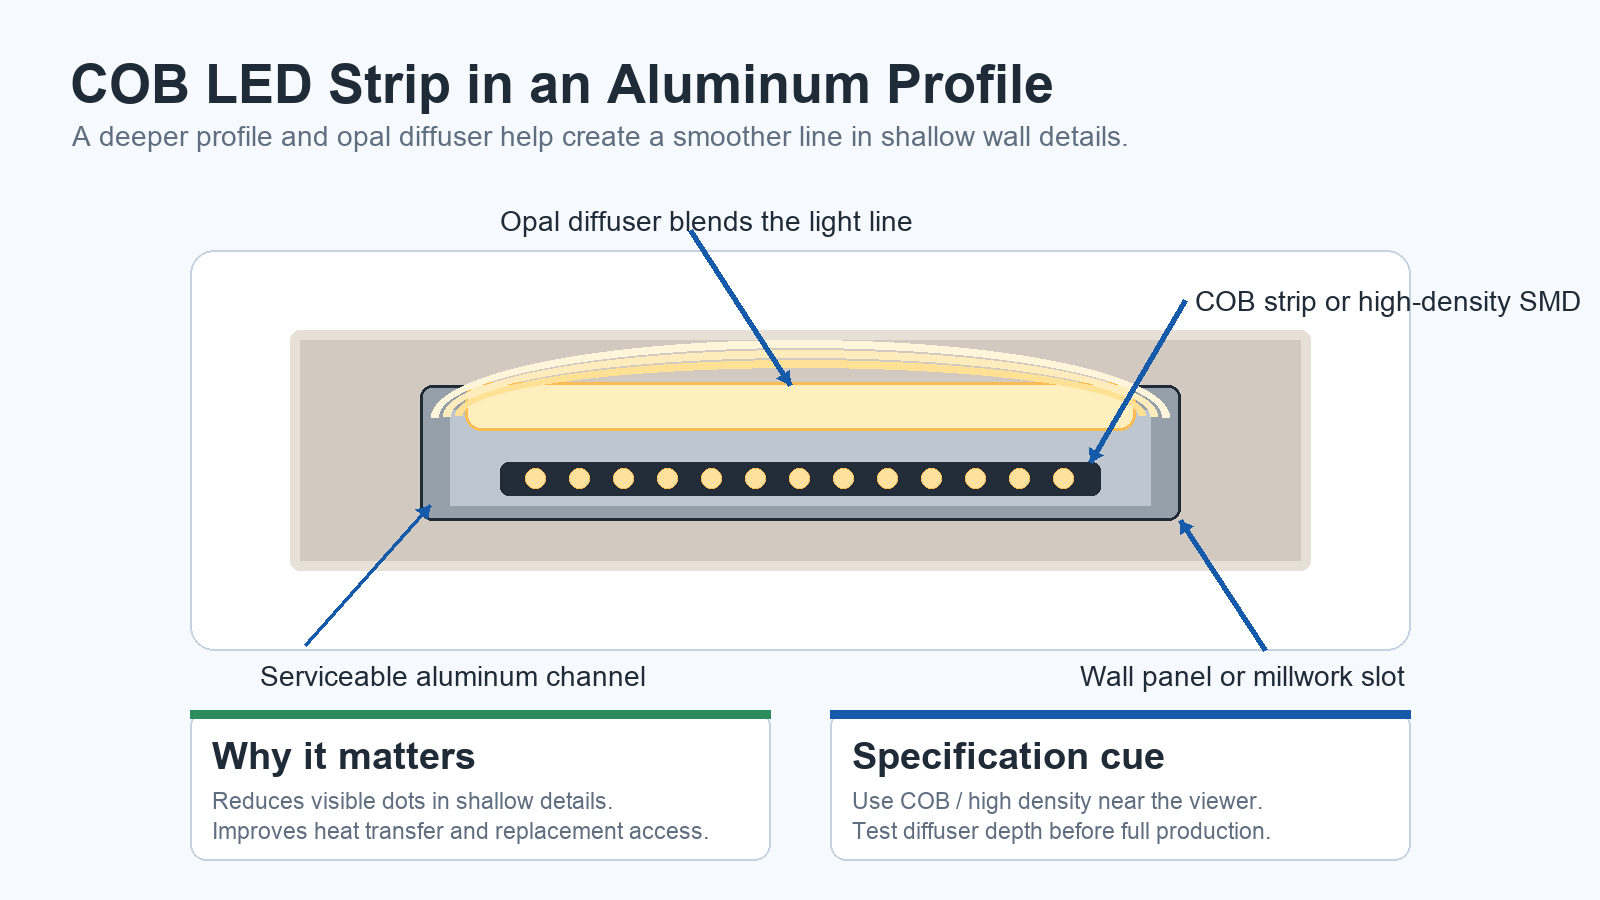
For decorative wall panels, dot visibility is one of the most common problems. If the LED strip is close to the diffuser or visible through a narrow gap, low-density strips can create a dotted effect that makes the installation look unfinished.
COB LED strip lights are often a strong choice for premium wall details because they create a smoother continuous line. They are especially useful for shallow profiles, indirect reveal lighting, cabinet and millwork details, and areas where the viewer is close to the light.
SMD LED strip lights can also work well, especially when the strip is hidden deeper inside a profile or when the diffuser distance is enough to blend the dots. High-density SMD strips may be a good balance between brightness, cost, and smoothness.
The safest rule is simple: the closer the viewer is to the light source, the smoother the LED line should be.
As a project rule of thumb, shallow visible slots usually need COB or very high-density SMD with an opal diffuser. RH’s COB range is listed with very high LED density around 420-672 LEDs/m, while standard SMD density is typically lower, around 60-240 LEDs/m. That difference matters when the light line is close to the viewer or close to the diffuser. Standard-density SMD can still be acceptable when the strip sits deeper inside a profile or the diffuser has enough distance to blend the points. Before approving a full wall, test a short mockup at the real viewing distance: standing, seated, and from the side.
| RH product family | Relevant parameters from RH data | Best use in wall-panel projects |
|---|---|---|
| SMD LED strip | 12V / 24V / 48V, CRI 80 / 90+, tunable white 2700K-6500K, RGB / RGBW / RGBWW, addressable RGB / RGBW / RGB+CCT, indoor IP20 | Hidden coves, deeper profiles, budget-controlled projects, tunable or color-control systems |
| COB LED strip | CRI >90, 5V / 12V / 24V, 2700K-6500K, RGB / RGBW / RGBCW, 420-672 LEDs/m, indoor IP20 | Shallow slots, close-view linear details, premium wall reveals, hospitality and architectural interiors |
| LED neon flex | DC 24V, IP67 / IP68 options, top bend / side bend / 3D profiles, side bend sizes from 10x10mm to 16x15mm, 3D sizes 10x10mm, 12x12mm, 16x16mm | Visible luminous lines, curved wall graphics, brand outlines, reception backdrops, contour lighting |
4. Use Aluminum Profiles for More Than Appearance
Aluminum profiles are not only decorative accessories. In wall-panel lighting, they help control heat, protect the strip, support the diffuser, hide the LED dots, create a clean installation line, and make replacement easier.
A bare LED strip stuck directly behind a wood slat or panel edge may work at first, but it can fail later because of heat, dust, adhesive weakness, uneven mounting, or difficult maintenance. A proper profile gives the strip a stable position and a more predictable optical result.
When choosing a profile, check:
- Internal width for the LED strip PCB.
- Profile depth for dot-free diffusion.
- Diffuser type: clear, frosted, opal, or black diffuser.
- Mounting method inside the wall panel detail.
- Access for replacement or repair.
- Heat dissipation for the selected wattage.
5. Control Glare Before It Reaches the Viewer
Decorative wall lighting should usually be seen as an effect, not as a visible bare light source. Glare can appear when the strip is too exposed, the diffuser is too clear, the viewing angle is too direct, or the wall material reflects light toward the viewer.
Glare is especially important in:
- Hotel headboard walls.
- Meeting rooms and office feature walls.
- Restaurant booth seating.
- Home theater acoustic walls.
- Reception desks and waiting areas.
- Retail fitting rooms and mirror-adjacent surfaces.
To reduce glare, use deeper recesses, opal diffusers, angled profiles, indirect placement, lower wattage, dimming, or a different lighting effect. A premium wall should feel comfortable from normal viewing positions, not only look good in a close-up photo.
For offices, hotels, restaurants, and home theaters, evaluate glare from real eye positions: seated height, standing height, and walking approach. WELL v2 treats glare control and electric light quality as part of visual comfort, which is a useful reminder for decorative walls: the brightest line is not always the best line.
6. Match CCT to the Interior Material
Color temperature changes how decorative surfaces are perceived. Warm white can make wood, leather, stone, and hospitality interiors feel richer. Neutral white may work better for offices, showrooms, and modern commercial spaces. Very cool white can make some materials look flat, gray, or harsh if it is not intentional.
Common choices include:
- 2700K: warm, intimate, suitable for hotels, lounges, villas, and restaurants.
- 3000K: warm but cleaner, often useful for premium commercial interiors.
- 3500K: balanced, suitable for modern offices and mixed-use spaces.
- 4000K: neutral and practical for commercial interiors where clarity matters.
For projects where the wall material is expensive or color-sensitive, sample testing is important. The same wood veneer or fabric panel can look different under 2700K, 3000K, and 4000K.
Practical insight
RH’s SMD and COB ranges both include warm-to-cool white options across 2700K-6500K, and tunable white versions can cover 2700K-6500K in one strip. For warm wood, leather, hospitality lounges, and hotel headboards, 2700K or 3000K is often safer than cool white. For modern offices and showrooms, 3500K or 4000K may feel cleaner. Do not choose CCT only from a catalog: test it on the real panel finish because the material reflectance changes the perceived color.
7. Do Not Ignore CRI and R9
CRI matters when the wall finish itself is part of the design value. Wood grain, fabric texture, leather, stone veins, artwork, and branded interiors can lose richness under poor color rendering.
For decorative wall panels in hotels, restaurants, luxury retail, showrooms, and premium residential projects, high CRI LED strips are often worth considering. If red, brown, skin tone, warm wood, or rich fabric colors are important, R9 performance may also matter.
This is not only a technical issue. It affects whether the finished space feels premium.
For premium interiors, CRI 90+ is a useful starting point, and RH’s COB range is listed as CRI >90 while SMD options include CRI 80 / 90+. But CRI is not the full story. R9 helps indicate saturated red rendering, which can matter for warm wood, leather, skin tones, hospitality spaces, and some branded interiors. For more advanced color evaluation, the IES TM-30 method[2] provides additional information beyond traditional CRI, including fidelity and gamut. Buyers do not need to become lighting scientists, but they should ask for more than a vague “high CRI” claim when the finish is expensive.
8. Plan Drivers, Wiring, and Maintenance Access Early
Wall-panel lighting often fails in planning because the visible effect is designed first and the electrical system is solved later. This can lead to exposed wiring, inaccessible drivers, uneven brightness, or difficult maintenance.
Before production or installation, confirm:
- Where the LED drivers will be installed.
- How they can be accessed for replacement.
- Whether the system uses 12V or 24V.
- Maximum run length and voltage drop control.
- Where power feed wires will enter the profile.
- Whether dimming is required.
- Whether the lighting needs zones or scenes.
- How the panel can be opened without damaging the finish.
A beautiful wall with hidden lighting is only successful if it can be serviced later. Maintenance access should not be treated as optional.
9. Use Dimming to Make the Wall Feel Premium
Decorative wall lighting is often more successful at lower brightness levels. If the LED strip is too bright, it can overpower the wall material, create glare, and make the space feel less comfortable.
Dimming allows the lighting to adapt to different times of day, scenes, and uses. A hotel lobby may need brighter wall lighting during cleaning or events, but softer lighting in the evening. A meeting room may need different scenes for presentations, video calls, and casual discussion. A home theater wall should be dimmable enough to avoid distraction.
When dimming is required, match the LED strip, driver, controller, and wall control method from the beginning. Do not assume every dimmer will work with every strip and driver combination.
For project-grade interiors, common control paths include 0-10V dimming, DALI, DMX, PWM controllers, smart control systems, or simple local dimmers depending on the project. RH’s product system also supports dimming, tunable white, RGB/RGBW, SPI, DMX, and smart control for strip and neon systems. The important point is compatibility. The LED strip, driver, controller, control signal, and load should be confirmed as one system before the wall panels are closed.
10. Avoid Heat Problems Behind Soft or Enclosed Panels
LED strips produce heat, and decorative wall panels can trap it. Fabric, acoustic felt, foam, leather, wood, and enclosed cavities may not dissipate heat as well as open aluminum channels or ventilated coves.
To reduce heat risk:
- Avoid using unnecessarily high wattage.
- Use aluminum profiles for heat dissipation.
- Leave ventilation where possible.
- Check driver load and avoid overdriving the strip.
- Test samples inside the real panel detail.
- Keep LED strips away from heat-sensitive materials when needed.
Heat control protects brightness, adhesive performance, color stability, and long-term reliability.
The U.S. Department of Energy Solid-State Lighting program highlights lighting quality topics such as color, glare, flicker, uniformity, and controls. In wall-panel projects, thermal management should be treated with the same seriousness because heat affects both performance and service life. A low-output strip in a proper profile often looks better and lasts longer than an overpowered strip trapped behind fabric or timber.
11. When to Use LED Neon Flex Instead of Standard Strip
Some wall-panel designs need a visible luminous line rather than a hidden strip. In those cases, LED neon flex may be a better choice than a standard strip inside a profile. RH’s neon flex range is based on DC 24V and includes IP67 and IP68 options, which makes it more suitable for exposed architectural lines than an indoor IP20 strip.
LED neon flex can work well for curved feature walls, brand lines, reception backgrounds, graphic outlines, corridor accents, and decorative shapes. It gives a continuous diffused appearance and can be easier to specify when the light line itself is part of the design. RH’s side-bend neon options include profile sizes from 10x10mm to 16x15mm, while 3D neon profiles include 10x10mm, 12x12mm, and 16x16mm for multi-plane shapes.
The key is to choose the correct bending direction, profile size, color, control method, and mounting accessories. Neon flex is not automatically better for every wall. It is best when the design needs a visible, clean, flexible light line.
12. Build a Small Mockup Before Approving the Detail
For premium wall panels, a mockup is often the difference between a good concept and a successful installation. A mockup does not need to be large. Even a one-meter sample can reveal dot visibility, glare, diffuser performance, color shift, shadow pattern, heat, wiring difficulty, and whether the panel can be opened later.
The mockup should include the real panel material, actual profile, selected strip, diffuser, driver, dimming method, and mounting distance. Review it from the normal viewing positions, not only from directly in front. If the wall will be seen from a sofa, restaurant booth, corridor, or meeting table, test from those positions.
This is especially important for acoustic panels because the lighting detail may interact with sound-absorbing material, cavity depth, fabric, and panel joints. The best detail is one that looks clean, avoids glare, controls heat, and still allows future service.
Common Mistakes in Wall Panel LED Strip Lighting
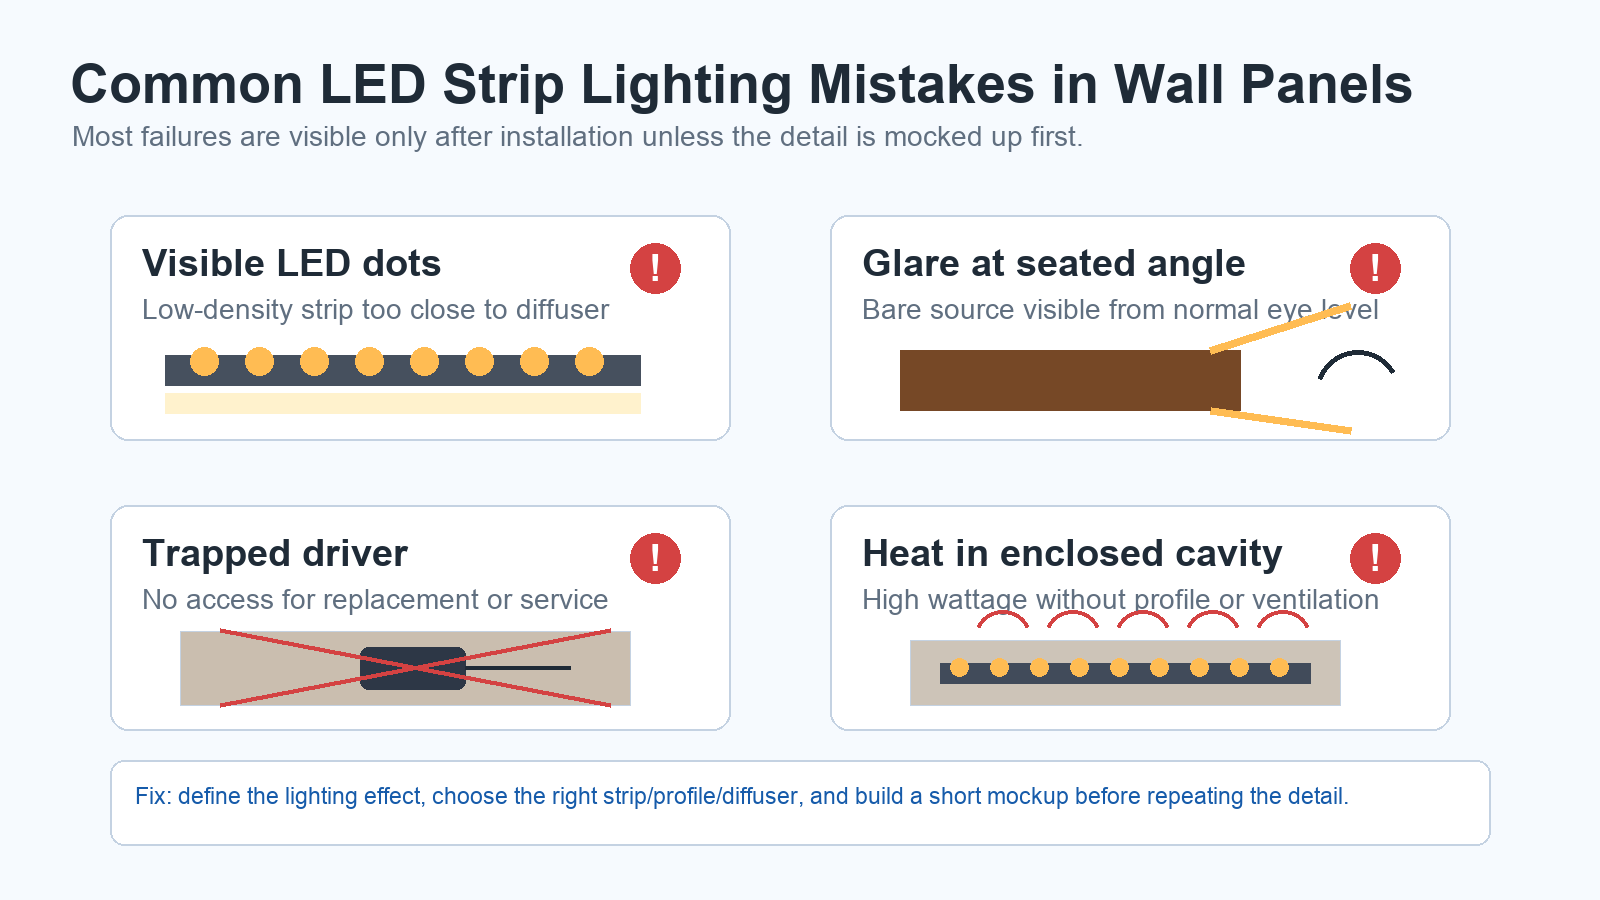
Many decorative wall lighting problems come from the same planning mistakes:
- Using low-density strips in shallow visible slots.
- Mounting bare strips directly to wood or fabric without a profile.
- Choosing brightness before defining the lighting effect.
- Forgetting driver access behind fixed panels.
- Using cool white light on warm wood without testing.
- Allowing the LED source to be visible from seated positions.
- Ignoring heat in enclosed acoustic or soft-panel details.
- Not matching the dimmer, driver, and LED strip.
- Designing the panel first and trying to hide the wiring afterward.
- Skipping a mockup before approving a repeated wall detail.
- Choosing CCT from the datasheet without testing it on the real material.
Final Takeaway
LED strip lighting can make acoustic panels, wood slat walls, stone surfaces, and decorative feature walls look more refined, but the result depends on planning. The strip must be matched to the material, lighting effect, profile depth, diffuser, color temperature, control method, heat condition, and maintenance access.
For premium commercial interiors, the goal is not simply to add brightness. The goal is to reveal texture, create depth, hide the light source, avoid glare, and keep the system reliable after installation.
Good decorative wall lighting is a coordination detail. Interior designers, millwork suppliers, acoustic panel suppliers, electricians, lighting designers, and LED strip suppliers should agree on the lighting effect, profile, driver location, access method, control system, and sample mockup before production begins. This is the practical difference between a wall that photographs well for one day and a wall that still looks professional years later.
If you are designing LED strip lighting for wall panels, acoustic panels, millwork, decorative surfaces, or commercial feature walls, RH Strip Lighting can help recommend the right COB LED strip, SMD LED strip, LED neon flex, profile, diffuser, power supply, and control method for your project.
References
- U.S. Department of Energy – Solid-State Lighting: lighting quality context for LED systems, including color, glare, flicker, uniformity, and controls.
- Illuminating Engineering Society – TM-30: reference method for evaluating color rendition beyond basic CRI claims.
- WELL v2 – Light Concept: visual comfort context for glare control, occupant experience, and electric light quality.
Request a Project or Trade Quote
Sourcing for an installation project, resale or OEM production? Share your requirements below. You can discuss project samples before committing to a bulk order.
Related Articles
LED Strip Lighting After a Power Outage: Designing a Reliable Restart
Plan LED strip power restoration beyond total watts. Review driver inrush, switching limits, restart scenes, and commissioning before project handover.
Why LED Strip Lights Buzz When Dimmed: A Guide for Quiet Spaces
Diagnose LED strip buzzing without guessing. Review drivers, PWM controls, mounting resonance, and low-level acoustic acceptance for quiet interiors.
LED Strip Lighting for Modular Retail Shelves: Design for Reconfiguration
Specify modular shelf lighting beyond driver wattage. Check shared-feed current, connector durability, cable movement, controls, and approved configurations.